This article should help you identify the different problems related to 3D printing. Search this list for the image or description that best describes the problem you are experiencing. We offer advice that should help you solve the problem.
As you know, printing in 3D is empirical, it is through errors that you learn to fully understand, adjust and use your machine. With this list you should be able to solve the main errors. If you are still experiencing problems or if you have any additional advice to add to this list, please do not hesitate to contact us and let us know!
#1 It's drooling
Symptom
Thin filaments are woven in the empty spaces between the different parts of the part printed in 3D.
Generic name: oozing
Break possible
Plastic continues to flow from the head as it moves, due to residual pressure in the heating element and the fluidity of molten plastic.
Suggested corrections
Increase the withdrawal length of the filament ("retraction length" in Slic3r,"retraction distance" in CuraEngine). The recoil of the filament will cause the pressure in the print head heater to drop. The effect can be modulated by also affecting the withdrawal speed directly in your slicer.
Increase the print head travel speed. This leaves less time for the molten plastic to flow and leave traces between the printed parts.
Reduce the extrusion temperature of your plastic. If it is too high, the plastic is more fluid and therefore escapes more quickly through the extruder.
#2 It's falling apart
Symptom
Collapse or poor quality of an overhanging surface, it leaves like small bulges.
Generic name: overhang
Break possible
The solidification of the plastic deposited on the periphery of the overhang is not fast enough and the deposited filament moves before solidification. The phenomenon repeats or increases from one layer to another.
Suggested corrections
Ventilate the deposited plastic more efficiently by adding a fan to your extruder for example or directly with a portable fan.
Create printing media below the overhangs.
Change the orientation of the room to avoid overhangs.
#3 It delaminates on the sides or the top
Symptoms
The contours are not sufficiently bound together.
Flat faces are not fully covered.
Break possible
There is not enough material deposited. Too narrow, the deposited thread does not touch enough, and therefore does not stick to the adjacent thread.
Presence of impurity in the nozzle which interferes with the passage of molten material.
Extrusion temperature is too low, the wire dries too fast or shrinks and therefore does not stick to the adjacent wire.
Suggested corrections
Calibrate the extruder to obtain a material flow rate in accordance with the slicer data.
Unplug the extrusion nozzle.
Increase extrusion temperature.
Increase the amount of overlap in your slicer.
#4 There's not enough material on the thin parts
Symptom
The edges of a very thin section are not strong enough, there is not enough material.
Break possible
Back-retract or resumption after retract not effective enough.
Poor wire solidification.
Slipping of the filament drive during retraction.
Suggested corrections
Decrease retraction speed and length when printing.
Increase "extra legth on retract" if you use Slic3r.
Increase the spring pressure on the idler.
#5 That blows up
Symptom
Blisters, non-compliant geometry such as small beads that are mainly seen on areas with a small surface.
Break possible
Filament too hot when extruded or filament cooling system not efficient enough.
Suggested corrections
Place more coins on the platter when printing. The nozzle will therefore print more objects and thus give the part more time to cool down before ironing.
Better cool your 3D printed object by adding cooling systems.
#6 Thin walls are delaminating
Symptom
A thin wall, without filling, sees its wires separated, they are not glued together laterally.
Break possible
The walls of your 3D print are either too thin or not suitable for this small size.
Suggested corrections
Draw thicker wall thicknesses to suit the filament thickness.
Apply a sub-multiple deposition width of the wall width in the slicer setting, while remaining compatible with the extrusion diameter and layer height.
Change slicer.
#7 One layer moves horizontally
Symptom
Offset of a layer along the X or Y axes (or both).
Break possible*
Problem moving the printhead or platter.
Suggested Correction
Reduce the acceleration on the axis affected by the problem.
#8 The layers shift evenly
Symptom
Quasi-systematic offset of the layers along the X and/or Y axes from a certain printing height.
Break possible
Failure to move the head or platter due to overheating of the motors which are safe.
Suggested Correction
Cool engines using cooling systems (fans).
#9 The angles bend upwards
Symptom
Deformation in Z direction during 3D printing. This is increased in case of strong overhang.
Generic name: curling
Break possible
Poor solidification, shrinkage effect due to the temperature difference of the yarns deposited on the cooled previous layer.
Suggested corrections
Increase the slope at the 3D part model to reduce the overhang.
Further cool the deposited plastic through a ventilation system.
Add print media where applicable.
#10 The corners come loose
Symptom
The corners of the printed object are removed from the tray, creating an uneven base.
Generic name: warping
Break possible
Poor adhesion of the part to the board.
Excessive material shrinkage coefficient.
First layer not crushed enough against the board.
Suggested corrections
Change the printing material because warping arrives less with PLA.
Put adhesive on the printing tray (glue, tape, lacquer...).
Adjust the height of the printing tray correctly before printing.
Apply a thinner first coat to further crush the deposited yarn.
Add a brim underneath the first layer.
Heat the tray.
Clean and degrease the substrate.
Change filling strategy. Filling the lower side concentric rather than linear and then filling the inside with honeycomb prevents shrinkage.
Decrease the interior filling density of your 3D printed object.
#11 Extrusion density is too low
Symptom
Incorrect material density.
Break possible
Material flow too low
Suggested corrections
Unplug the extrusion nozzle.
The filament is blocked upstream of the extruder (node in your reel for example)
Revisit the wire drive (e. g. problem with knurled screw)
#12 angles are not forming well
Symptom
The corners are not straight enough, they can even come out and increase the size of the room.
Break possible
Excess material deposited in the angle, due to too high a slowing down of the nozzle when passing through this point.
Suggested corrections
Voluntarily smooth the part angle in a 3D modeling software.
Increase the jerk on the axis control of your 3D printer.
#13 There are black drops
Symptom
Presence of burned (blackened) plastic on some areas of the printed object.
Break possible
Improper sealing of the nozzle causes burnt PLA or ABS to leak around the nozzle.
Suggested Correction
Remove the nozzle and redo the seal.
#14 The layers are poorly welded
Symptom
Brittle piece at the level of the adhesion between two layers of printing.
Break possible*
Too much cooling, the deposited layer does not adhere well to the previous layer because it is not warm enough at the time of its deposit.
Suggested corrections
Decrease fan speed when printing.
Increase the minimum print speed in the slicer.
#15 Bubbles form on the first layer
Symptom
The first layer loosens locally from the tray as bubbles.
Possible causes
Presence in the moisture material that gradually vaporizes on contact with the heating plate.
Insufficient heating plate temperature for the material used.
Suggested corrections
Store coils of raw material in a dry, sealed package with desiccant sachet.
Dry the incriminated material: Transfer to the oven at 40°C for about 3 hours. Be careful not to heat above 45°C or 50°C: this may cause the yarns to stick to each other in the spool, they may even lose their cylindrical appearance.
Increase the temperature of the heating plate.
Print on specific tape or glue.
#16 Fragile top and bottom
Symptom
Horizontal faces are too thin and brittle.
Possible causes
Lack of material thickness above and below a printed object with low density filling. The deposited wires have too few contact points and collapse between the ribs of the filling.
Suggested corrections
Put at least 2 or 3 layers completely filled (parameter "Solid layers" in Slic3r) for the top and bottom sides.
Increase the filling of your object.
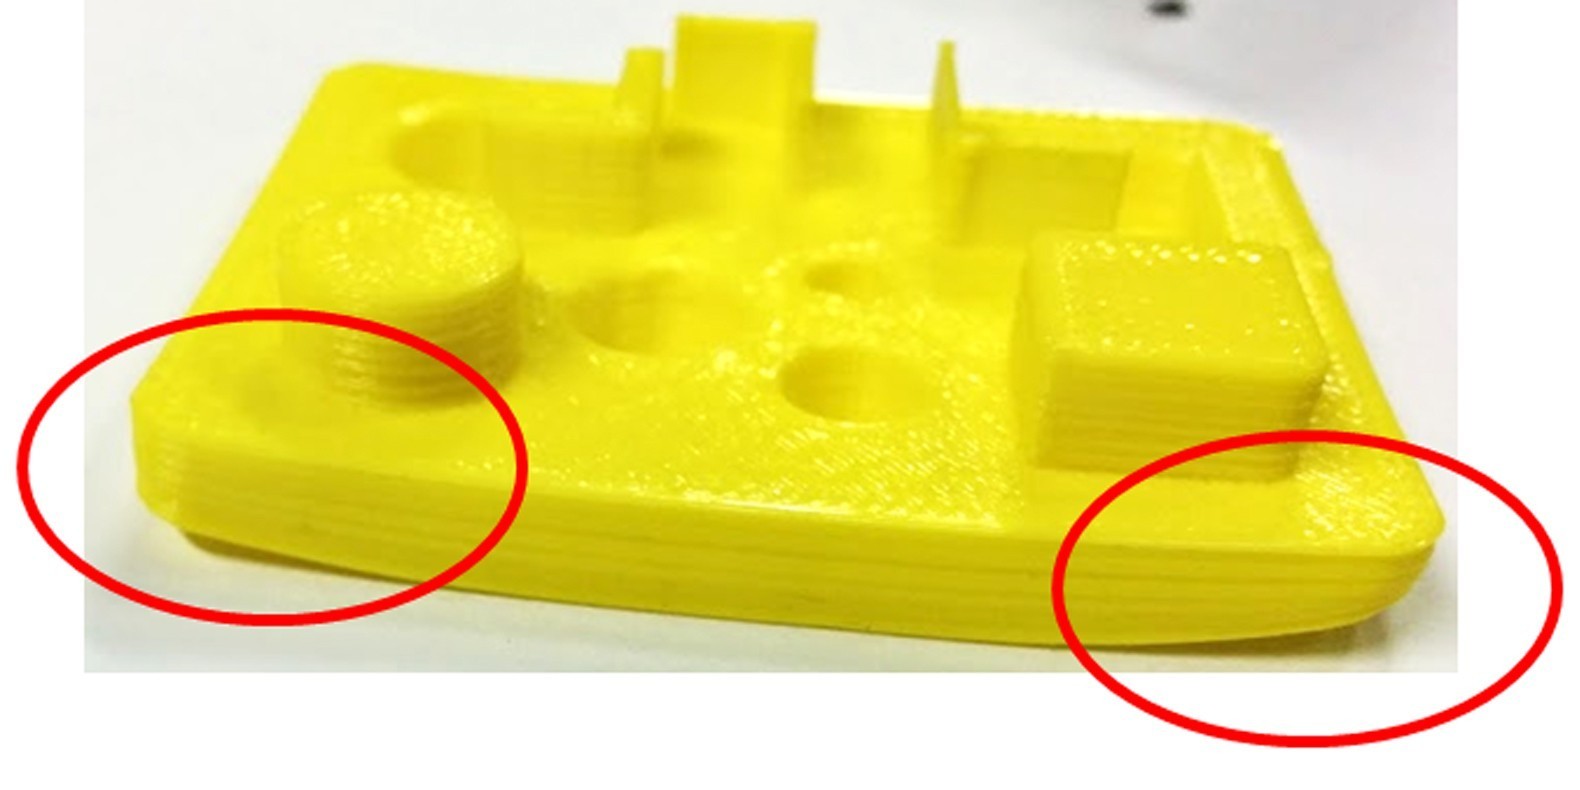
#17 The tops of the holes are collapsing
Symptom
The wires from the top of a horizontal shaft hole collapse during construction.
Possible causes
Plumbing zone too horizontal.
Incorrect consistency between nozzle temperature, wire deposited cooling and speed.
Suggested corrections
Reduce or remove this overhang area by changing the geometry of the 3D file. Example on the large hole in the photo, in the shape of a drop of water rather than a cylindrical hole.
Add printing media below this area if the overhang is too difficult to manage for the 3D printer.
Avoid slowing down too much in this area, even if the printing time of the layer is low.
#18 Colour or transparency varies
Symptom
The color or transparency of the material varies according to the sections during 3D printing.
Possible causes
Different crystallizations of the material due to different cooling rates. For example, this can be linked to the printing time of each part of the object or to the power of the fan.
The radiation from the nozzle can have an impact on the thermal cycle of the preceding layer and thus change its appearance.
The deposited layer is too hot because the lower layer did not have time to cool down.
Please note that the physical and mechanical properties of the part may vary according to these crystallization differences!
Suggested corrections
Better manage cooling via slicer parameters: vary the fan power according to the cooling time of a slice or slow down the printing speed in proportion to the surface of the slice.
Reduce the extrusion temperature to facilitate a faster and more homogeneous phase change.
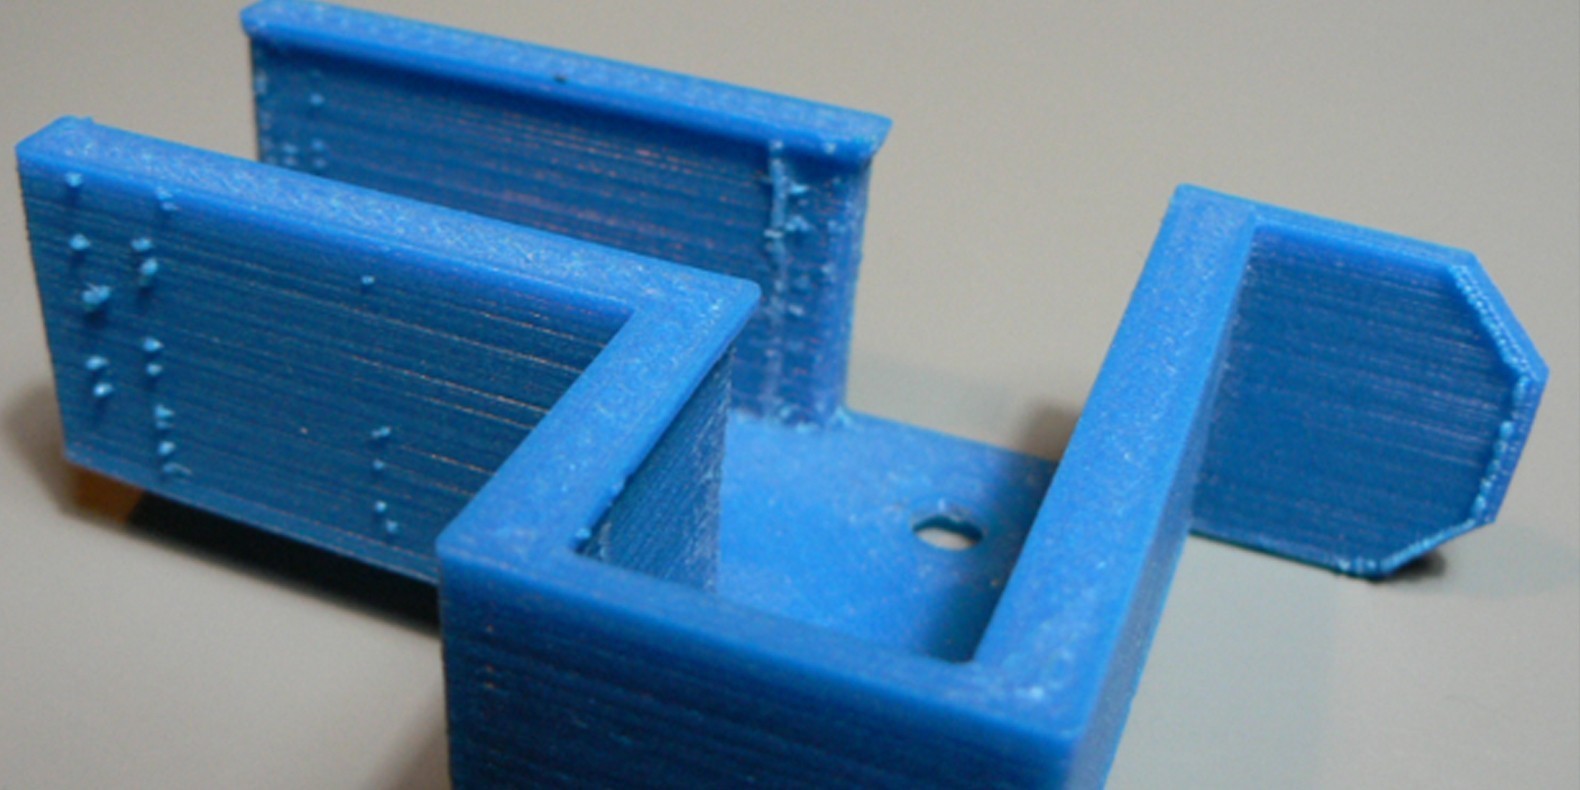
#19 The diapers are delaminating
Symptom
Some layers bend and cracks appear between the different printing layers.
Possible causes
The curling phenomenon due to the effect mentioned in #9 above occurs between layers.
Cooling of the wire too fast at the nozzle outlet, it does not weld properly to the previous layer.
Significant contraction of the material during cooling or phase change.
Certain materials extruded at high temperature (ABS, PC...) can represent a significant contraction phenomenon.
Suggested corrections
Change extrusion temperature.
Change the printing material.
Avoid blowing on the deposited wire, reducing fan power or putting your printer in a room that may be draughty.
Enclose the construction area in a controlled enclosure at a temperature close to the glass transition of the material.
#20 Droplets appear
Symptom
Material droplets are deposited at various points on the side surface of the 3D printed object.
Possible causes
Extrusion excess during resumption after an extrusion stop when passing from one point of the part to another, or when changing layers.
Suggested corrections
In some slicers a parameter allows you to ask, after a print pause, to push back more than what has been removed from the retract before restarting normal printing.
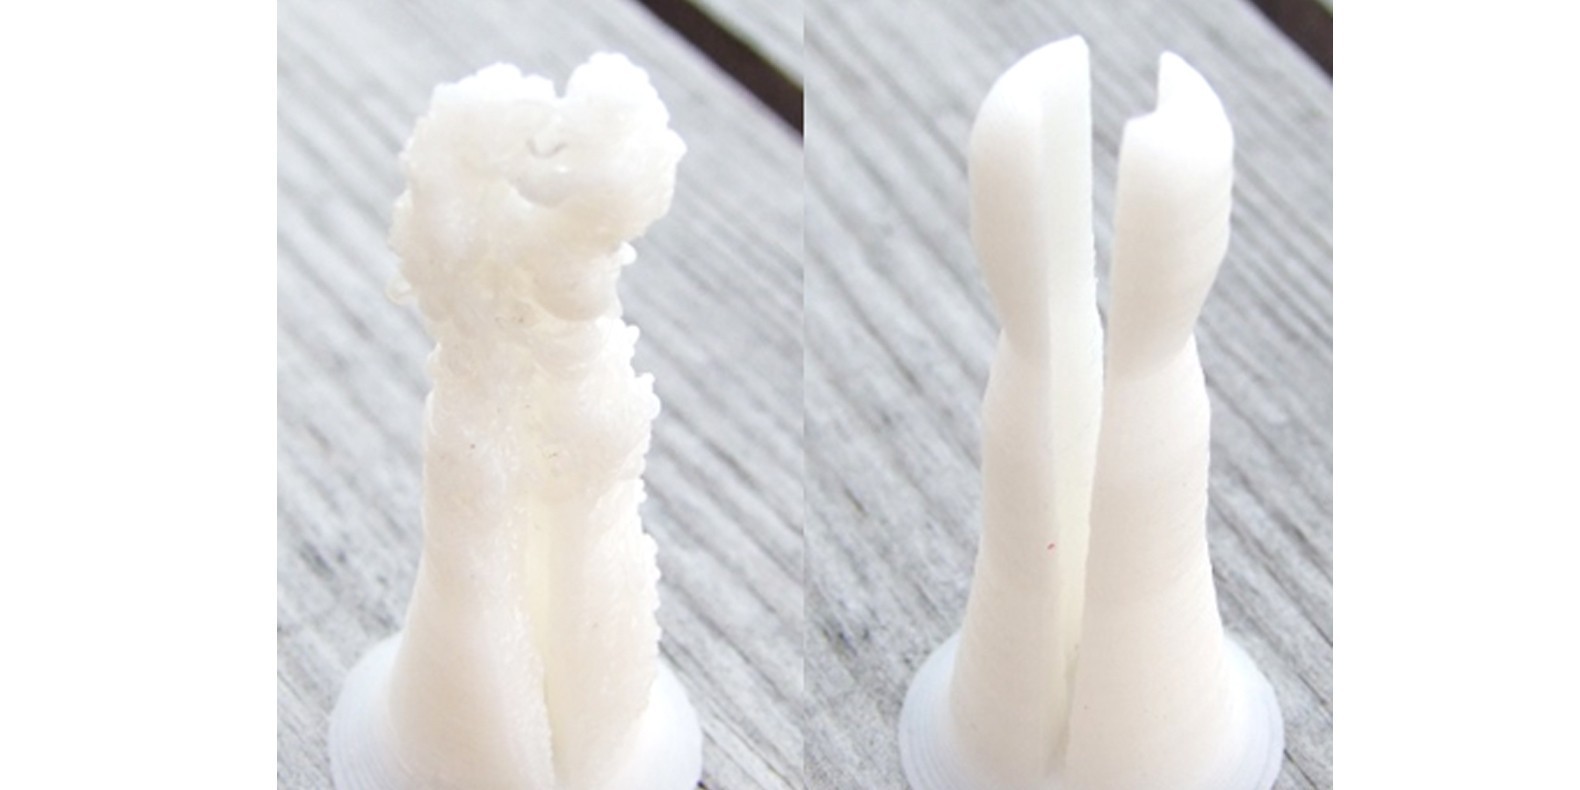
#21 An extruder Bowden drooling
Symptom
The extruder in Bowden flows too much or not enough. The first impressions with your extruder are not very good, too much extruded material, bridges drawn between different areas during movements where the extrusion should stop.
Break possible
Filament shrinkage is insufficient to compensate for play in the Bowden tube. Depending on the tube and filament diameters, and the length of the casing, the motor must pull a certain length of filament through the tube curves before the filament retracts from the heating head.
Suggested corrections
Increase the "retract" distance in the slicer. The part on the left was printed with 1.5mm of retract, which was clearly insufficient. Passed to 6mm of retract, one obtains the central piece. Too much shrinkage brings hot material back into the heat-break, the temperature of the heat-break gradually rises and the melting filament gets stuck in the heat-break. The engine can no longer push it efficiently. With a retract distance reduced to 4mm, you get the part on the right in the picture.
#22 Zebra or regular pattern at extrusion
Symptom
Appearance of a recurring pattern on the walls of 3D prints.
The pattern may change depending on the direction of movement of the motors.
Break possible
Incorrect setting of the extruder driver
This problem can occur when the extruder is incorrectly adjusted in intensity. If it is underfed, the extrusion is not constant.
Suggested corrections
Adjustment with a multimeter of the extruder driver. Be careful not to short-circuit during measurement, use a ceramic screwdriver.
Work done by Philippe, Pierrot and Franck and initially posted on LOGre