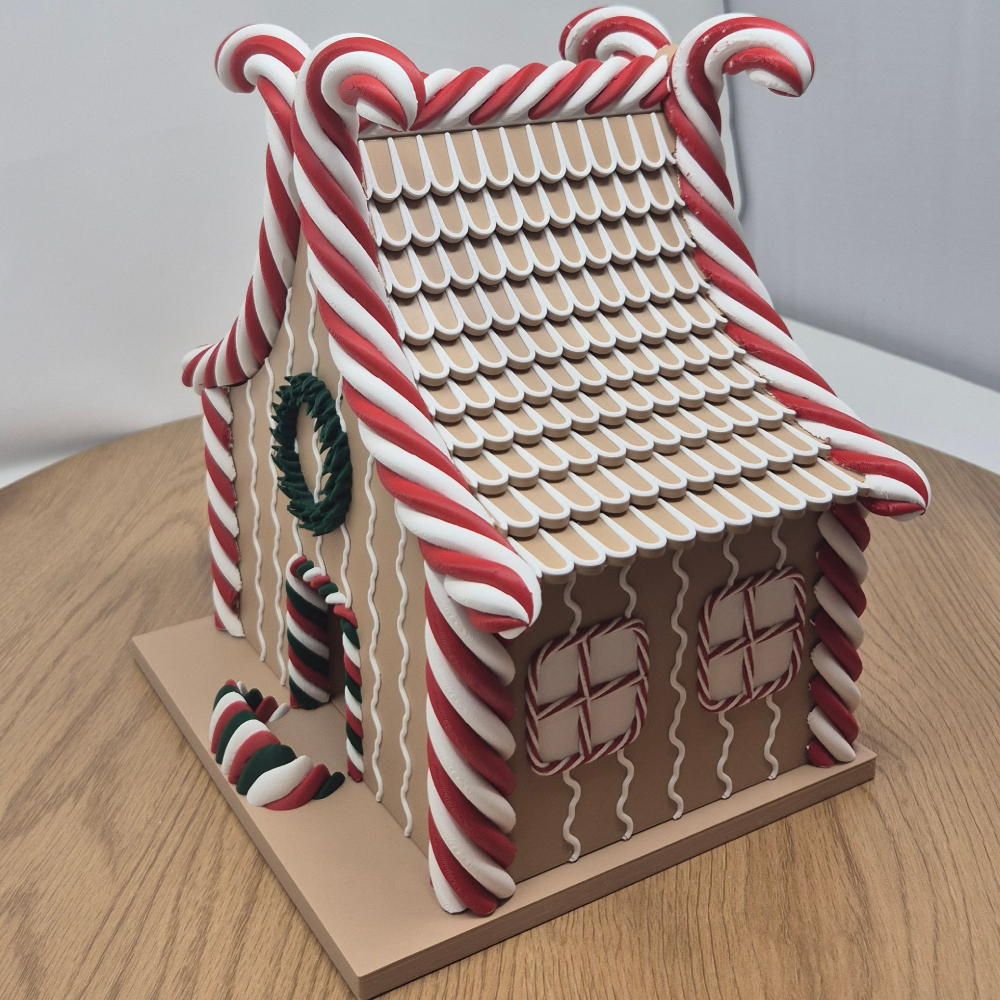
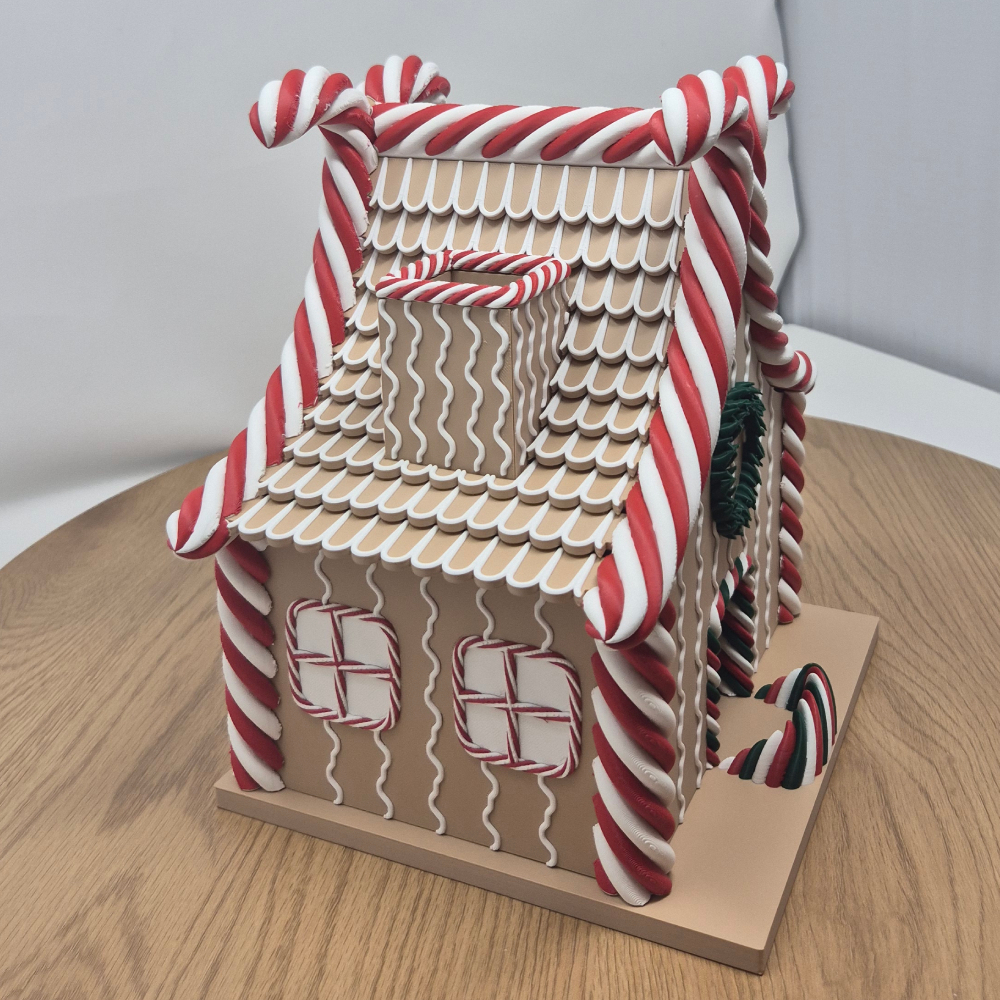
Say hello to the sweetest dice tower of the season! This Gingerbread House Dice Tower turns every roll into a tiny holiday adventure. Drop your dice through the chimney, listen to them tumble inside the “cookie walls,” and watch them pop out the front door like they're coming home for the holidays.
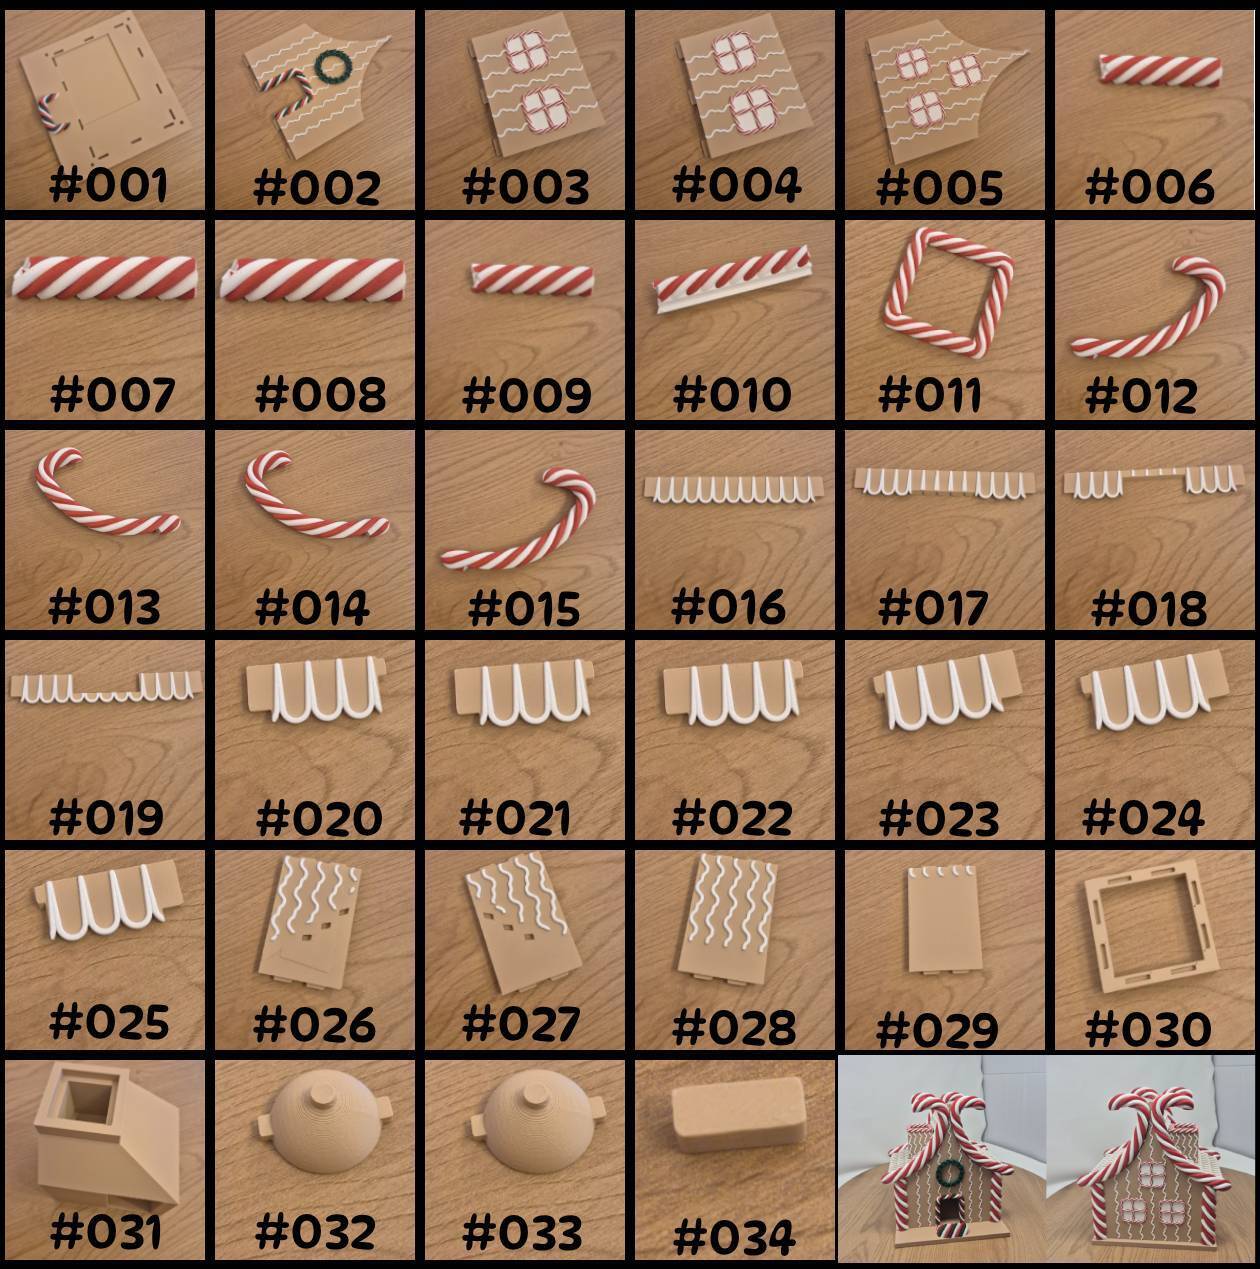
This build comes as a full-on assembly kit with 34 unique parts (and over 50 total prints), making the whole project feel like you're actually constructing your own gingerbread cottage—minus the sticky icing.
⭐ Features
🍪 Gingerbread house design packed with festive charm
🎲 Chimney-to-door dice run for smooth, magical rolls
🧩 34 unique pieces / 50+ printed parts for a satisfying build
🛠️ Assembly-kit style for makers who love putting things together
🎨Painted 3mf files included - ready to be printed right away, no need to spend hours painting it in slicer!
🛠️If you don't like kits, I also included same design as single object - also already painted as 3mf file!
🎨 Perfect for holiday tabletops, game nights, or cozy décor
Print time and material use
Total print time: ~57 hours
Total brown material used: 211.5 m / 630 g
Total white material used: 186.5 m / 556 g
Total red material used: 94.7 m / 282.5 g
Total green material used: 28.2 m / 84 g
Now to the assembly!
Assembly instruction with images attached as a pdf file to the design files
For the first step you will need to take 8x part #034 and one of each parts #006, #007, #008, and #009. Your goal of this step is to push in the connector pieces (part #034) in both ends of each of the vertical candy cane beams.
The next thing that you will want to do is to take base (part #001) and all four wall panels (Parts: #002, #003, #004, and #005). Once you have these parts ready, push them in their corresponding locations as shown in the image.
You will have to put in the vertical beams that you assembled in step 1 and put them in their designated corners. It is tricky, because the corners all look similar, but they are actually different. While parts #006 and #009 are identical, and parts #007 and #008 are identical. To tell them apart you will notice that the bottom connector piece is not centered on the bottom of the vertical cone. So with the walls already placed in the base, you will not be able to put the candy cane beams in the incorrect places.
Next step is very easy - all you will have to do is to take the dice tray (part #031) and place it in the middle of the perimeter of the gingerbread house that you have made so far. There is a designated spot exactly for this piece and it will be easy to fit it in.
Now let’s put this current progress to the side as we will now do everything required to assemble the roof part. Let’s start with the chimney! You will need parts: #011, #026, #027, #028, #029, and #030. The first thing that you want to do is to take part #030 and attach the parts #026, #027, #028, and #029 just as shown in the image. Once you have done that, just place part #011 on top of it and the chimney will be ready to go!
Now we need to add the roof tiles to the Chimney and then we will be ready to go with the next step. For this step of the assembly you will need the chimney that you just assembled as well as parts: #020, #021, #022, #023, #024, and #025. Be careful! While parts #020 to #022 and parts #023 to #025 looks identical, I can assure you that it is not the case. Each of these parts have a different angle and if you try to put them in the wrong holes, it will not work out great. So follow the image below to make sure that you assemble them correctly.
Now that we are done with the chimney, the next difficult part will begin. I would say that this one is the most difficult, but be patient and it will be done smoothly. For this step you will need the chimney with roof parts that you just assembled as well as additionally you will need parts #013, #017, #018, and #019. To successfully assemble this set, It will be important to start with the chimney part as well as parts #017, #018, and #019 - You have to do it simultaneously or else it will not be possible to assemble. You want to aim the parts in the designated holes of part #013 at the same time. It will take time, but you will do it - be patient.
Once you are done with that part, you will need to take 4x part #016 and put them in the remaining slots for the roof tiles.
And now to top it off, we will have to use part #012 and manage to aim all of the roof tiles in their designated slots - it will take some practice but be patient and you will do it! Congratulations - you have assembled the most difficult part of this assembly kit!
We are getting close to the end, we only need to assemble a few more things so follow these exact steps and don’t skip anything! Now let’s assemble the other side of the roof, You will need 10x part #016, and one of each #014 and #015. Now take part #015 and add parts #016 in their designated slots 1 by 1 and once you are done, put the part #14 on the opposite end of part #015.
Alright, we are almost done with the roof part , but before we connect both sides of the roof, we will need to take part #010, #032, and #033 (part nr 32 and 32 are the same). Now put the round extruded parts in part #10 and have the square extruded parts face to the side as they will be the pieces that connect the roof sides to the part #010.
Now we are closing in to the finish line! Take the part you just assembled and attach the roof sides to it. You should end up with a complete roof part just as in the image below.
And now we are truly at the end of the assembly - all you have to do is to place the roof part on the top of the base that we assembled in the beginning! The pieces will connect with the 4 connector pieces on top of the vertical candy beams as well as the chimney part securing into the dice tray!
Congratulations! You have successfully assembled the Gingerbread House Dice Tower! I hope you enjoy it and that it will become a new favorite for your game nights!
If you want to see more designs like this, consider boosting this design as it takes a long time to design these!
Assembly instruction with images attached as a pdf file to the design files


:format(webp)/https://fbi.cults3d.com/uploaders/31355496/illustration-file/6acdcca4-b24c-475b-8a36-204257d9b902/20231229_182201.jpg)
:format(webp)/https://fbi.cults3d.com/uploaders/31355496/illustration-file/099c406b-204f-4b10-84a4-5b3b79f03f94/dog_piggy_title.png)
:format(webp)/https://fbi.cults3d.com/uploaders/31355496/illustration-file/739fd9d7-688f-447f-b593-54e17279b5fb/champagne_gif.gif)
:still()/https://fbi.cults3d.com/uploaders/31355496/illustration-file/2853048c-be82-4a5d-94e7-b96d54ae4ca8/Dragon_holder_video.gif)
:still()/https://fbi.cults3d.com/uploaders/31355496/illustration-file/73921773-a514-4c44-9f76-486c2847a32b/Untitled-video-Made-with-Clipchamp.gif)
:still()/https://fbi.cults3d.com/uploaders/31355496/illustration-file/a5826abd-ffcc-45ba-9d3d-df9d52122d97/Untitledvideo-MadewithClipchamp8-ezgif.com-optimize.gif)
:format(webp)/https://fbi.cults3d.com/uploaders/31355496/illustration-file/9a6ce63f-b9d5-49a4-bb92-8051215477aa/10_maze_wb_3.jpg)
:format(webp)/https://fbi.cults3d.com/uploaders/31355496/illustration-file/988e2430-952d-4865-8136-e9032833b1ec/Key_chain_holder_2.jpg)