Here we are. A real painful journey for me but I ain't a quitter.
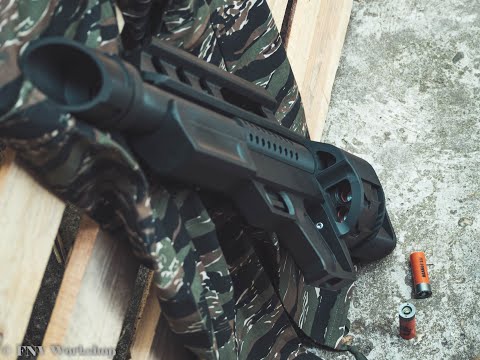
Double action only APS CAMI/CAMIII shell based Pancor Jackhammer.
CASSETTE ROTATES
SMALL PRINTER FRIENDLY
And no, you don't need to disassemble the rear to reload, that was only a toolroom prototype. This is based on the MK3, which was sent to the pentagon for testing.
ASSEMBLY VIDEO
https://www.youtube.com/watch?v=EiX0LGLooR0&ab_channel=FNVworkshop
UPDATE
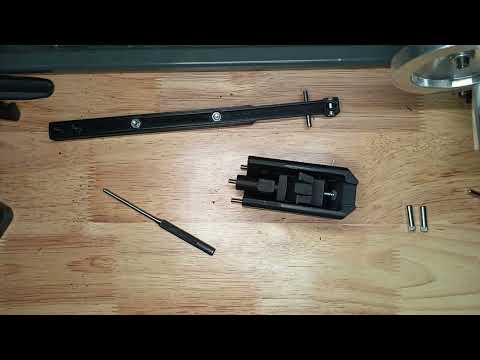
Added a user-friendly pushpin type alternative trigger system that is also less dependent on print quality. From now on this is the recommended system to use.
IF YOU USE THIS, DISREGARD THE INFORMATION ABOUT THE FIRING MECHANISM BELOW.
https://www.youtube.com/watch?v=oDVGc6n2Yt0
Every error prone trigger component is made strong, with steel parts (bolts and pins) serving as surfaces prone to impact and wear.
UPDATE
Following community feedback, I added the option to use tighter barrels. You will also have the option to use 450mm long PVC, aluminum, brass, steel or whatever tubes as barrel inserts. Whatever you may choose/have access to, it has to be straight, smooth, 450mm long, and either of these sizes:
-20x1mm (OD:20 mm, wall thickness 1 mm, ID 18 mm)
-21x1.5mm (OD:21 mm, wall thickness 1.5 mm, ID 18 mm)
-22x2mm (OD:22 mm, wall thickness 2 mm, ID 18 mm)
I would highly recommend using the matching magazine (PJcasettetight.stl)
UPDATE
I added another version of the striker housing in which that little edge in the cam tracks where the striker sear cam breaks, is replaced by an M1x6mm pin. It will obviously last an eternity compared to the sharp 3d printed edge in the original version.
Trigger sequence looks like this:
0.: you start from the precock striker position, that is the only way the cassette can be taken out / put in
1.: as you squeeze the trigger, you cock the striker
2.: at a certain point, sear breaks, striker goes forward, FIRE
3.: as you keep squeezing the trigger (yes, after the firing
occured) you engage the precocker action, firing pin is pulled out of the "chamber" so that the cassette is free to rotate
4.: as you near the end of trigger travel, the front cam engages the camtracks on the cassette, which turns approximately 10 degrees
5.: now you reached the end of trigger travel, as you let go the spring pressure pushed back the trigger-oprod assembly. The rear cam engages the camtrack on the cassette which turns the remaining 26 degrees.
This is certainly a lot to wrap your head around but essentially, you simply pull the trigger all the way and then let go. It's that simple. You may abort the sequence at any time, when you continue, you will continue from the next step.
The barrel moves back and forth passively, forced by the rotation of the cassette. Every chamber has cutout for an O-ring, which will seal the system to give you extra range.
I had to use a couple small bearings to make it all work. They also go a long way in easing the trigger pull.
I included variations for the precocker, in case the base one won't disengage.
UPDATE
I added reinforced versions for the shroud. Use 4 M2.5 or M3 threaded rods, about 210mm long each, fix them with 8 M2.5 or M3 hexnuts respectively. This will make the whole replica very sturdy and you don't even need to to use that much filament to make it strong.
BEARTRAP
https://cults3d.com/en/3d-model/game/fnv-pancor-jackhammer-beartrap-mine
CASSETTE HOLSTER
https://cults3d.com/en/3d-model/game/fnv-pancor-jackhammer-cassette-holster
TRACER ADAPTER
https://cults3d.com/en/3d-model/game/fnv-pancor-jackhammer-tracer-adapter
RAIL MOUNTS
https://cults3d.com/en/3d-model/game/rail-set-for-fnv-pancor-jackhammer
Standard components
APS CAM1/CAM3 shells
Bolts
2 pcs M4x8-10mm grub screw (sightbridge fixture)
2 pcs M3x10mm socket head bolt (oprod bearing mounts)
3-9 pcs M3x16mm socket head bolt (barrel A and B joint, striker bearing mount, pumprod bearing mount)
2-8 pcs M3x20mm socket head bolt (barrel A and B joint, trigger bearing mount, striker housing bearing mount)
3 pcs M3x25mm socket head bolt (striker guide)
2 pcs M4x12mm socket head bolt (operating rod-trigger connection)
9 pcs M4x20mm socket head bolt (barrel shroud-receiver connection, barrel shroud A and B joint, pump-action rod)
1 pc M4x30mm socket head bolt (striker housing spring guide)
4 pcs M4x40mm socket head bolt (firing pin, striker housing, pumprod)
2 pcs M5x8mm socket head bolt (operating rod cams)
4 pc M5x16-18mm socket head bolt (pistol grip-receiver connection, sightbridge connection)
3 pcs M5x120mm socket head bolt (receiver-buttstock connection)
16 pcs M3 hexnut
15 pcs M4 hexnut
9 pcs M5 hexnut
Pins
2 pcs M2x14mm end-knurled pin (oprod-precocker mount)
2 pcs M4x30mm dowel pin (middle-knurled or smooth) (oprod and pushpinlever for the pushpin system, or sear cam for the striker system)
2-3 pcs M5x20mm end-knurled dowel pin (striker guide, sear only for the striker system)
optional 2pcs M1x6mm dowel pin (only for the pin reinforced strikerhousing in the striker system) (if you find an end-knurled one, use that)
Springs
1 pc compression spring 30 mm long 30mm OD (I recommend 2 mm wire) (barrel spring)
1 pc compression spring 60 mm long 20mm OD (I recommend 1.5mm wire) (trigger spring)
1 pc compression spring 30 mm long 6mm OD (I recommend 0.6-0.7 mm wire) (pushpin return spring, I recommend getting a 300-305mm long one and then cut it to size so that you can adjust length)
1 pc compression spring 25 mm long 6mm OD (I recommend 0.6-0.7 mm wire) (pushpin lever return spring, I recommend getting a 300-305mm long one and then cut it to size so that you can adjust length)
optional for striker system
1 pc compression spring 45 mm long 6mm OD (I recommend 0.8 mm wire) (striker spring, I recommend getting a 300-305mm long one and then cut it to size so that you can adjust the striking power)
1 pc compression spring 15 mm long 4-4.5 mm OD (You can find such springs in ballpoint pens)
1 pc compression spring 20 mm long 3-4 mm OD (You can find such springs in ballpoint pens)
Bearings
6-7 pcs 3x8x4mm ball bearing (OD 8mm, ID 3mm, thickness 4mm)
O-rings
10 pcs 19x1.5mm O-ring / casette (19mm ID, 22mm OD, 1.5mm thickness)
Some of these components are hard to find, reach out and I can send you every standard components for a small fee.
:format(webp)/https://fbi.cults3d.com/uploaders/24272163/illustration-file/4433af8c-ea43-4c07-a1a5-27e44e199c41/P8140145.jpg)
/https://preview3d-images.cults3d.com/q4taka10te9hnwdixzp3encqps4h)
/https://preview3d-images.cults3d.com/49s0z5he83rj20ku63v11nstko4s)
/https://preview3d-images.cults3d.com/3mfhifycphhlage1pt0ltml3804f)
/https://preview3d-images.cults3d.com/7yi1ecek0y53cjuur7mz66202t8q)
/https://preview3d-images.cults3d.com/q9yseccxgznlbufzwk2on1ntyspi)
/https://preview3d-images.cults3d.com/z1zpbndmyl1q4t4rtz6k7ev4v93i)
/https://preview3d-images.cults3d.com/d7pa9dfhf4k003db527jqp47q4x7)
/https://preview3d-images.cults3d.com/y5a44dg0gurma74xo9cfubf6yipx)
/https://preview3d-images.cults3d.com/sluhrp3o2avau6v50wp29heh6f0n)
/https://preview3d-images.cults3d.com/pw2cg7wv6h89pudg2styo4nnk9ly)
/https://preview3d-images.cults3d.com/73fhowlg5ct1ncnv7qsfxqbd0wyx)
/https://preview3d-images.cults3d.com/moq85cswguc3t28d49ckvd4t6pnw)
/https://preview3d-images.cults3d.com/xp4hx70owz2jlblj1jndhcnuvsn6)
/https://preview3d-images.cults3d.com/yki0nhmus1e13qhsyc2amvjhx02v)
/https://preview3d-images.cults3d.com/ftknh9ul0y98hg8auie0m05948rn)
/https://preview3d-images.cults3d.com/ov3ne73wol8nj8s5l34nl4i2heql)
/https://preview3d-images.cults3d.com/g2lyfwlqqp4tvfbyj1tvpcykl03s)
/https://preview3d-images.cults3d.com/t9rwp3bd6xjht2l5bxvenanz24ds)
/https://preview3d-images.cults3d.com/nxyb1z9duso9j6vpigxv4ma1zcr2)
/https://preview3d-images.cults3d.com/rufw2csotv1g4d3x7orvtu49olei)
/https://preview3d-images.cults3d.com/jeq1errbjj3kxdvchr5q91h4he4r)
/https://preview3d-images.cults3d.com/uwb899fovp1r0xo4cq9eh7coh2au)
/https://preview3d-images.cults3d.com/hcywij9j6gc6081zofijnmdaxrey)
/https://preview3d-images.cults3d.com/ufe7d8bat1n94dj9k2wjy5vk74c1)
/https://preview3d-images.cults3d.com/4ca86bz4obcy9q6nam7qfqd1n3ct)
/https://preview3d-images.cults3d.com/otjtw05u7evz2ffh1snf9k5qhdcf)
/https://preview3d-images.cults3d.com/f266358fjxek5x9stgq1171u3cbq)
/https://preview3d-images.cults3d.com/eoxvukuy72l6t61jr4nlox6n852a)
/https://preview3d-images.cults3d.com/anfnuu9vvqogg6dwy73s2spjdfs1)
/https://preview3d-images.cults3d.com/lfno9y7xm2x0eoyyhvh41c2qwdbi)
/https://preview3d-images.cults3d.com/o64twzn4az601awbueg8992hqu9w)
/https://preview3d-images.cults3d.com/dldhhdvuuasd69fc00j4zm9fqg3r)
/https://preview3d-images.cults3d.com/hw94pgc3lk6s1hwo1ai304chtq13)
/https://preview3d-images.cults3d.com/v8jbfdr3bcvrngb884wj5qxzm1z2)
/https://preview3d-images.cults3d.com/6n6dc08gyl6gpkyecpajf9ba48nw)
/https://preview3d-images.cults3d.com/zpycl6585550rm8ikfxsmd0cx5oo)
/https://preview3d-images.cults3d.com/sztr9y8ht681xqp6g9usolhq1oha)
/https://preview3d-images.cults3d.com/4ik4cu46velp9lqk3rin0cneun2v)
/https://preview3d-images.cults3d.com/jylgv3vduop0xmtbbpdj746tikp9)
/https://preview3d-images.cults3d.com/b5fzeezwl8qn0lasckkolcqjsg23)
/https://preview3d-images.cults3d.com/ebezerfi7g5jlud9dywi7yevi5pp)
/https://preview3d-images.cults3d.com/d90urksg79rxskbguq7jo00ywtki)
/https://preview3d-images.cults3d.com/rr5cyijywtcn8p4fpxi0uba2l2gb)
/https://preview3d-images.cults3d.com/5nihbqngze1moagk86oj9pz6d48j)
/https://preview3d-images.cults3d.com/1kf9nkhffmytsm83glju7fpd6u1m)
/https://preview3d-images.cults3d.com/9qf1rkty07269lae0r3v5lcrehg0)
/https://preview3d-images.cults3d.com/si37dtcrftj57z3qq2k5a7sq3tbh)
/https://preview3d-images.cults3d.com/lbll196453jehzveombxf4l03xyc)
/https://preview3d-images.cults3d.com/57cw3h3wvzqeju2b7qajqq7dar5f)
/https://preview3d-images.cults3d.com/9jmulnvm0p5njvlftan52oovmip9)
/https://preview3d-images.cults3d.com/1eofrnq3kpqf24byayvj0wrumpi3)
/https://preview3d-images.cults3d.com/u0fsm5eri55dow3jrze6ef4z1vkp)
/https://preview3d-images.cults3d.com/oi2dolu2t081rk845lbp4ytm7htc)
/https://preview3d-images.cults3d.com/sznqpl6q5hve836kmdejnog9mvt0)
/https://preview3d-images.cults3d.com/mdmft7itvschltksiikpdedqim2t)
/https://preview3d-images.cults3d.com/evwt0x919bh7y6gqm3piy3nhpun2)
/https://preview3d-images.cults3d.com/w25qlt6d9v3osiicqw7p7mgqi4bl)
/https://preview3d-images.cults3d.com/cskf44xuazj9l2y4alpj5kei9ur7)


:format(webp)/https://fbi.cults3d.com/uploaders/24272163/illustration-file/36d33270-8a47-4615-889f-d60fbc2b98e3/P4030946.jpg)