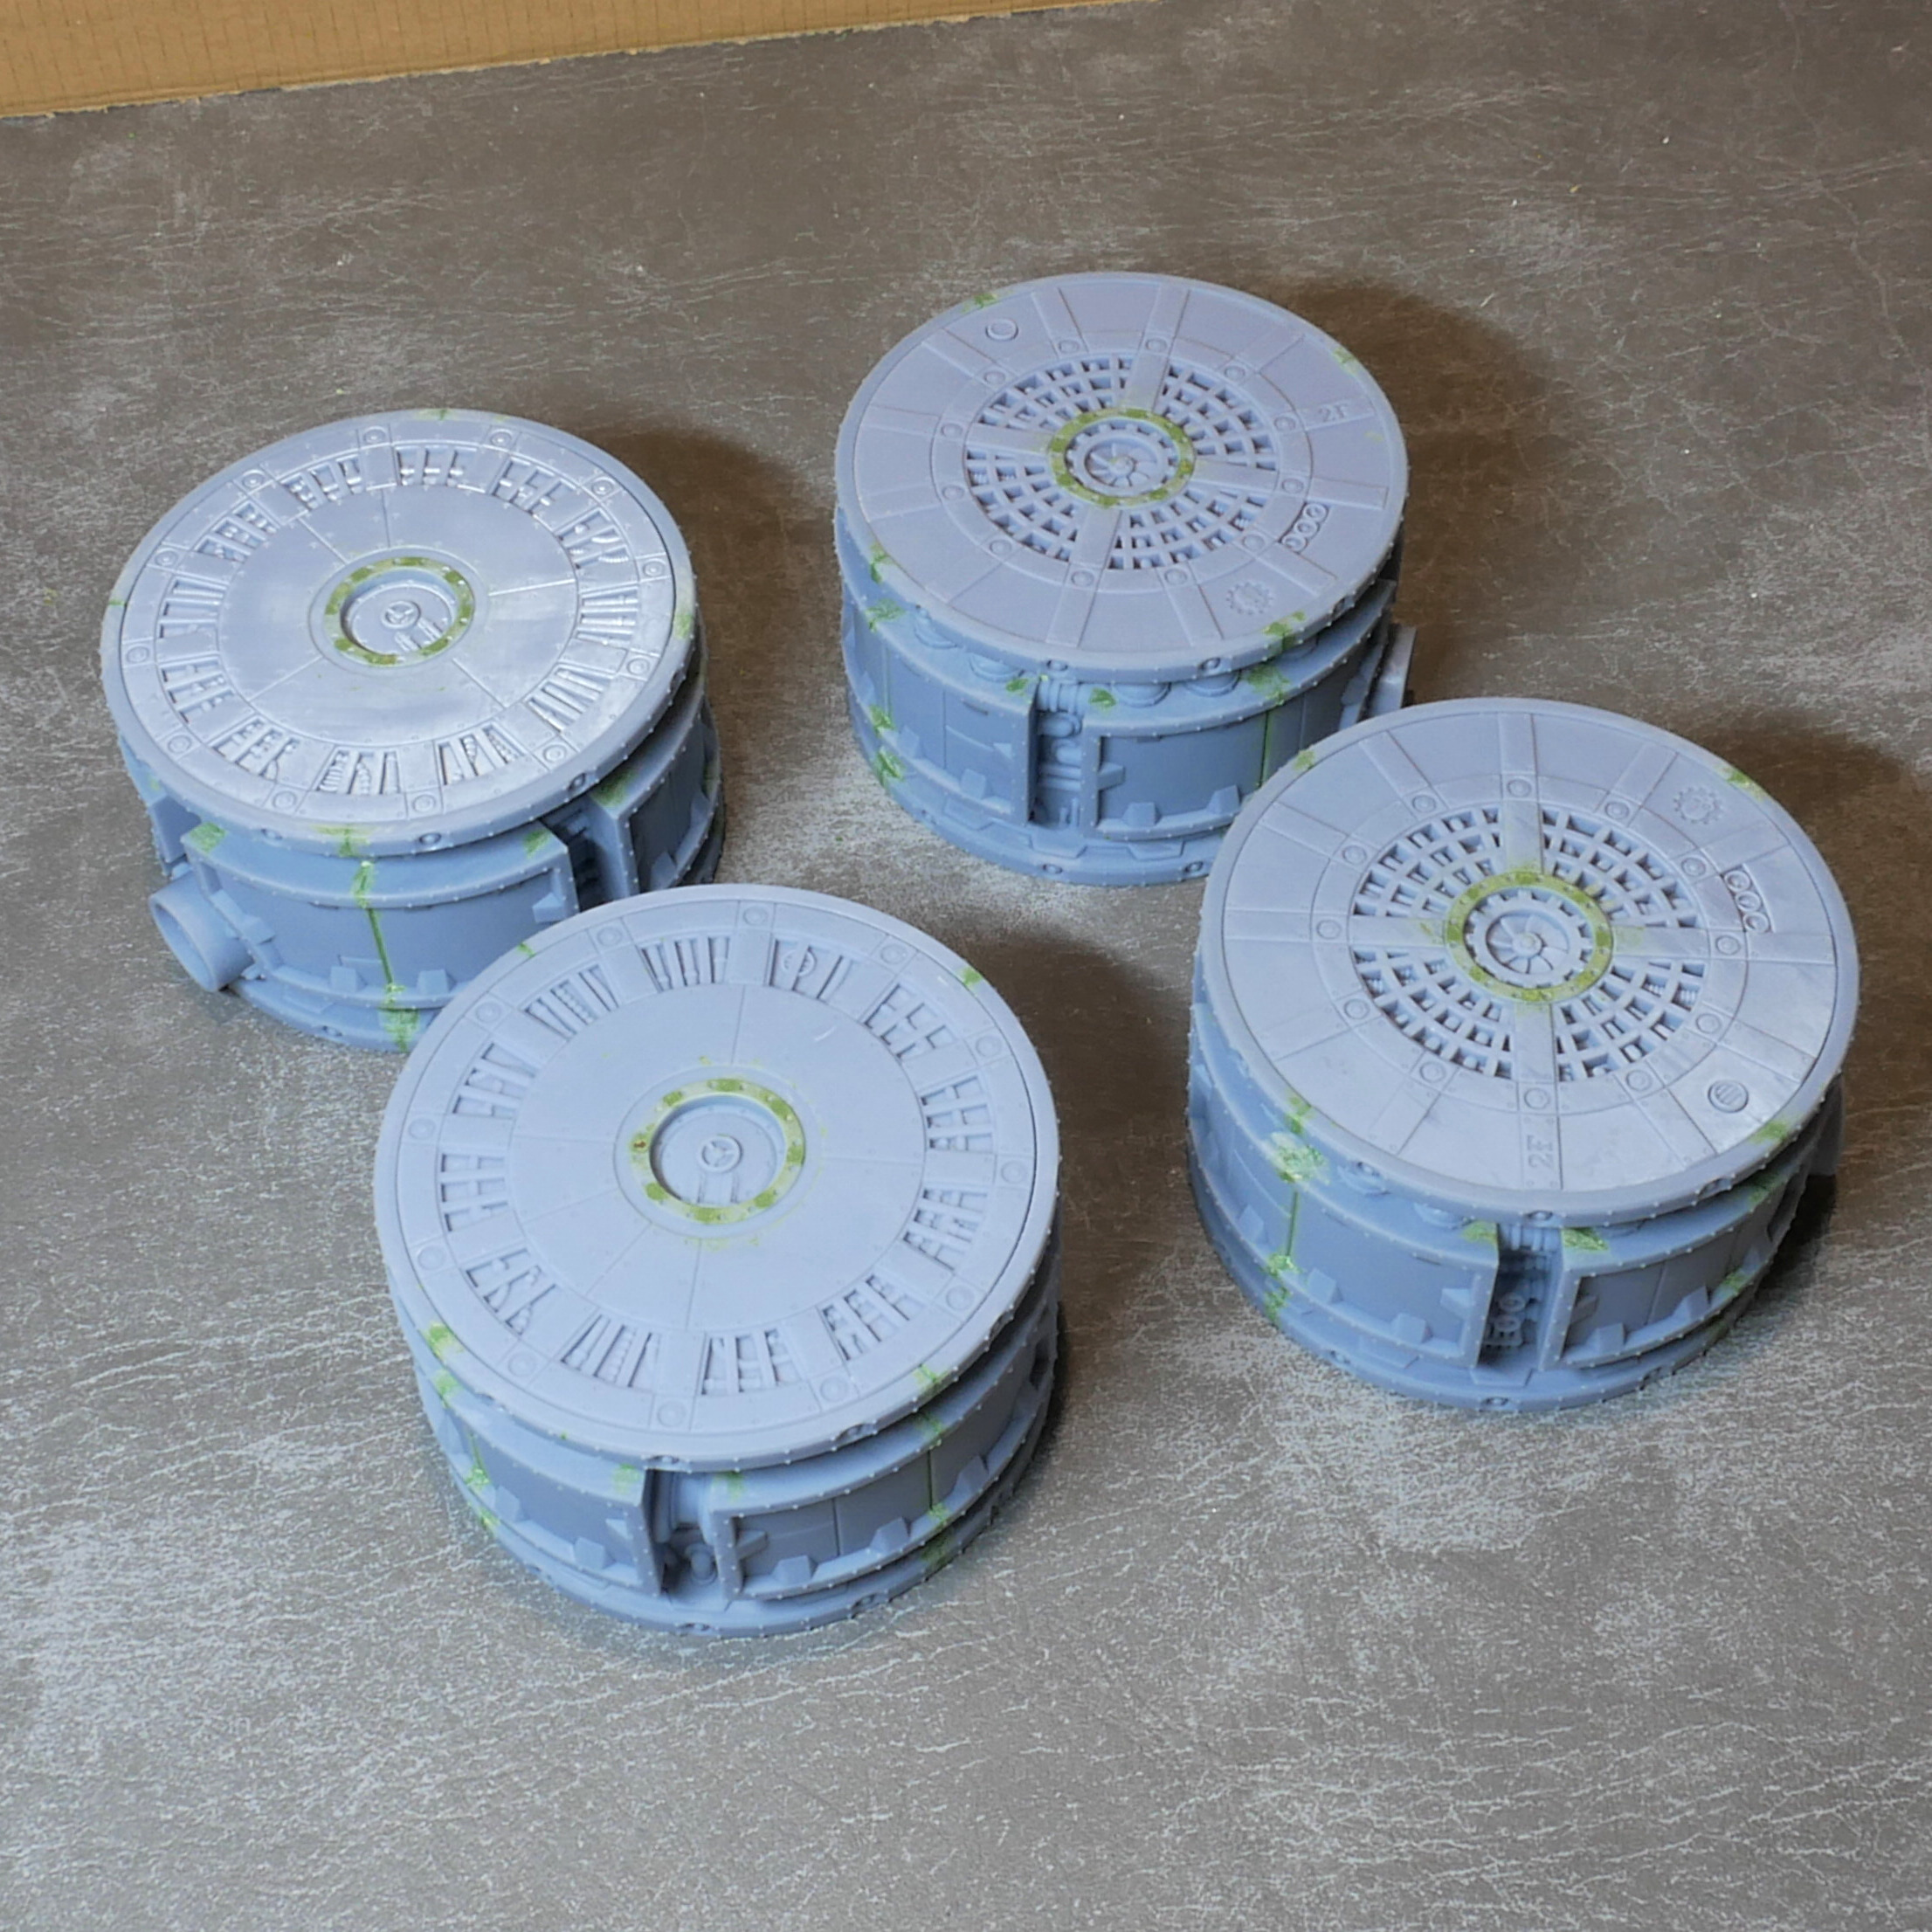
You know the Sector Mechanicus cylinder - sorry, the Ferratonic Furnace? What if you wanted something like it, but shorter? Well, you've found it.
As the pictures suggest, this is designed for resin printing, because I am way too demanding of detail in my terrain.
The thing is, I went a bit overboard making this. So there are... a few options. In total, there are 348 files. I have a problem.
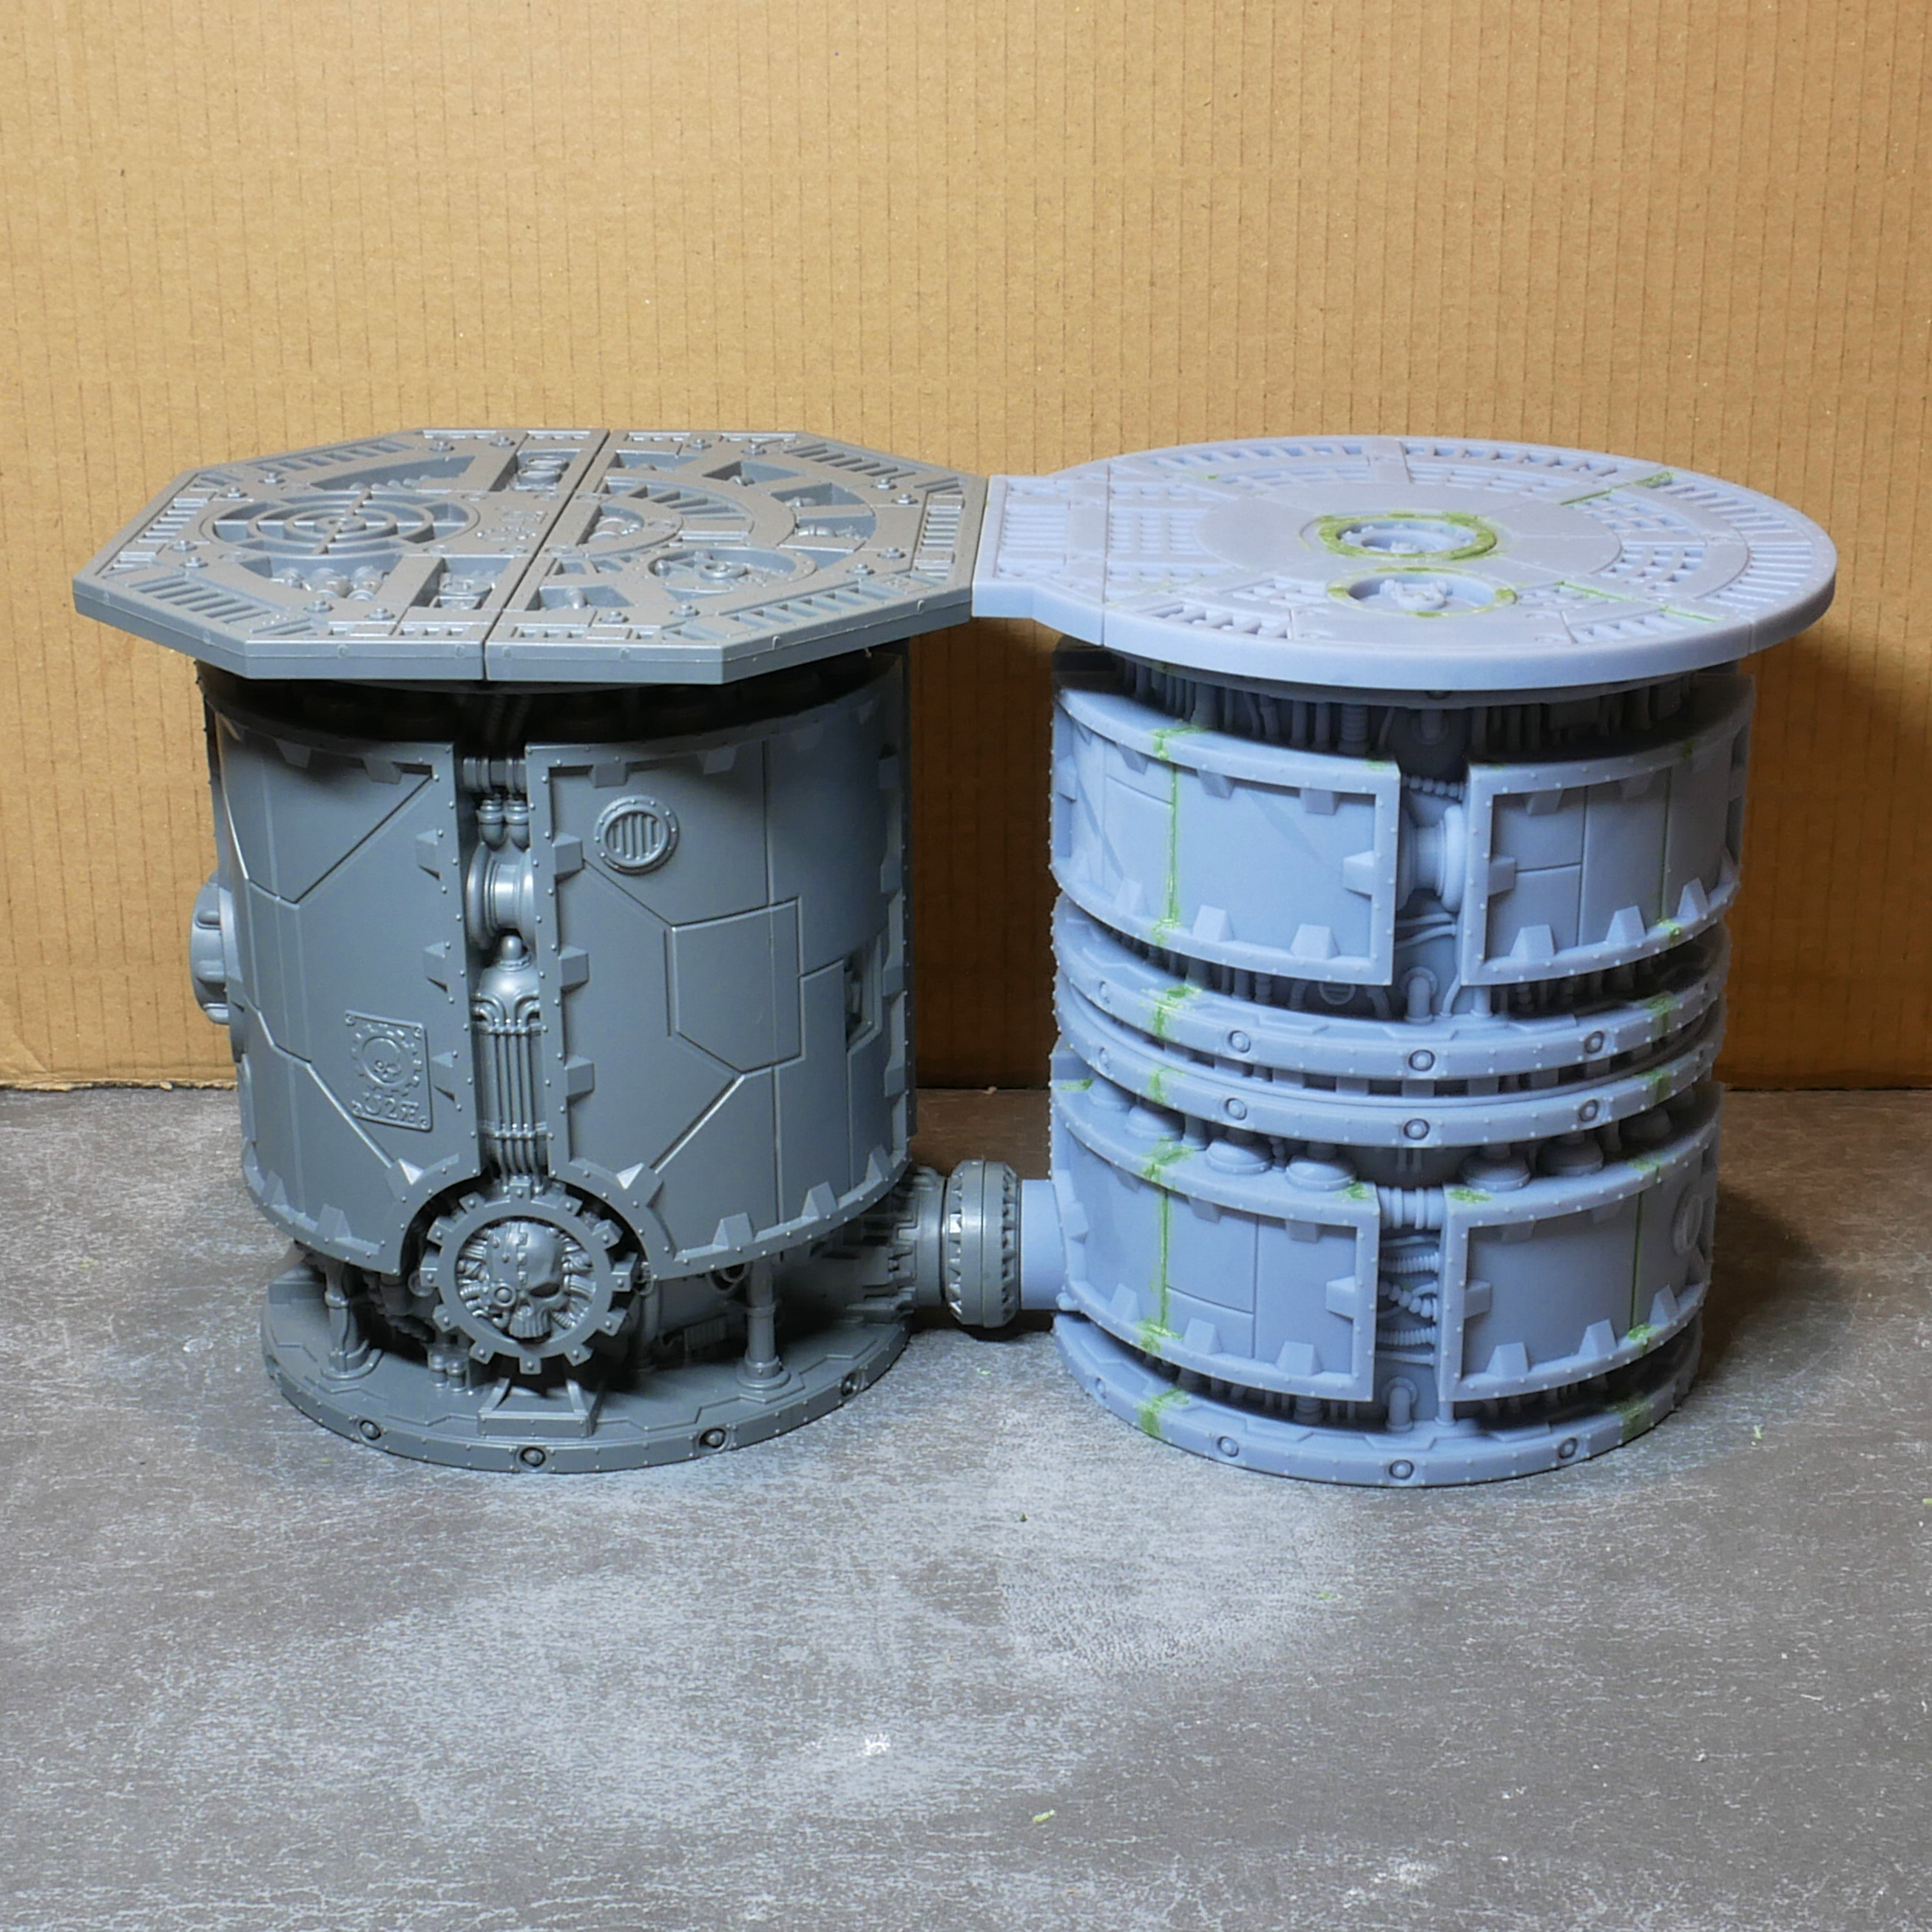
Cylinder body
The cylinder_ zip files contain segments that make up the body of a cylinder. You will need 4 segments to make a complete cylinder.
Segments have rotational symmetry, so you can turn any number of segments upside down for extra variation. Some in Style 1 may not look as good like that, but they will functionally work.
You can mirror segments for yet more variation. Mirrored segments will only fit with other mirrored segments. The skull icon is technically incorrect if you mirror it, but that's only on
one pipe variant for Style 1, and you can make up your own mind whether that's acceptable anyway.
Heights
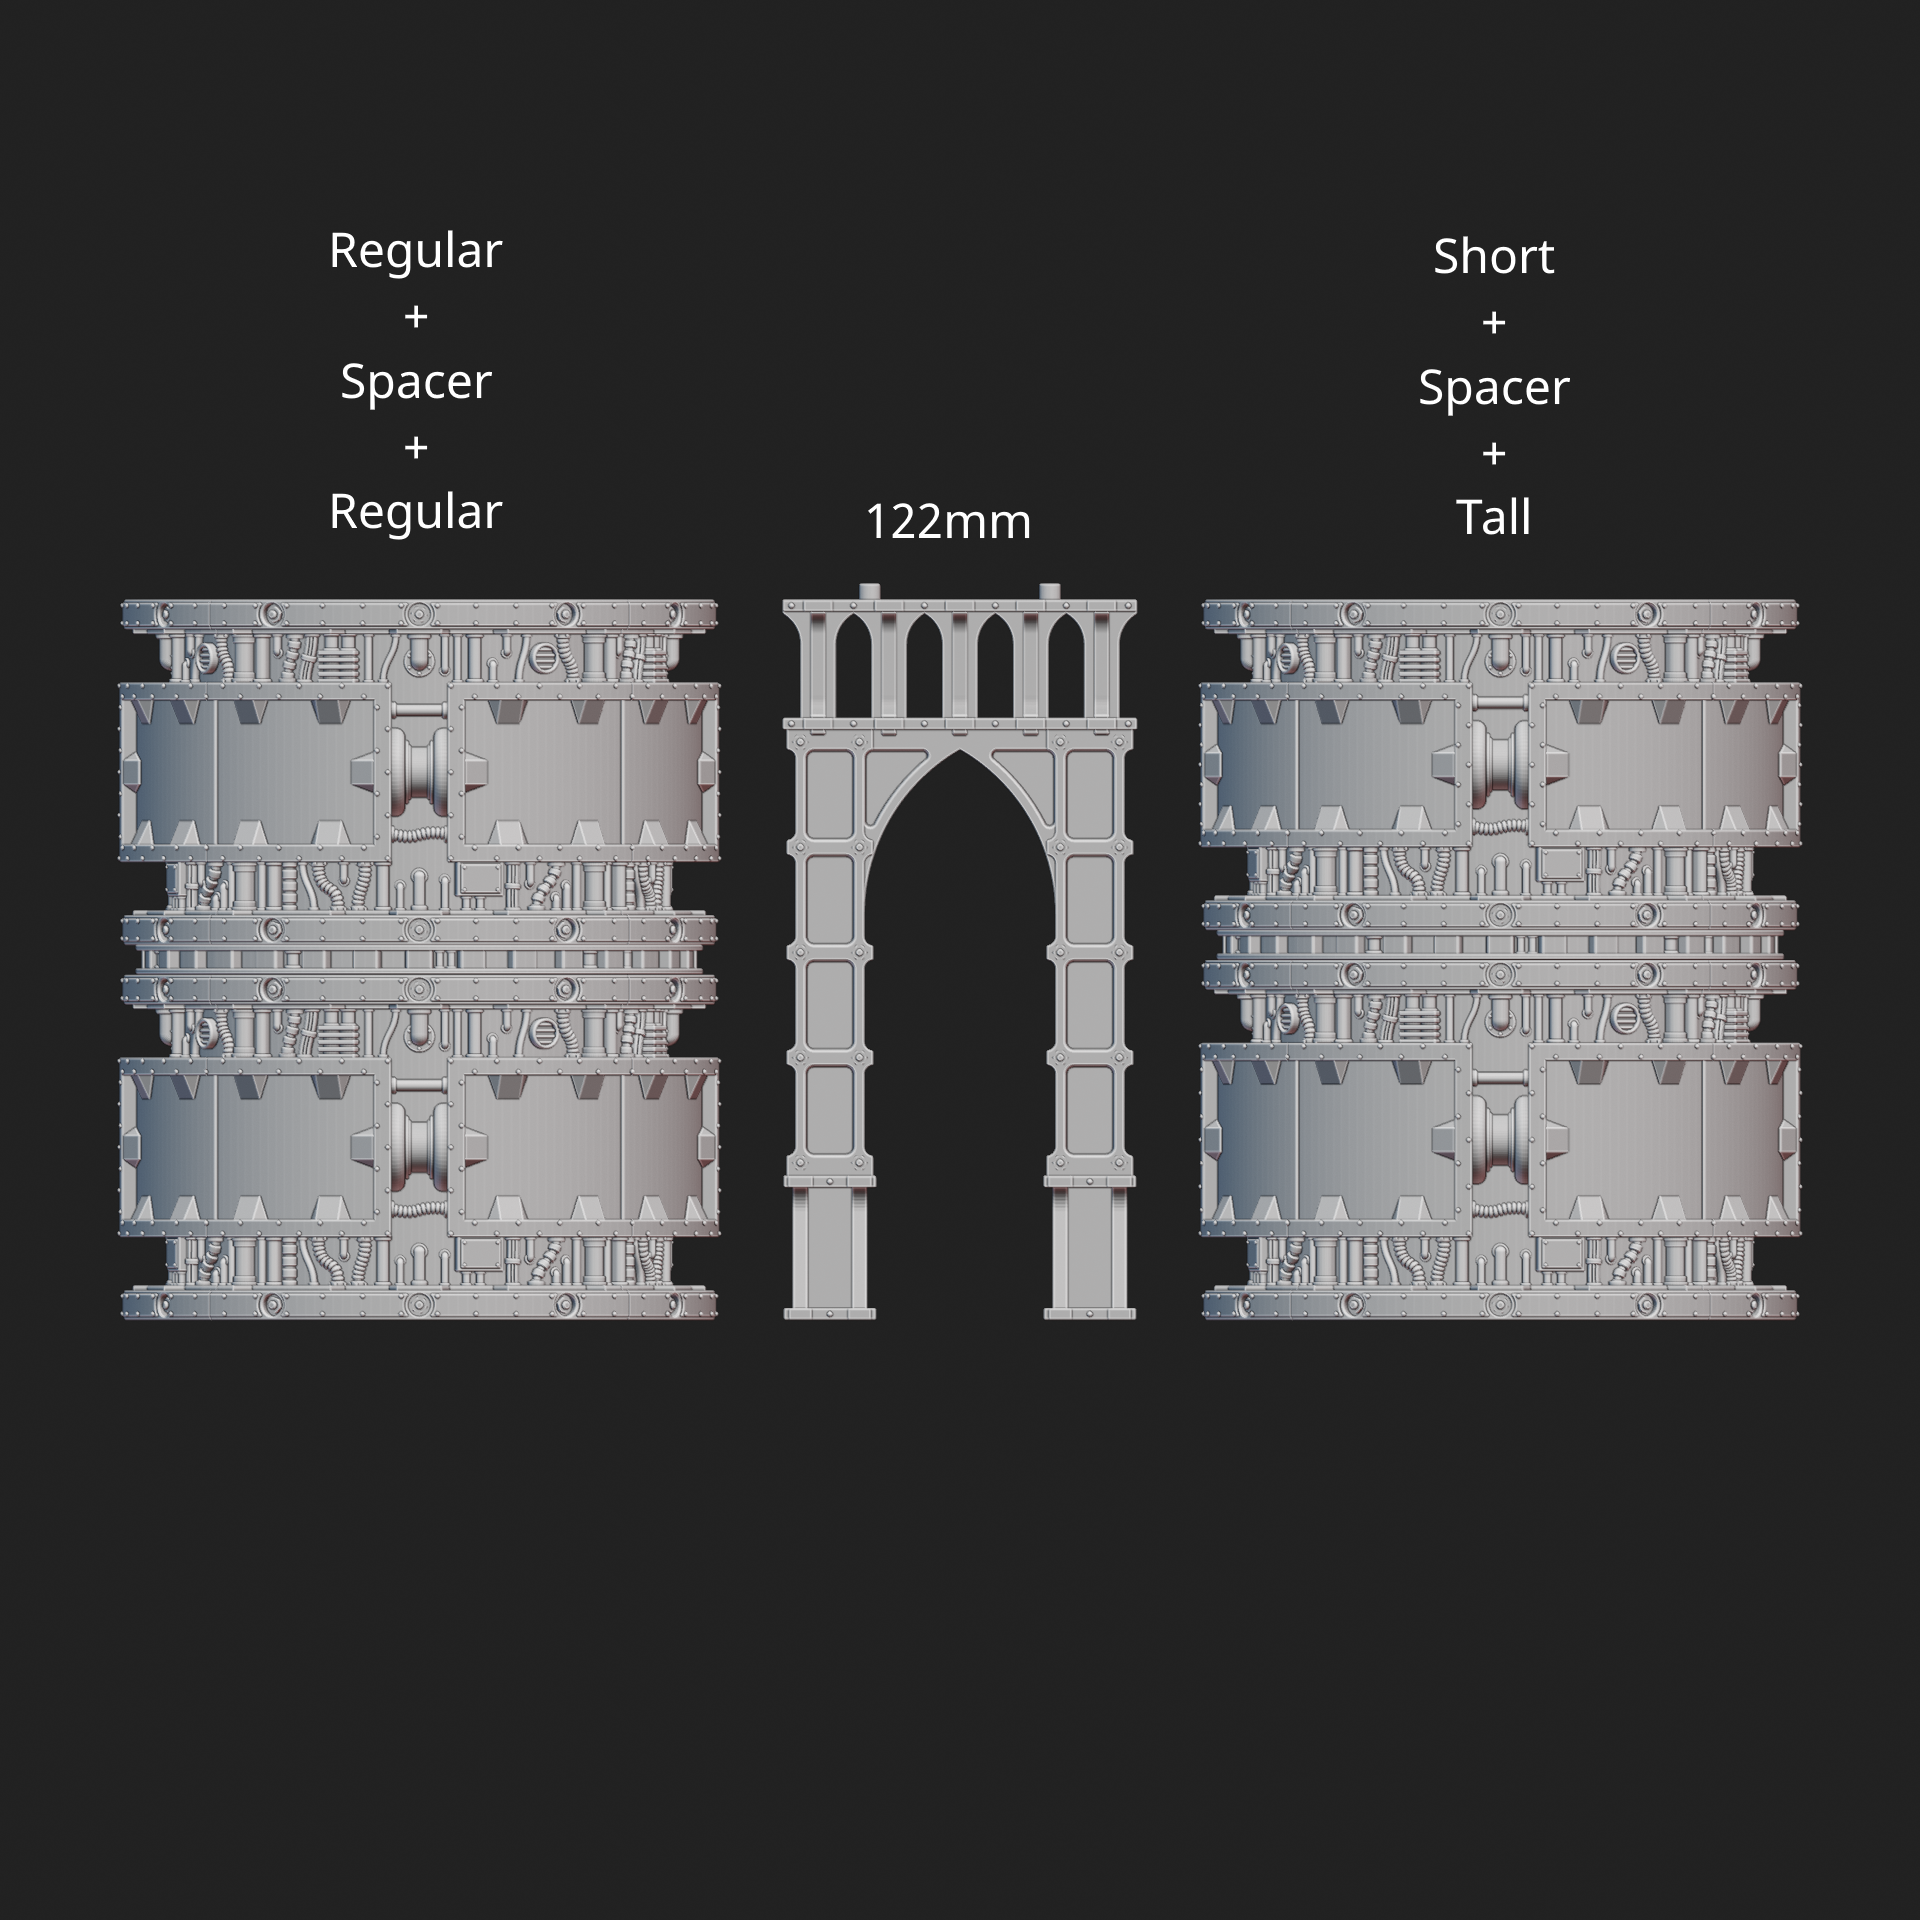
The cylinder comes in 3 heights:
- Regular - 58.5mm, i.e. the same height as Zone Mortalis terrain
2 of these with a platform or spacer between will be the same height as a regular Furnace (and SM pillars, etc.)
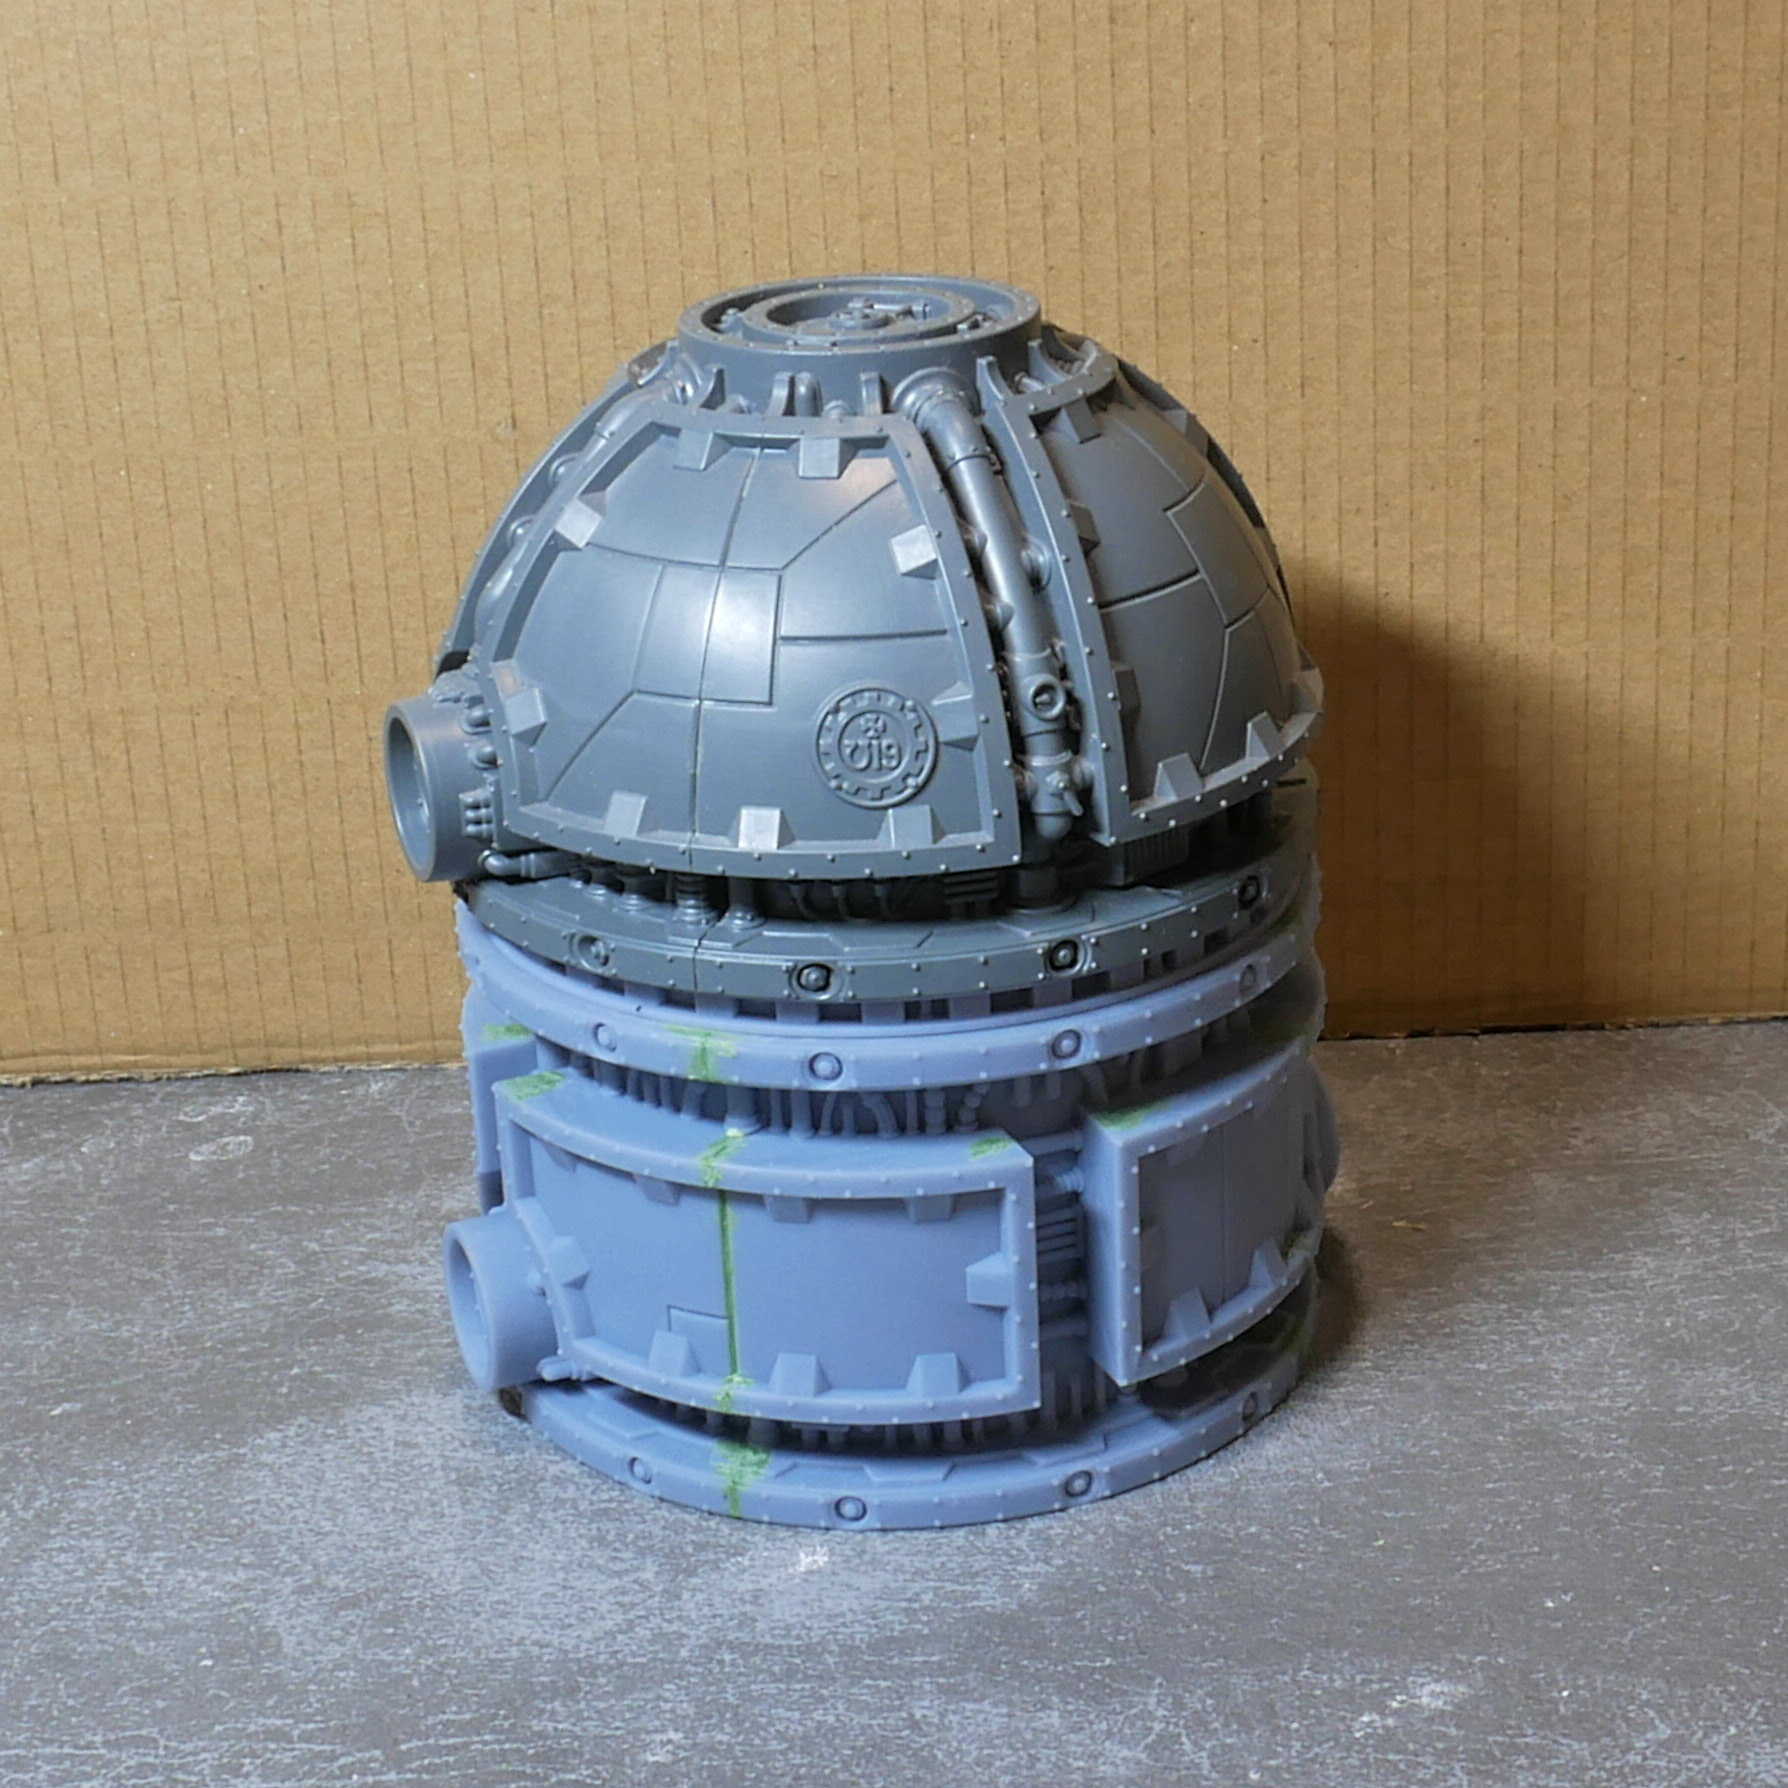
- Tall - 61mm, i.e. half the height of a regular Furnace (and the same height as a SM dome, etc.)
- Short - 56mm
Intended for stacking with 61mm pieces (e.g. the Sec Mech dome or little cylinder, or indeed the tall version of this cylinder) and a platform/spacer
All the segments of your cylinder must be the same height to fit together. Any other variations, as described below, can be mixed and matched as you want.
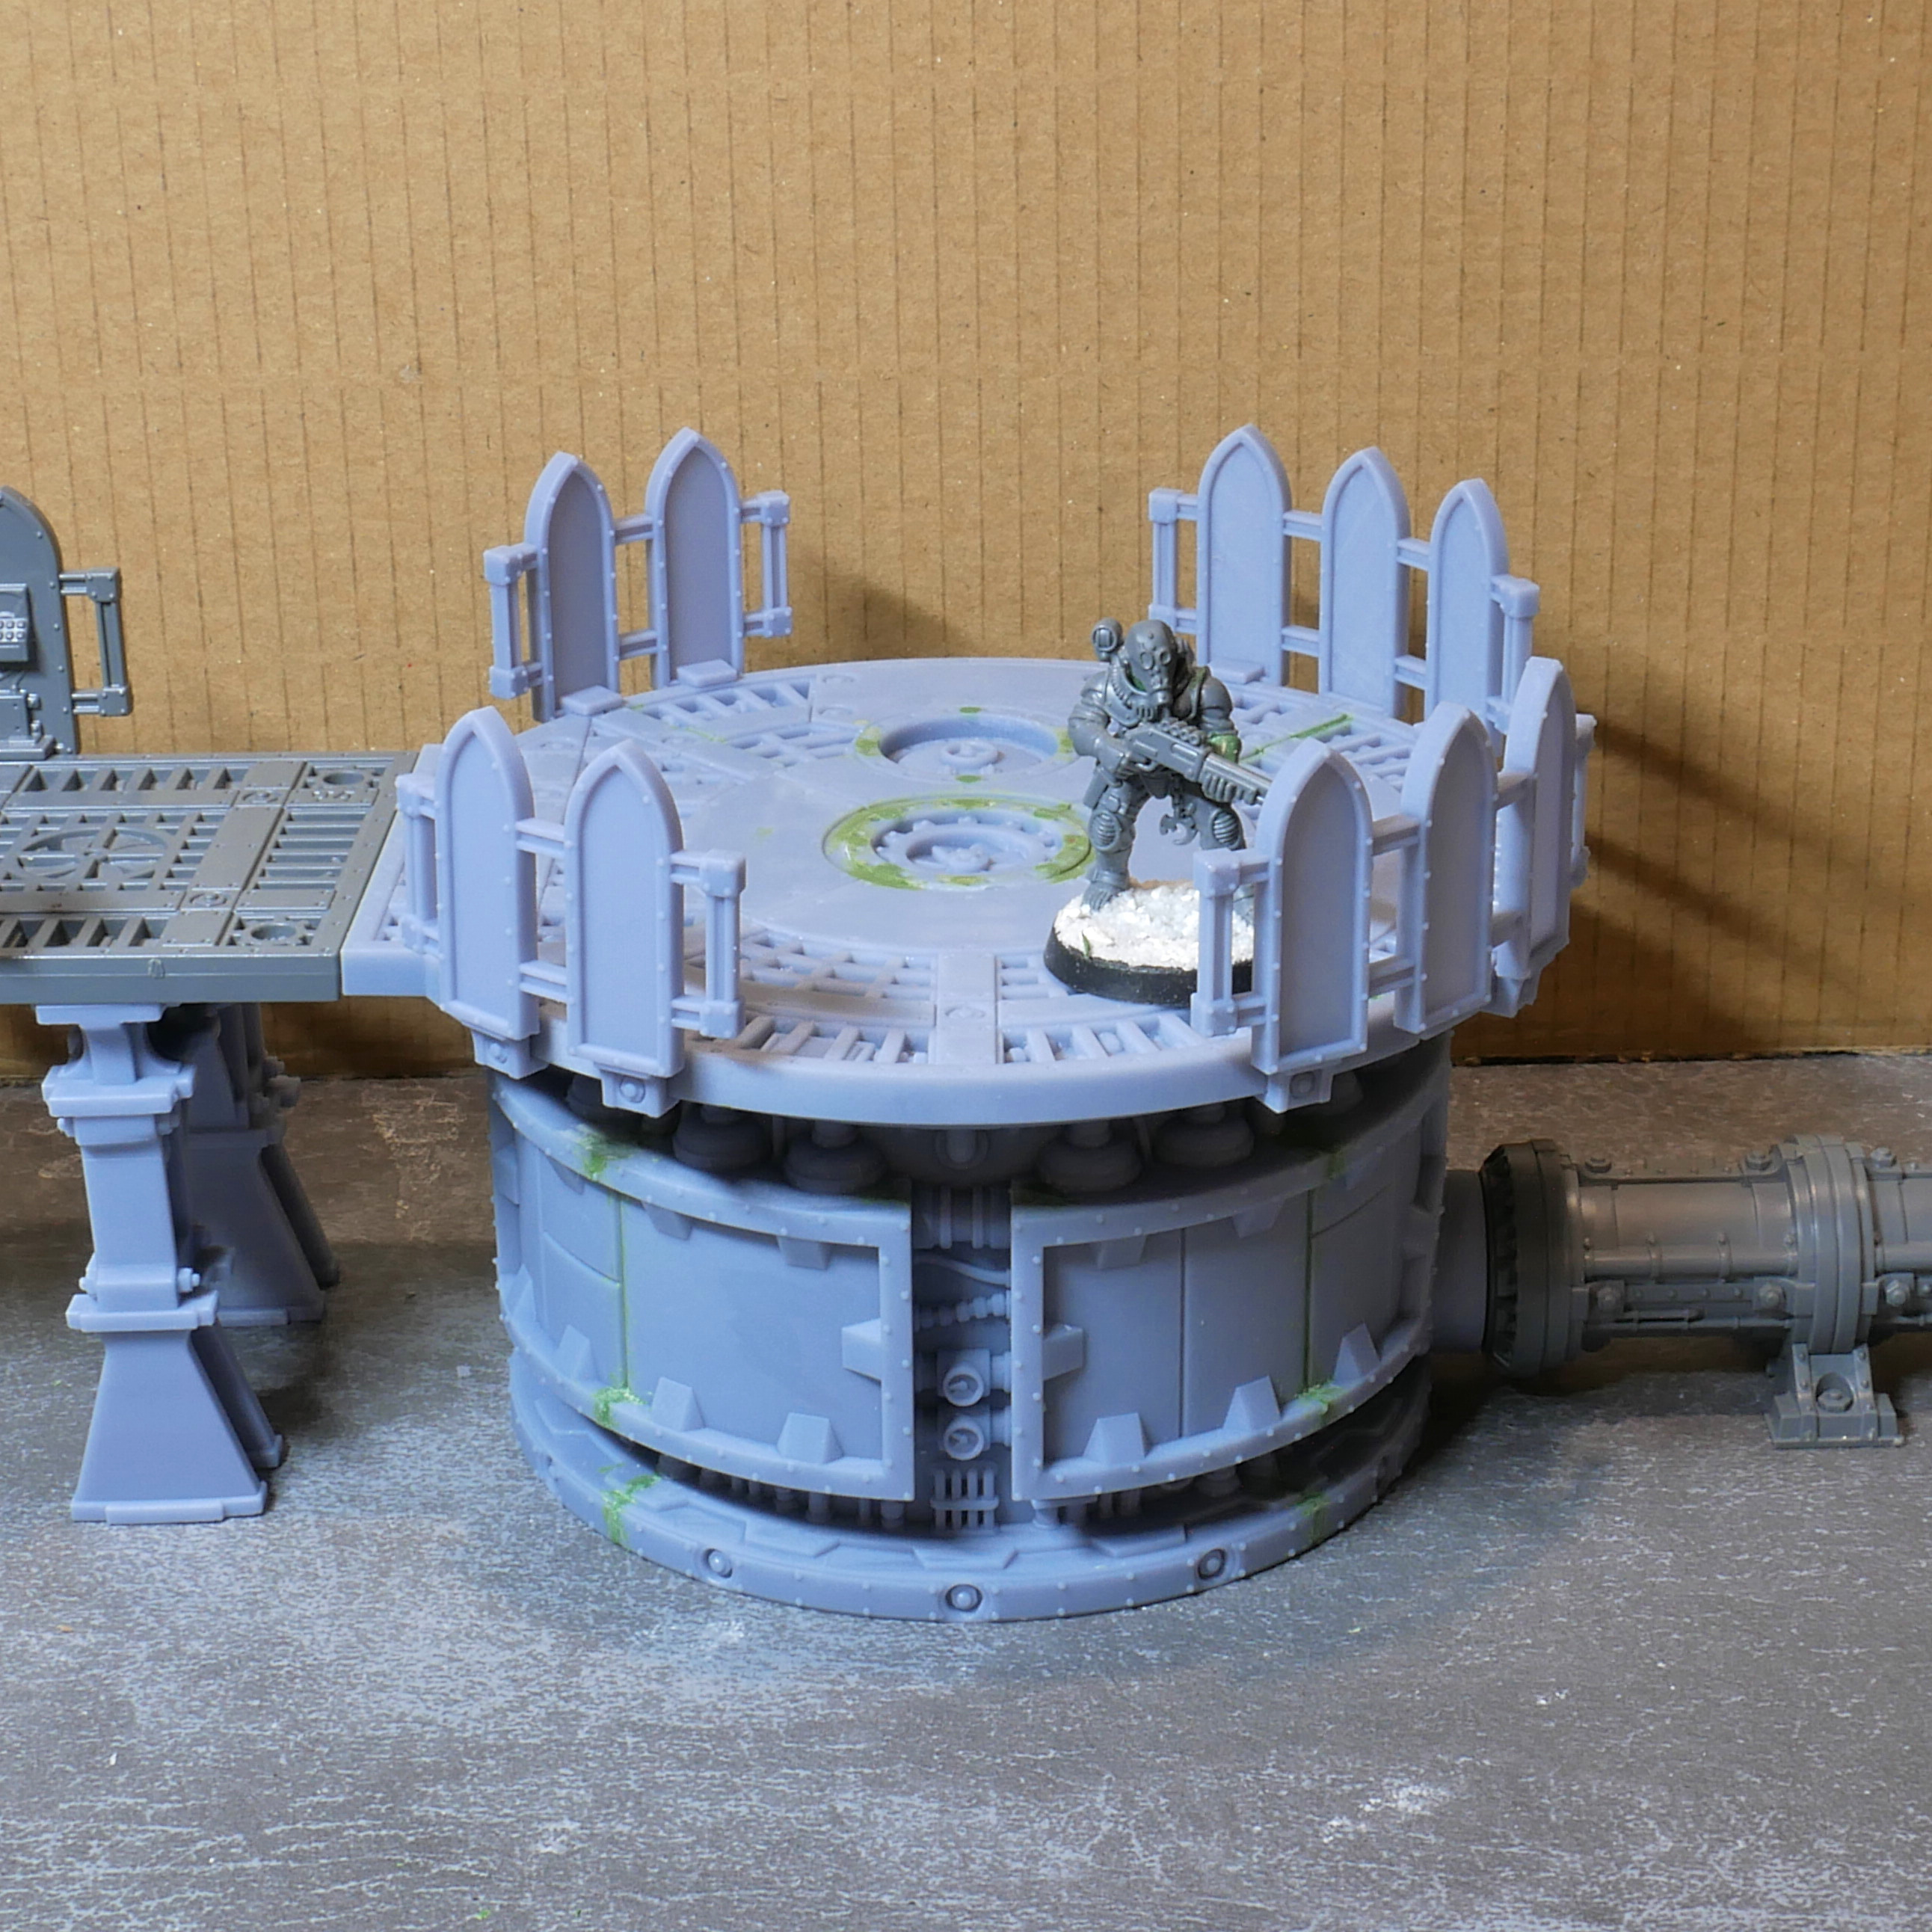
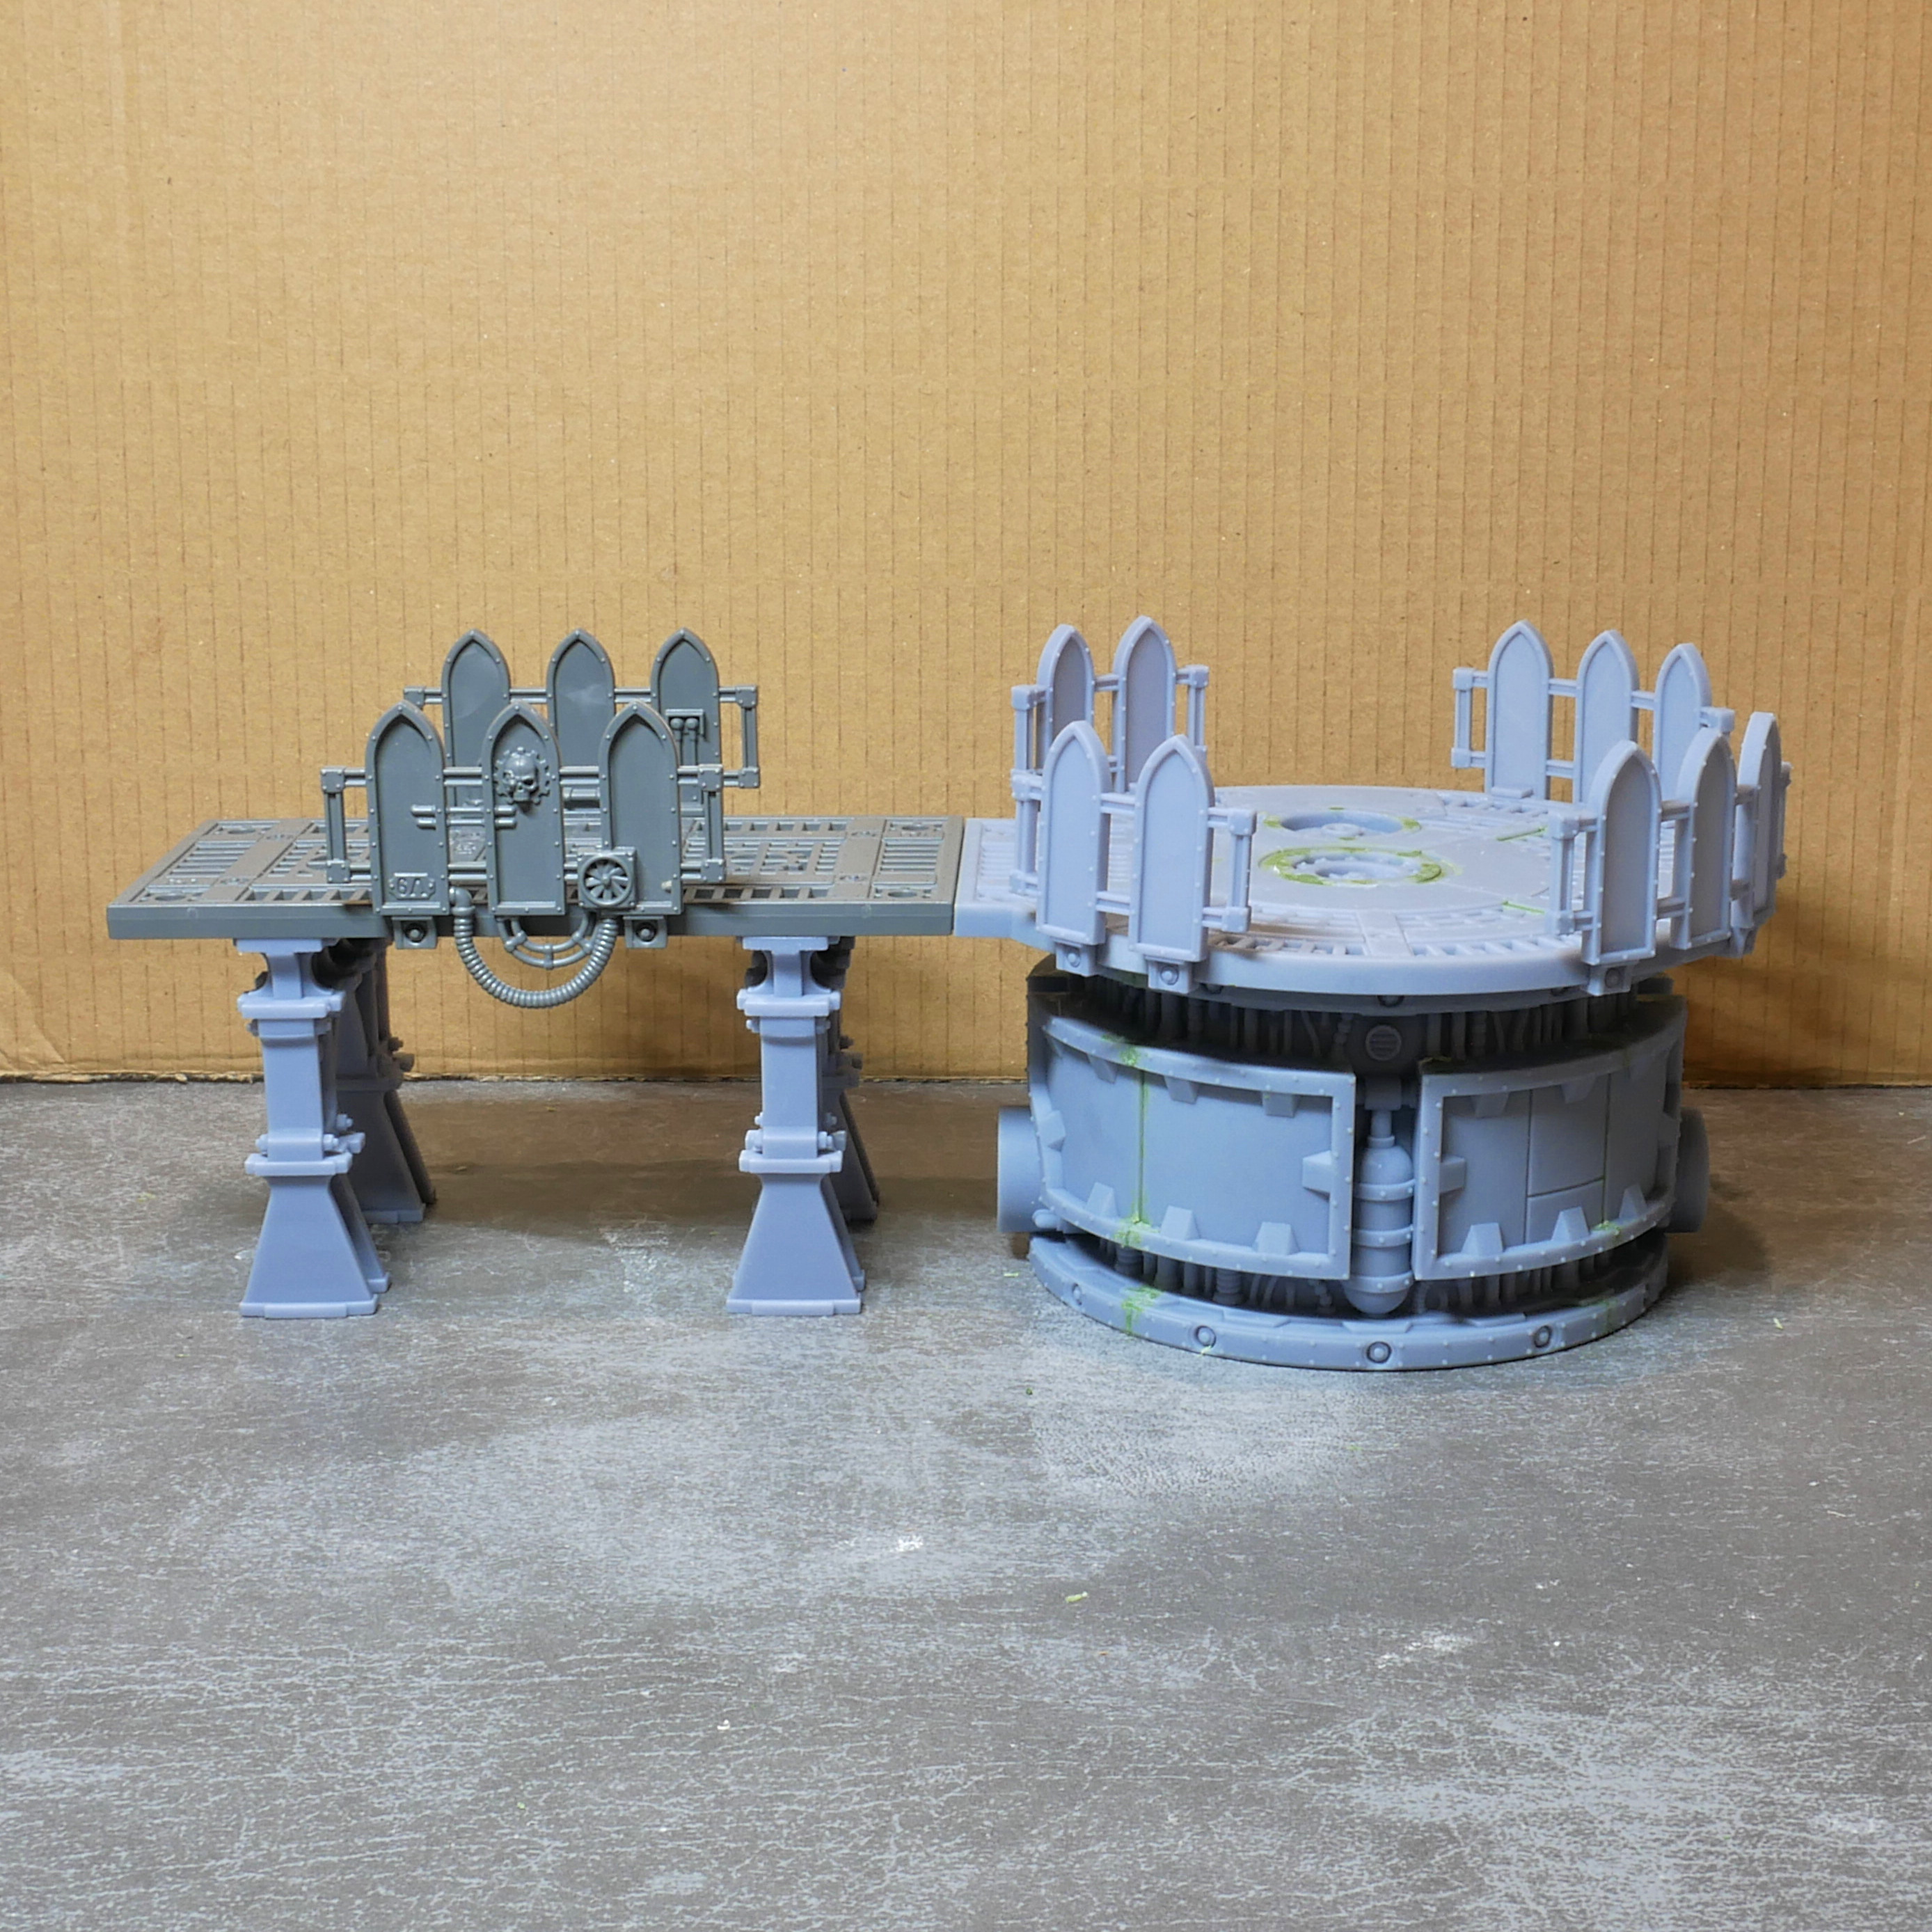
Regular and tall variants will, of course, match up with my Shorter Pillars and Shorter Ladder, as seen in a couple of the pictures.
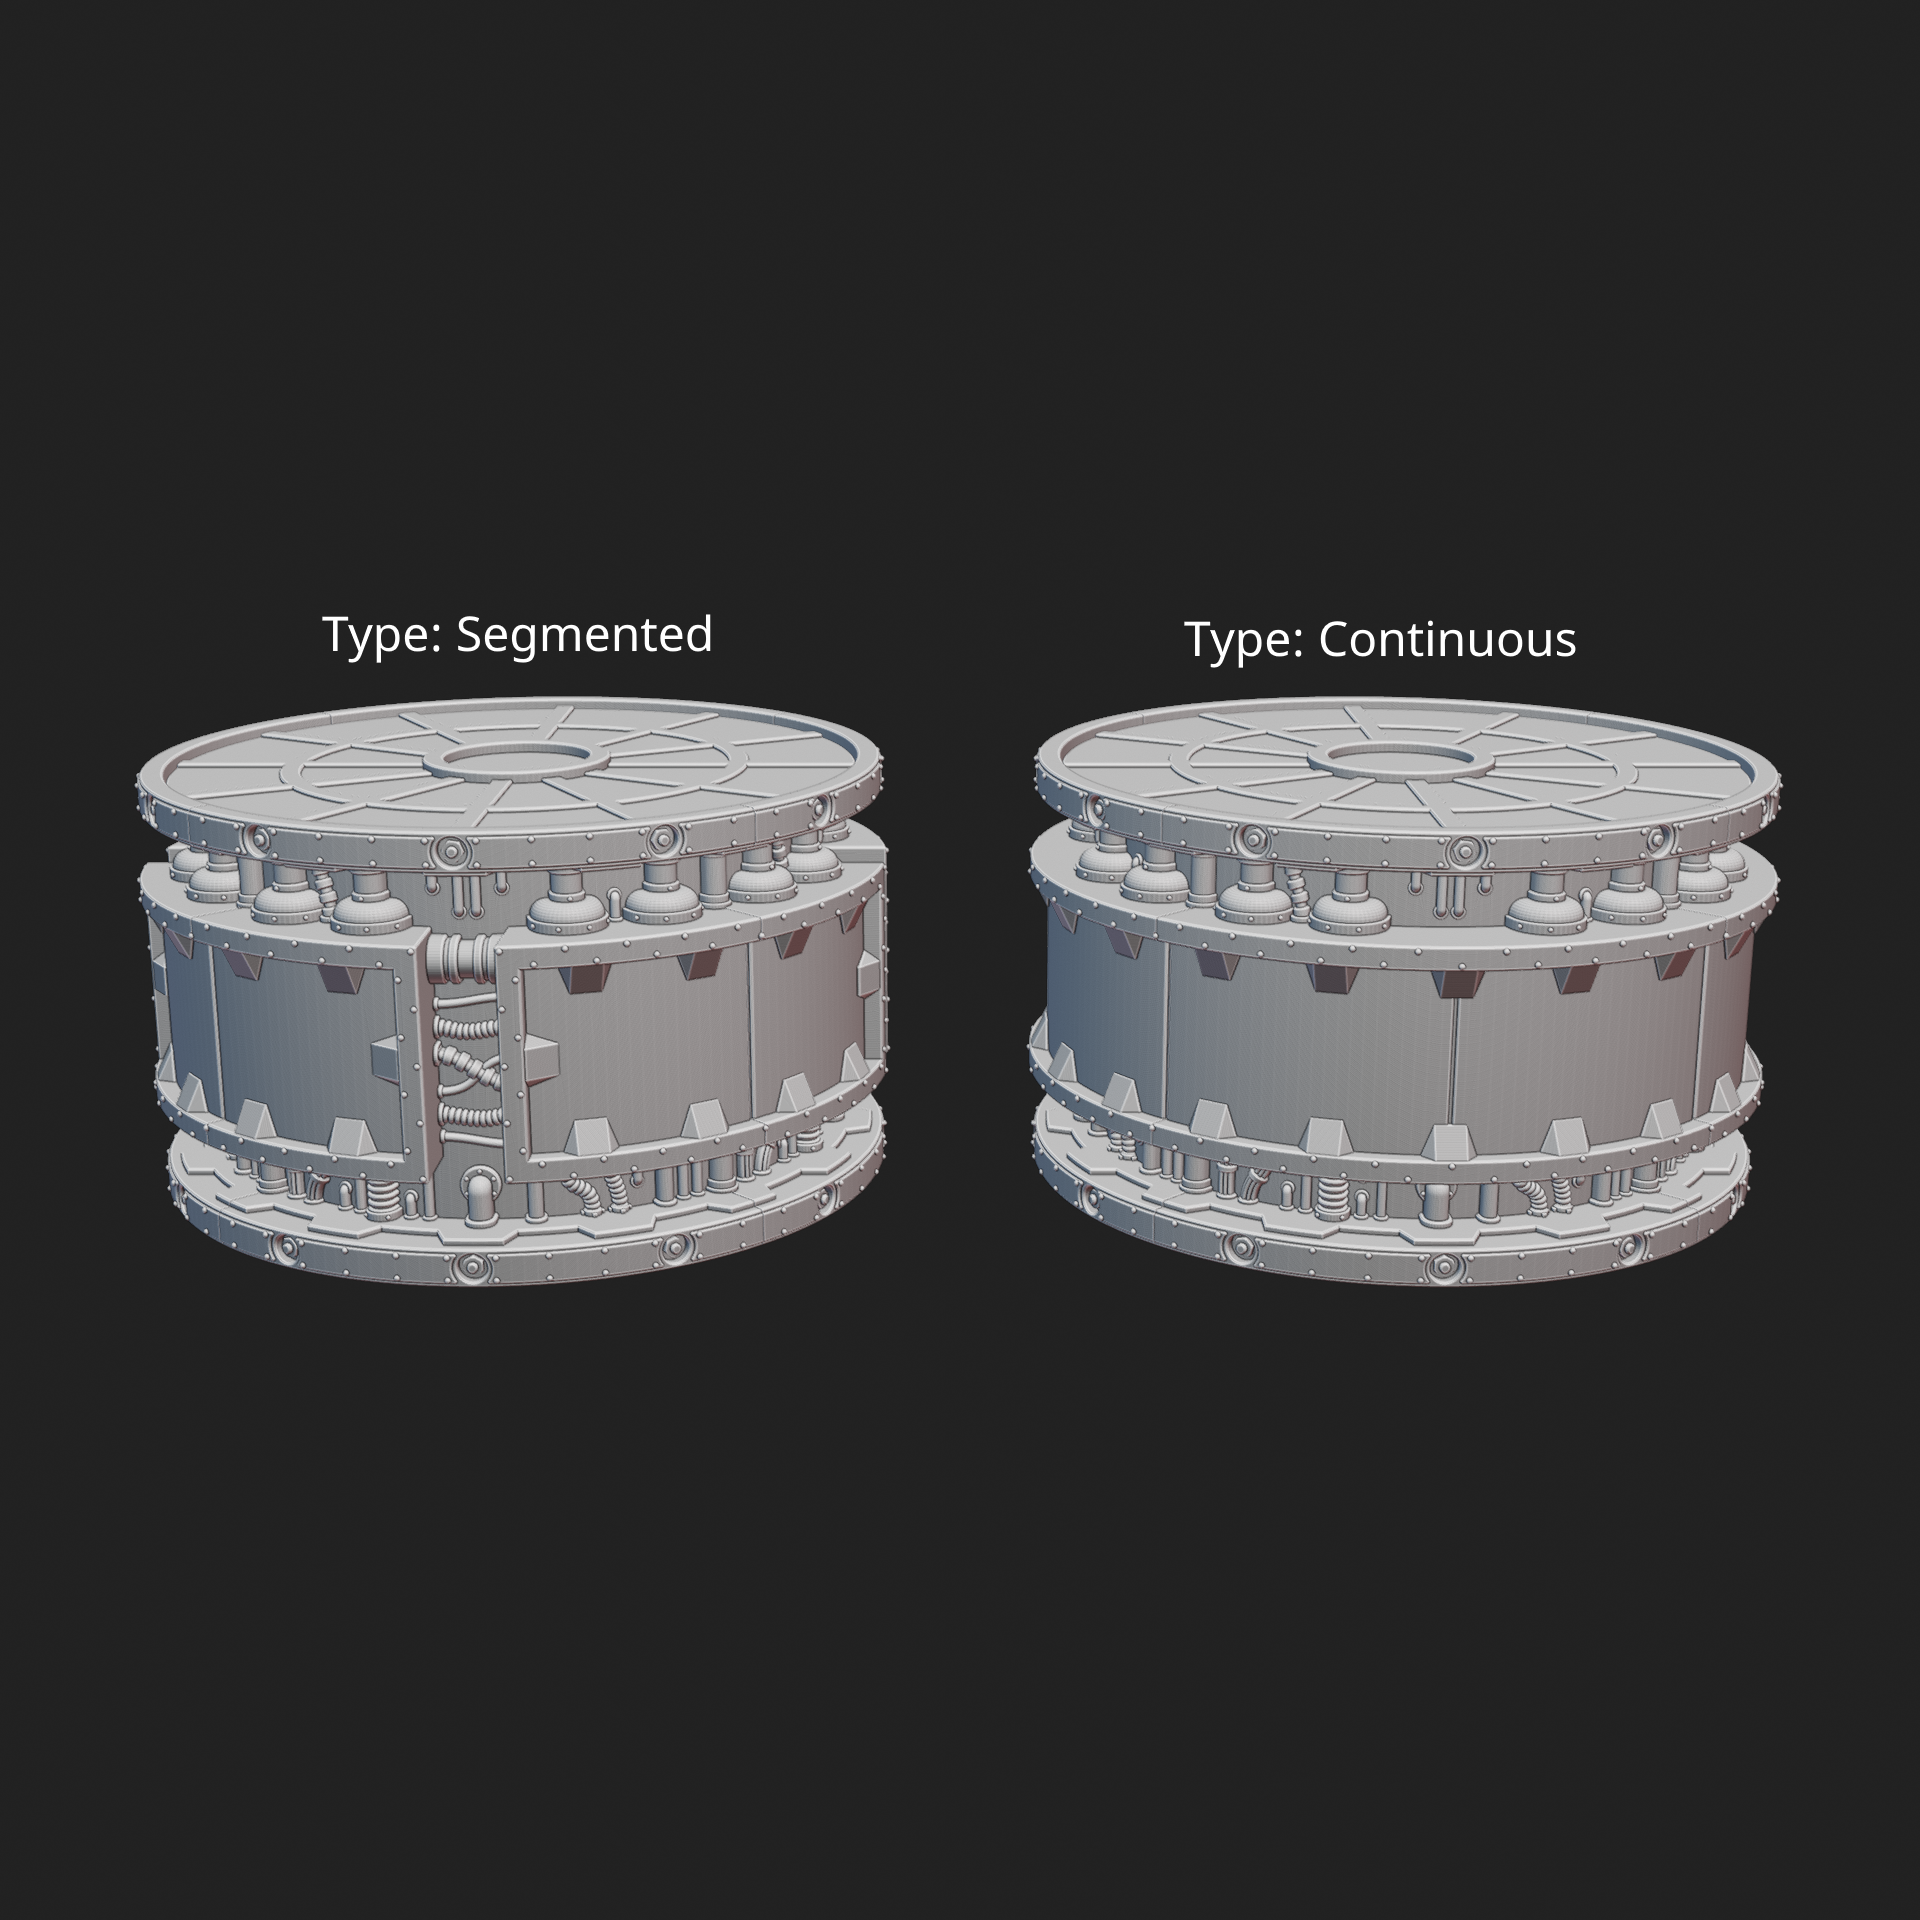
Types
There are 2 "types" of cylinder segment:
- Split - the standard type, like the regular Furnace, which has vertical splits between panels
- Continuous - no split between panels
These can be combined to make cylinders with larger panels.
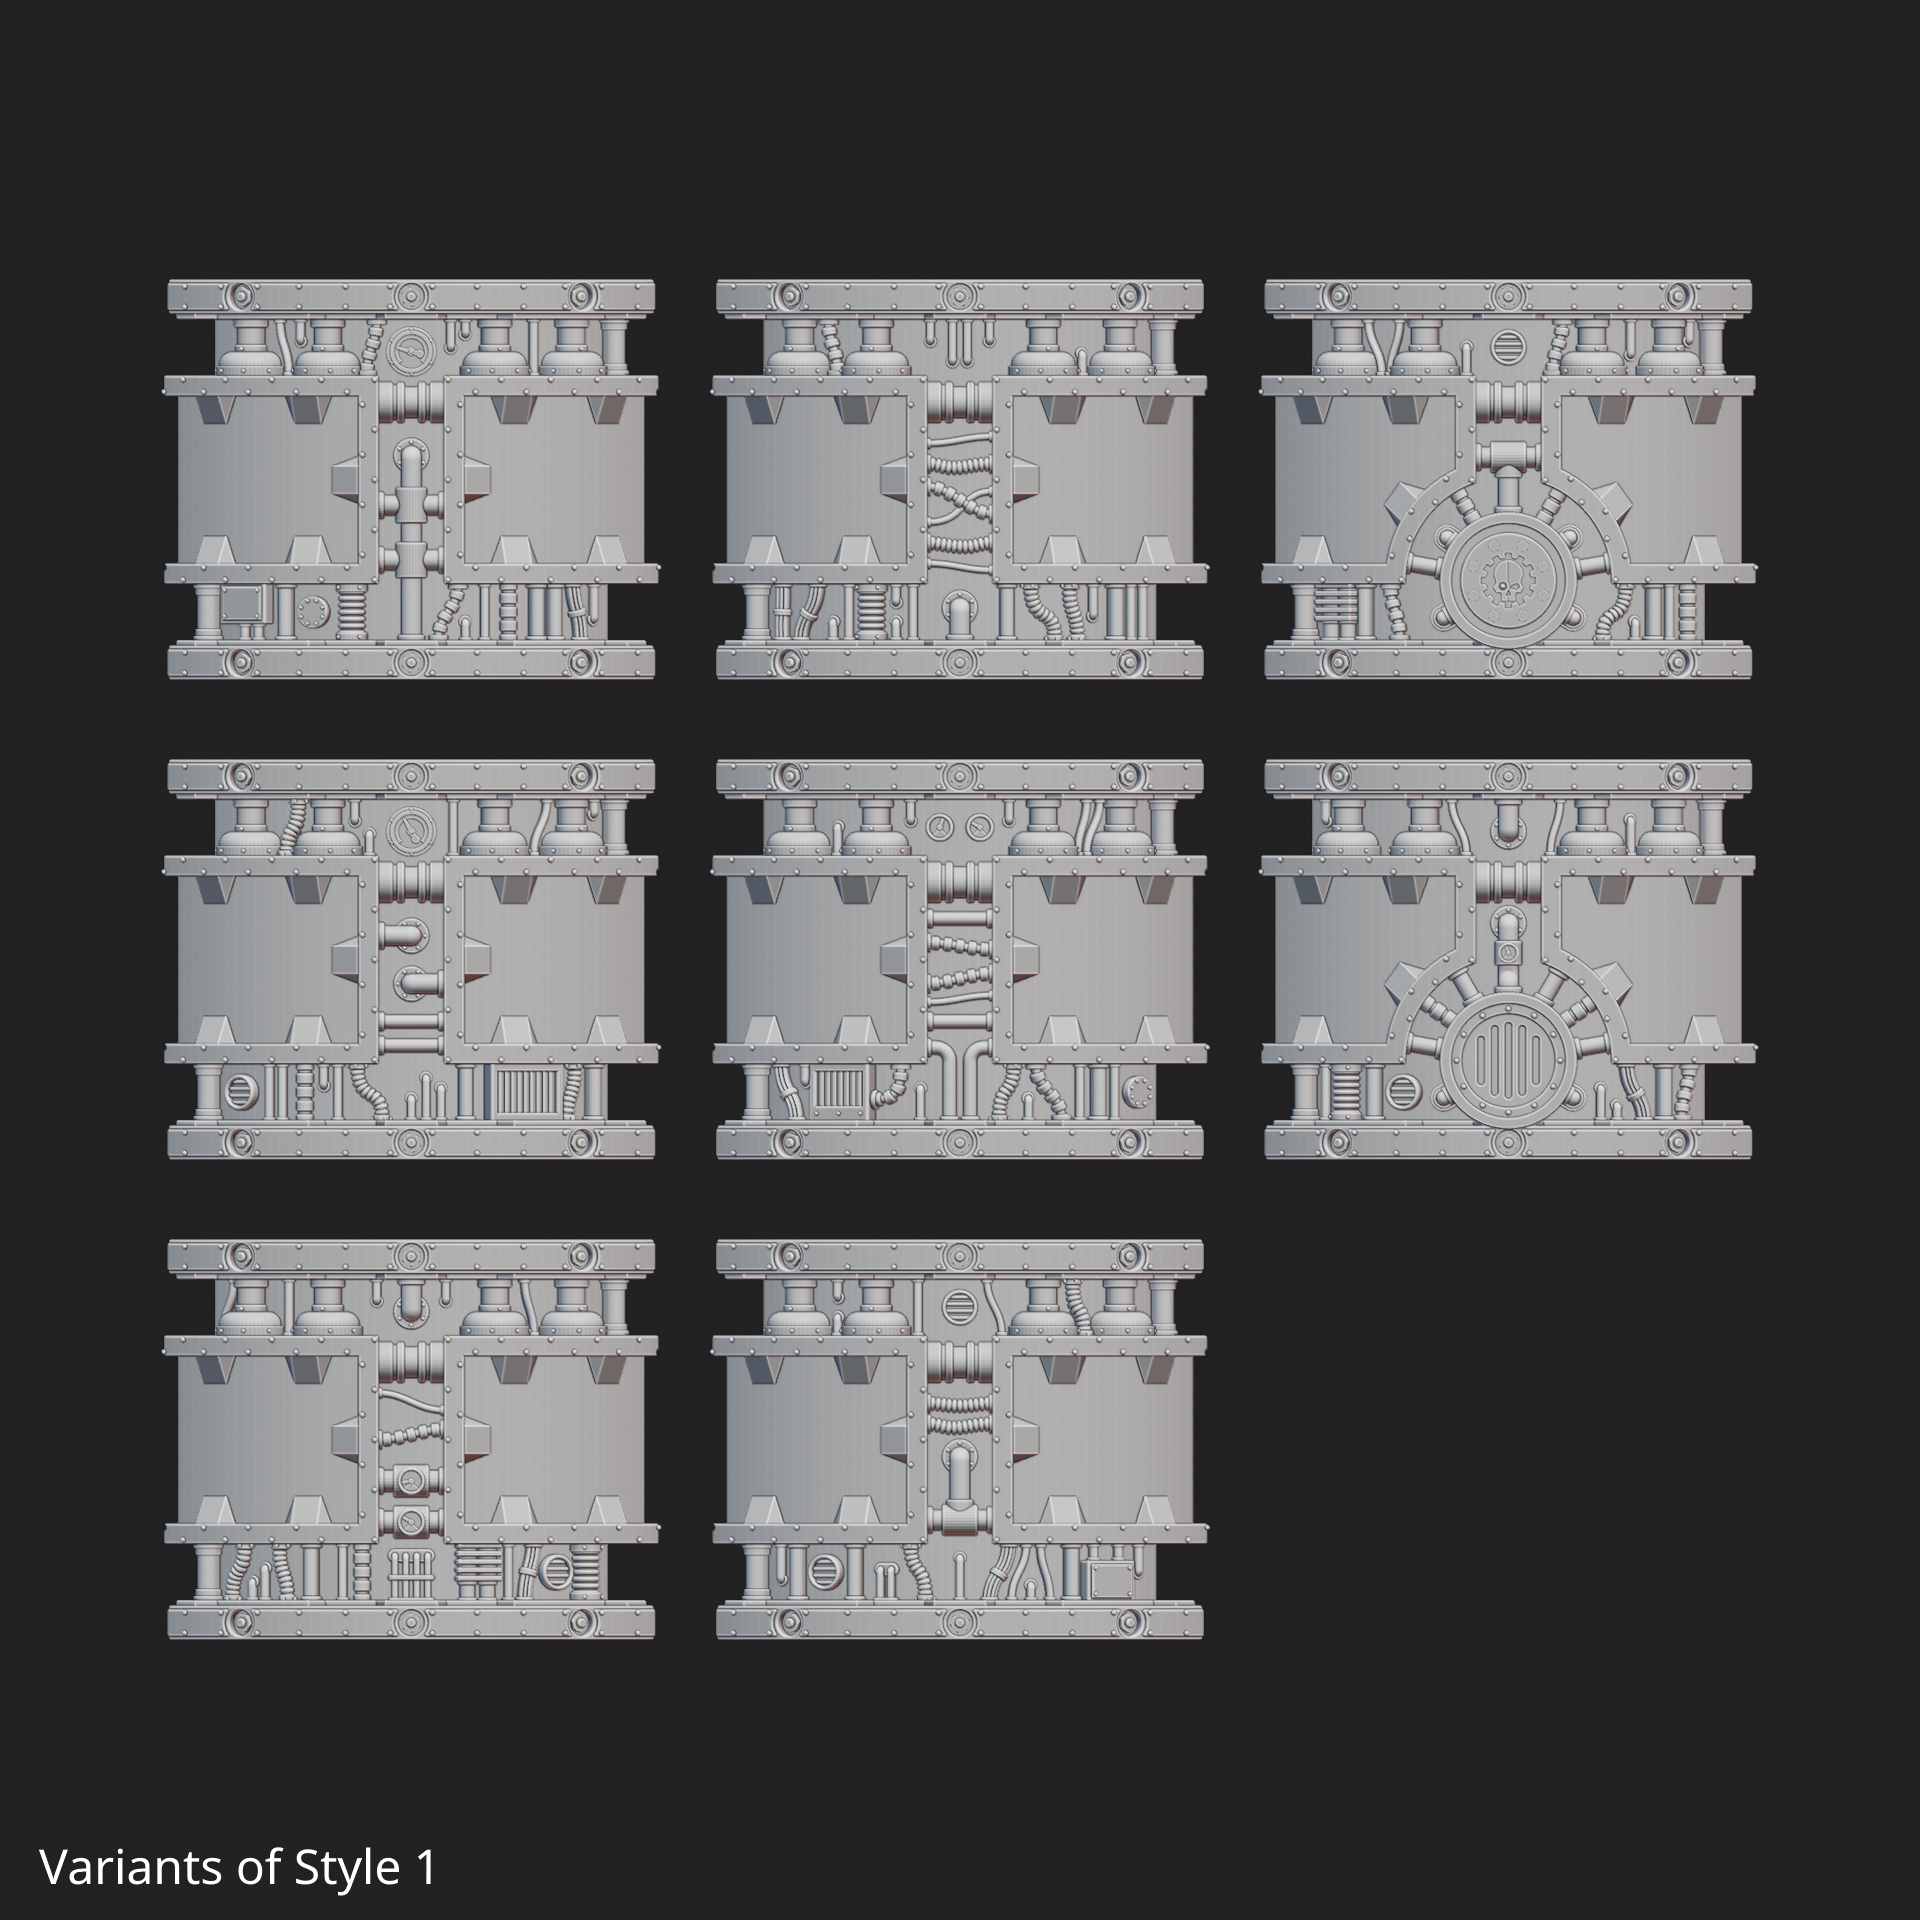
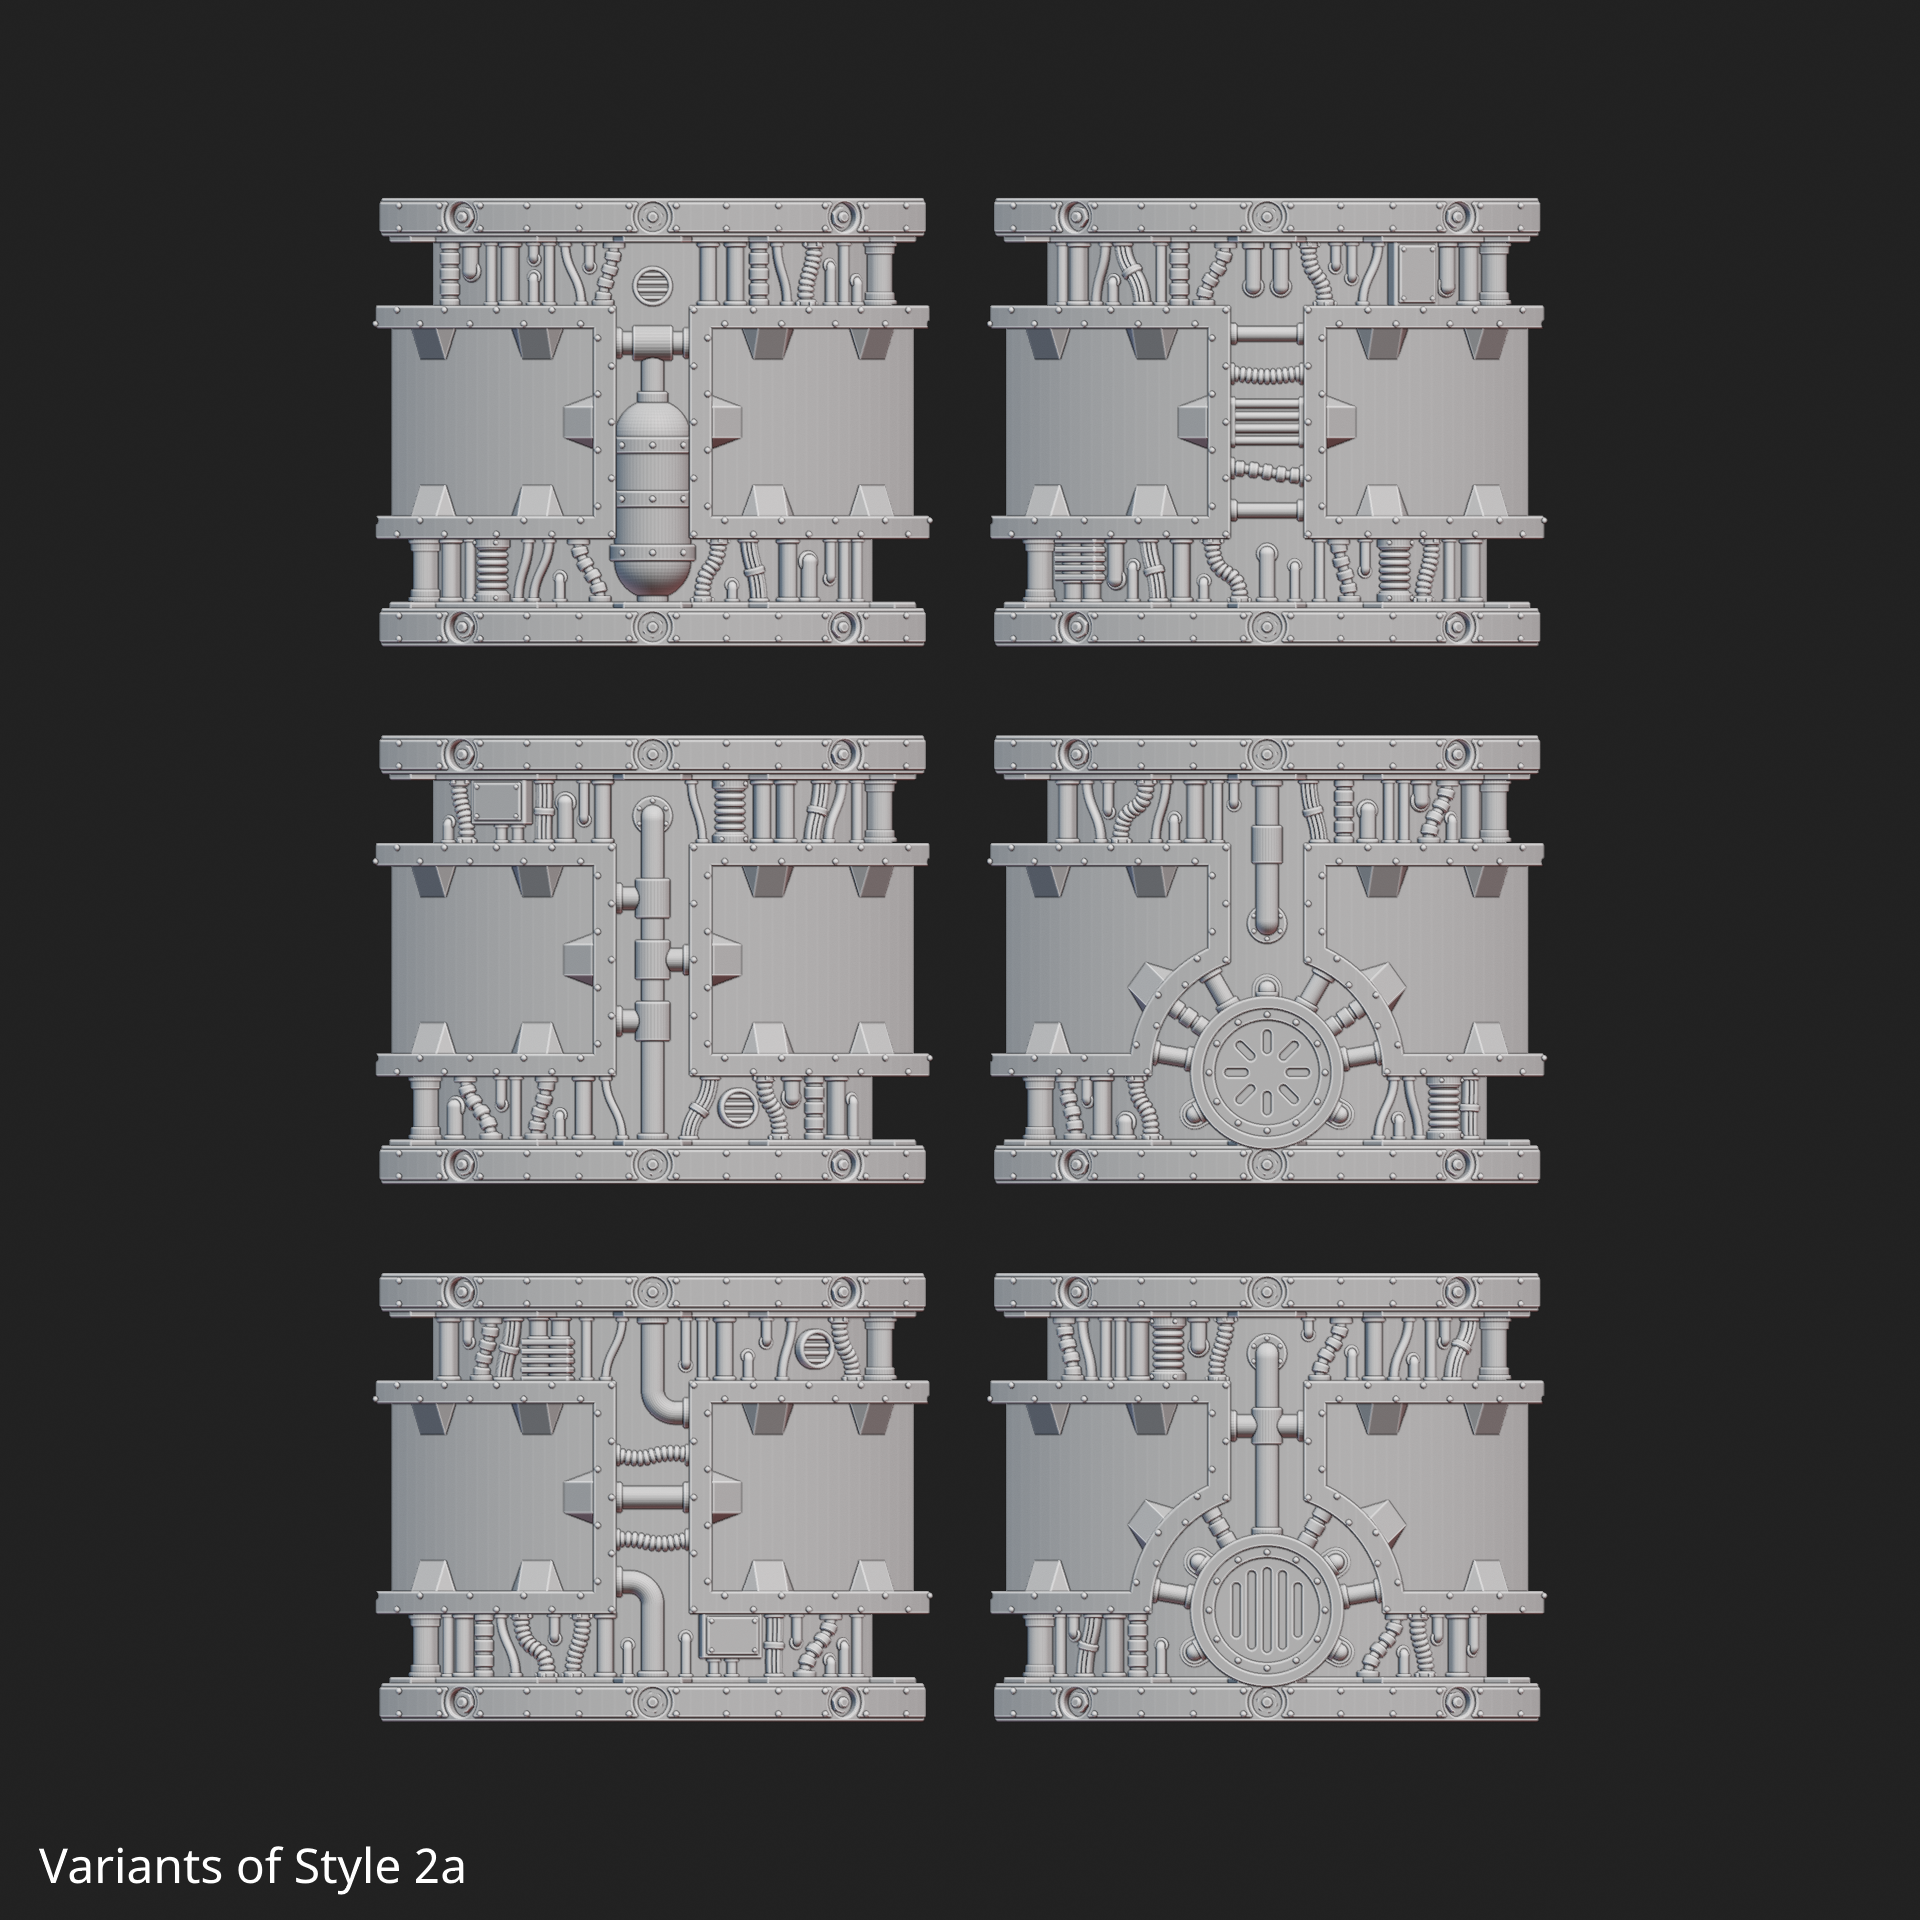
Styles
There are 2 major "styles" of cylinder segment:
- Style 1 - little mixing tanks at the top, similar to on the regular Furnace. Style 1 cylinders are designed to be this way up. Putting them the other way up will make the gauges and the skull icon upside down.
- Style 2 - designed to look fine either way up
- 2a has varied details between the panels
- 2b has horizontal pipe details between the panels, reminiscent of a detail on the regular Furnace. 2b segments do not have pipe connectors.
- Continuous type segments have no panels to have anything between, so they have no distinction between 2a and 2b, and just have 2 instead.
Variants
A variant refers to different greebles. The variants for styles 1 and 2 are not directly comparable, but within each style you'll notice the same (or very similar) elements are present for a given variant number.
A variant with a "p" indicates it has a pipe connector. These pipe connectors are functionally comparable to those on the Furnace. You will need a flange adaptor (as found in many SM kits, or available as STLs from a couple of sources) to connect them to a regular pipe/conduit/whatever, or to another cylinder/Furnace/dome/whatever (in which case you'll need a flange for each side). Just as with the regular Furnace, the face of such a flange will be 61mm horizontally from the centre point of the cylinder - standard dimensions. The centre point of the pipe connector is 14.5mm from the ground, the same as Thermic Plasma Conduits, Sec Mech terrain, countless other GW grimdark-future terrain pieces with pipe ports.
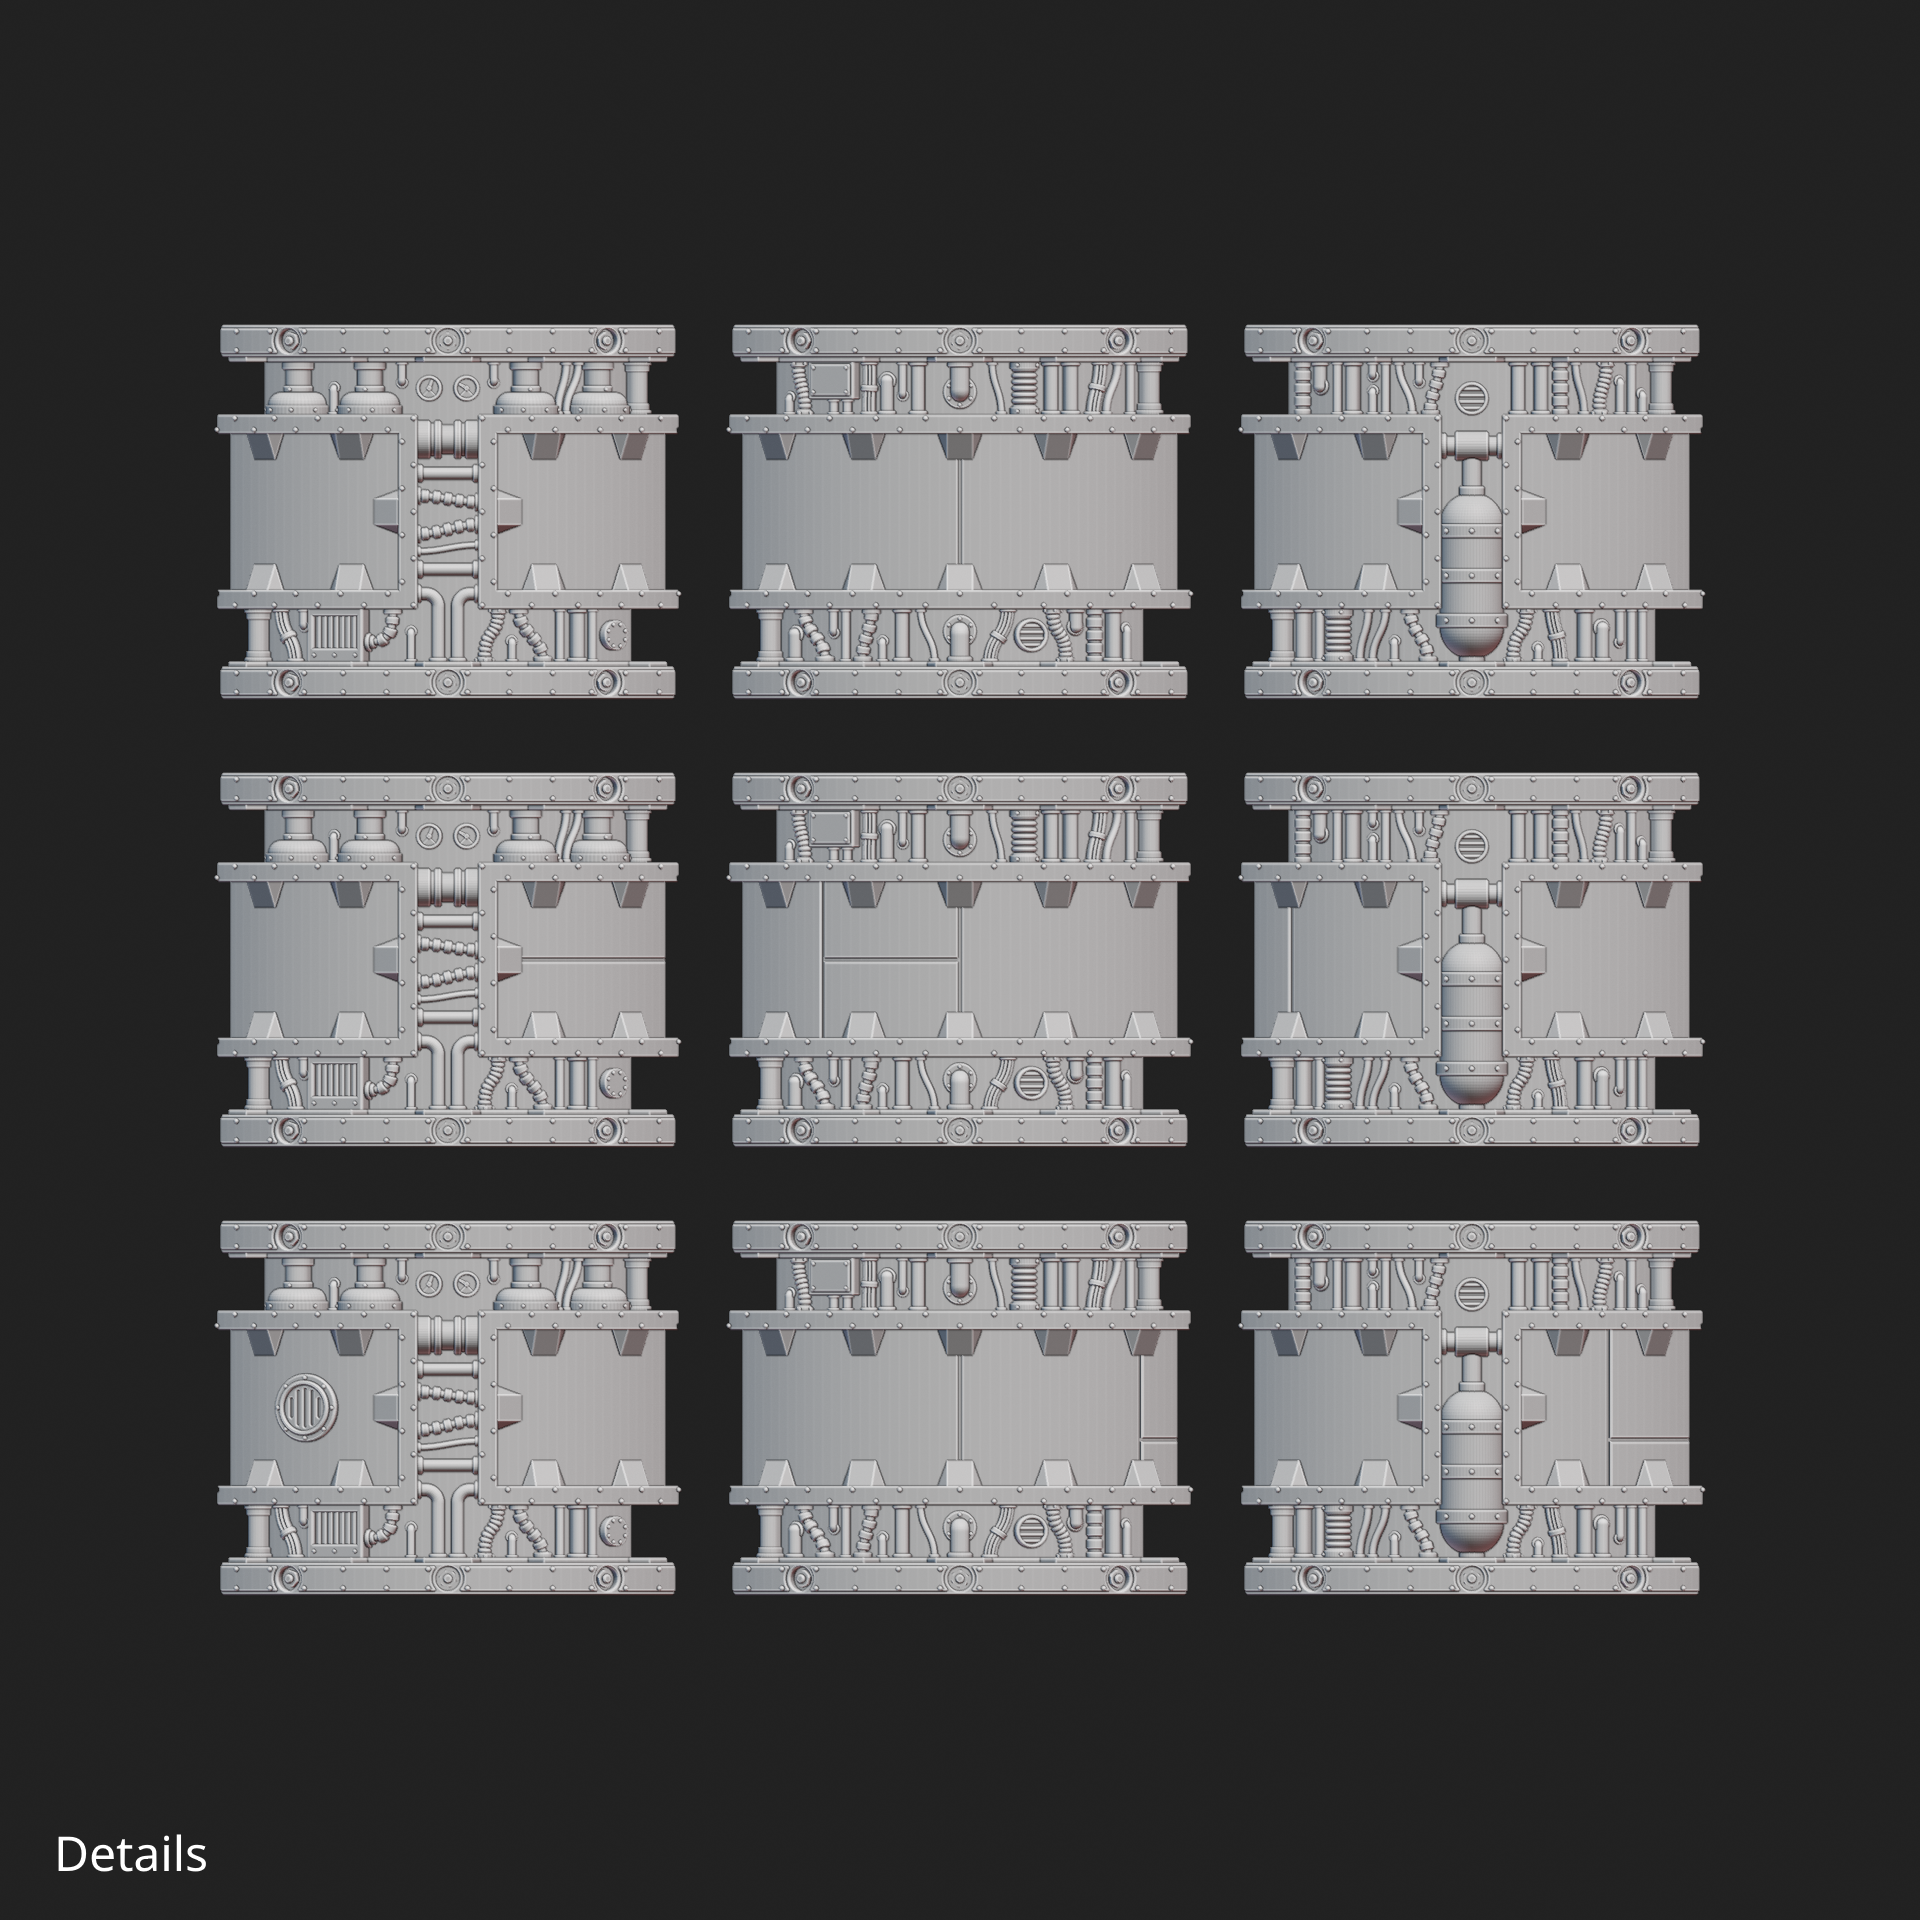
Details
Details are just minor variations to the panels themselves - mostly a little variation in panel lines. Details 0 means no additional details at all.
The number is not meaningful - details option 1 for one segment may not match details option 1 for another. They are mostly similar between pieces that differ only in height and/or type, though continuous and segmented types may express the same details slightly differently.
Filenames
So, putting all that together, I've grouped the cylinder sgements in subdirectories, but the filenames explain their full lineage.
For example, the file named cylinder_segment_HrTsS2aV5pD1 is:
- Height: Regular
- Type: Split
- Style: 2a
- Variant: 5p (so it has a pipe connector)
- Details: 1
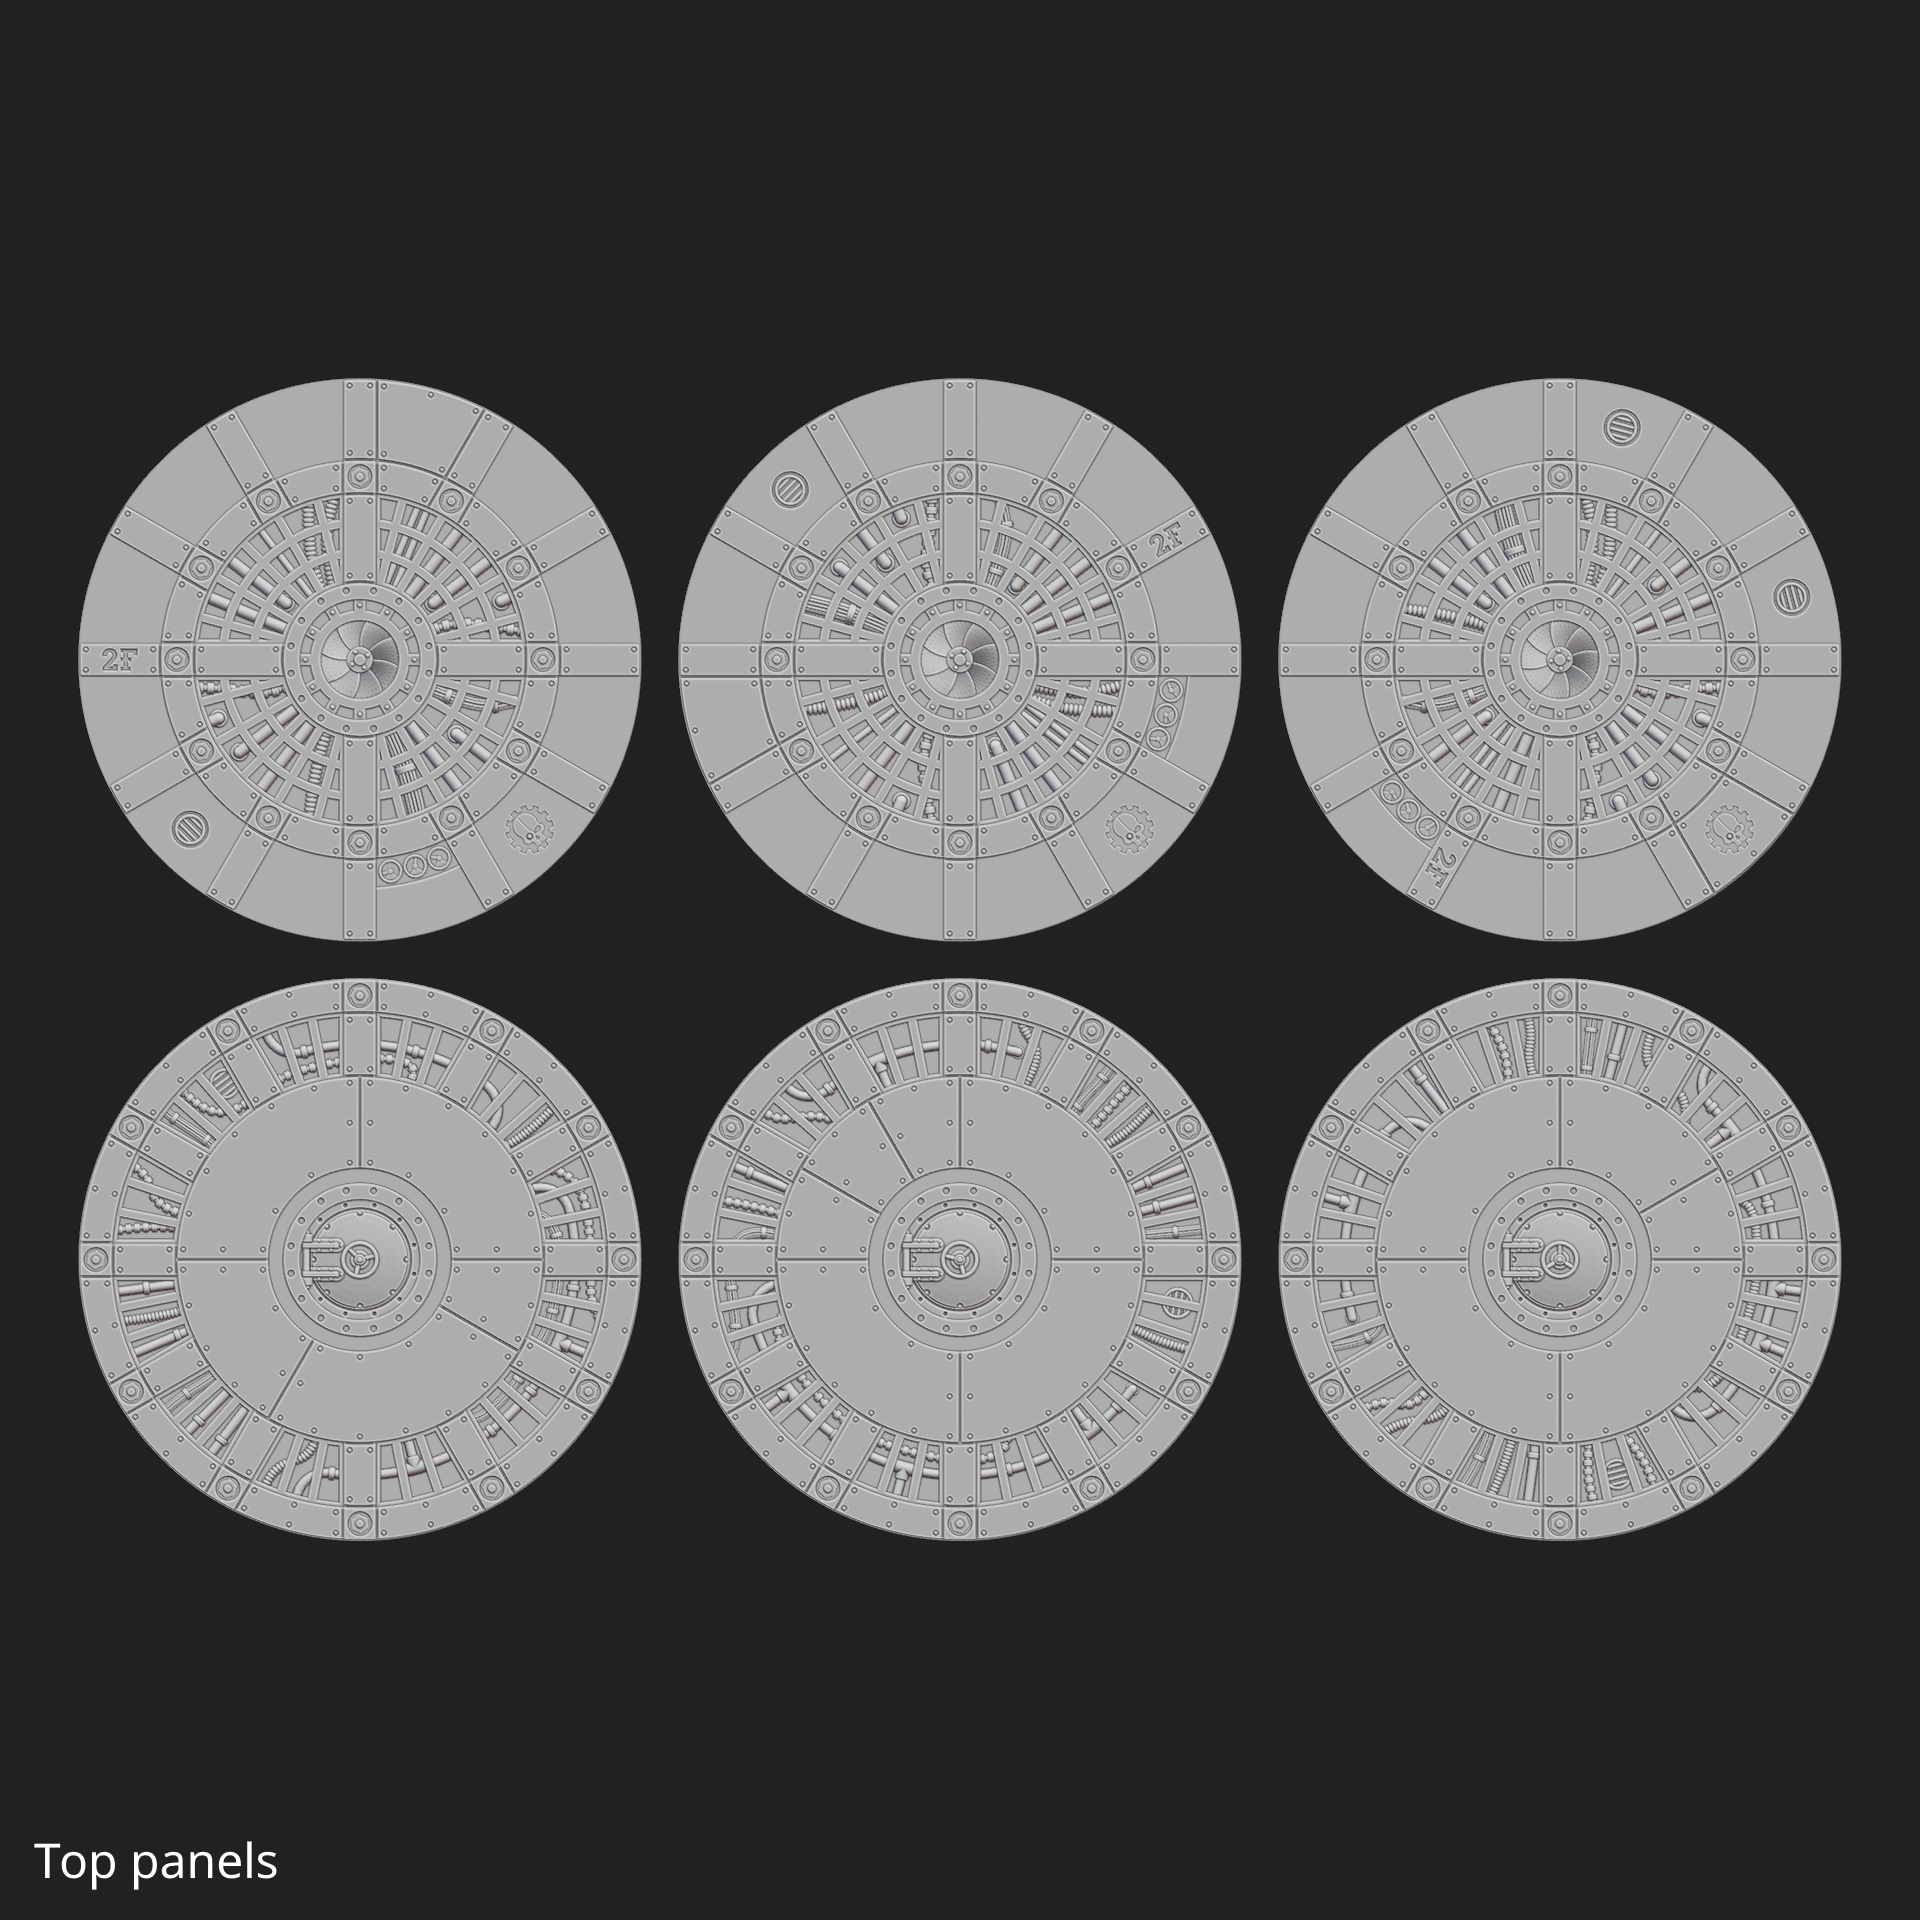
End Panels
If you are stacking these with platforms, then these are entirely optional. If you ever want your cylinders to look OK with nothing on top, then I recommend using a top panel. The base panel is extraneous unless you are magnetising (see below) or just want a bit of extra solidity.
There are 2 major variants (1 and 2), each with 3 minor variants (a, b and c).
Spacers
A spacer is 5mm high, which is the same as a regular platform tile. These may be useful to you if you want to stack these little cylinders to make a bigger one. See notes on cylinder heights, above.
If you wish you can obviously also use these to stack regular Ferratonic Furnaces or Alchomite Stack domes with each other and/or this cylinder. One of those domes is 61mm high, so a short cylinder plus a spacer plus a dome will together be 122mm high - i.e. the same as a regular Furnace, or SM pillars.
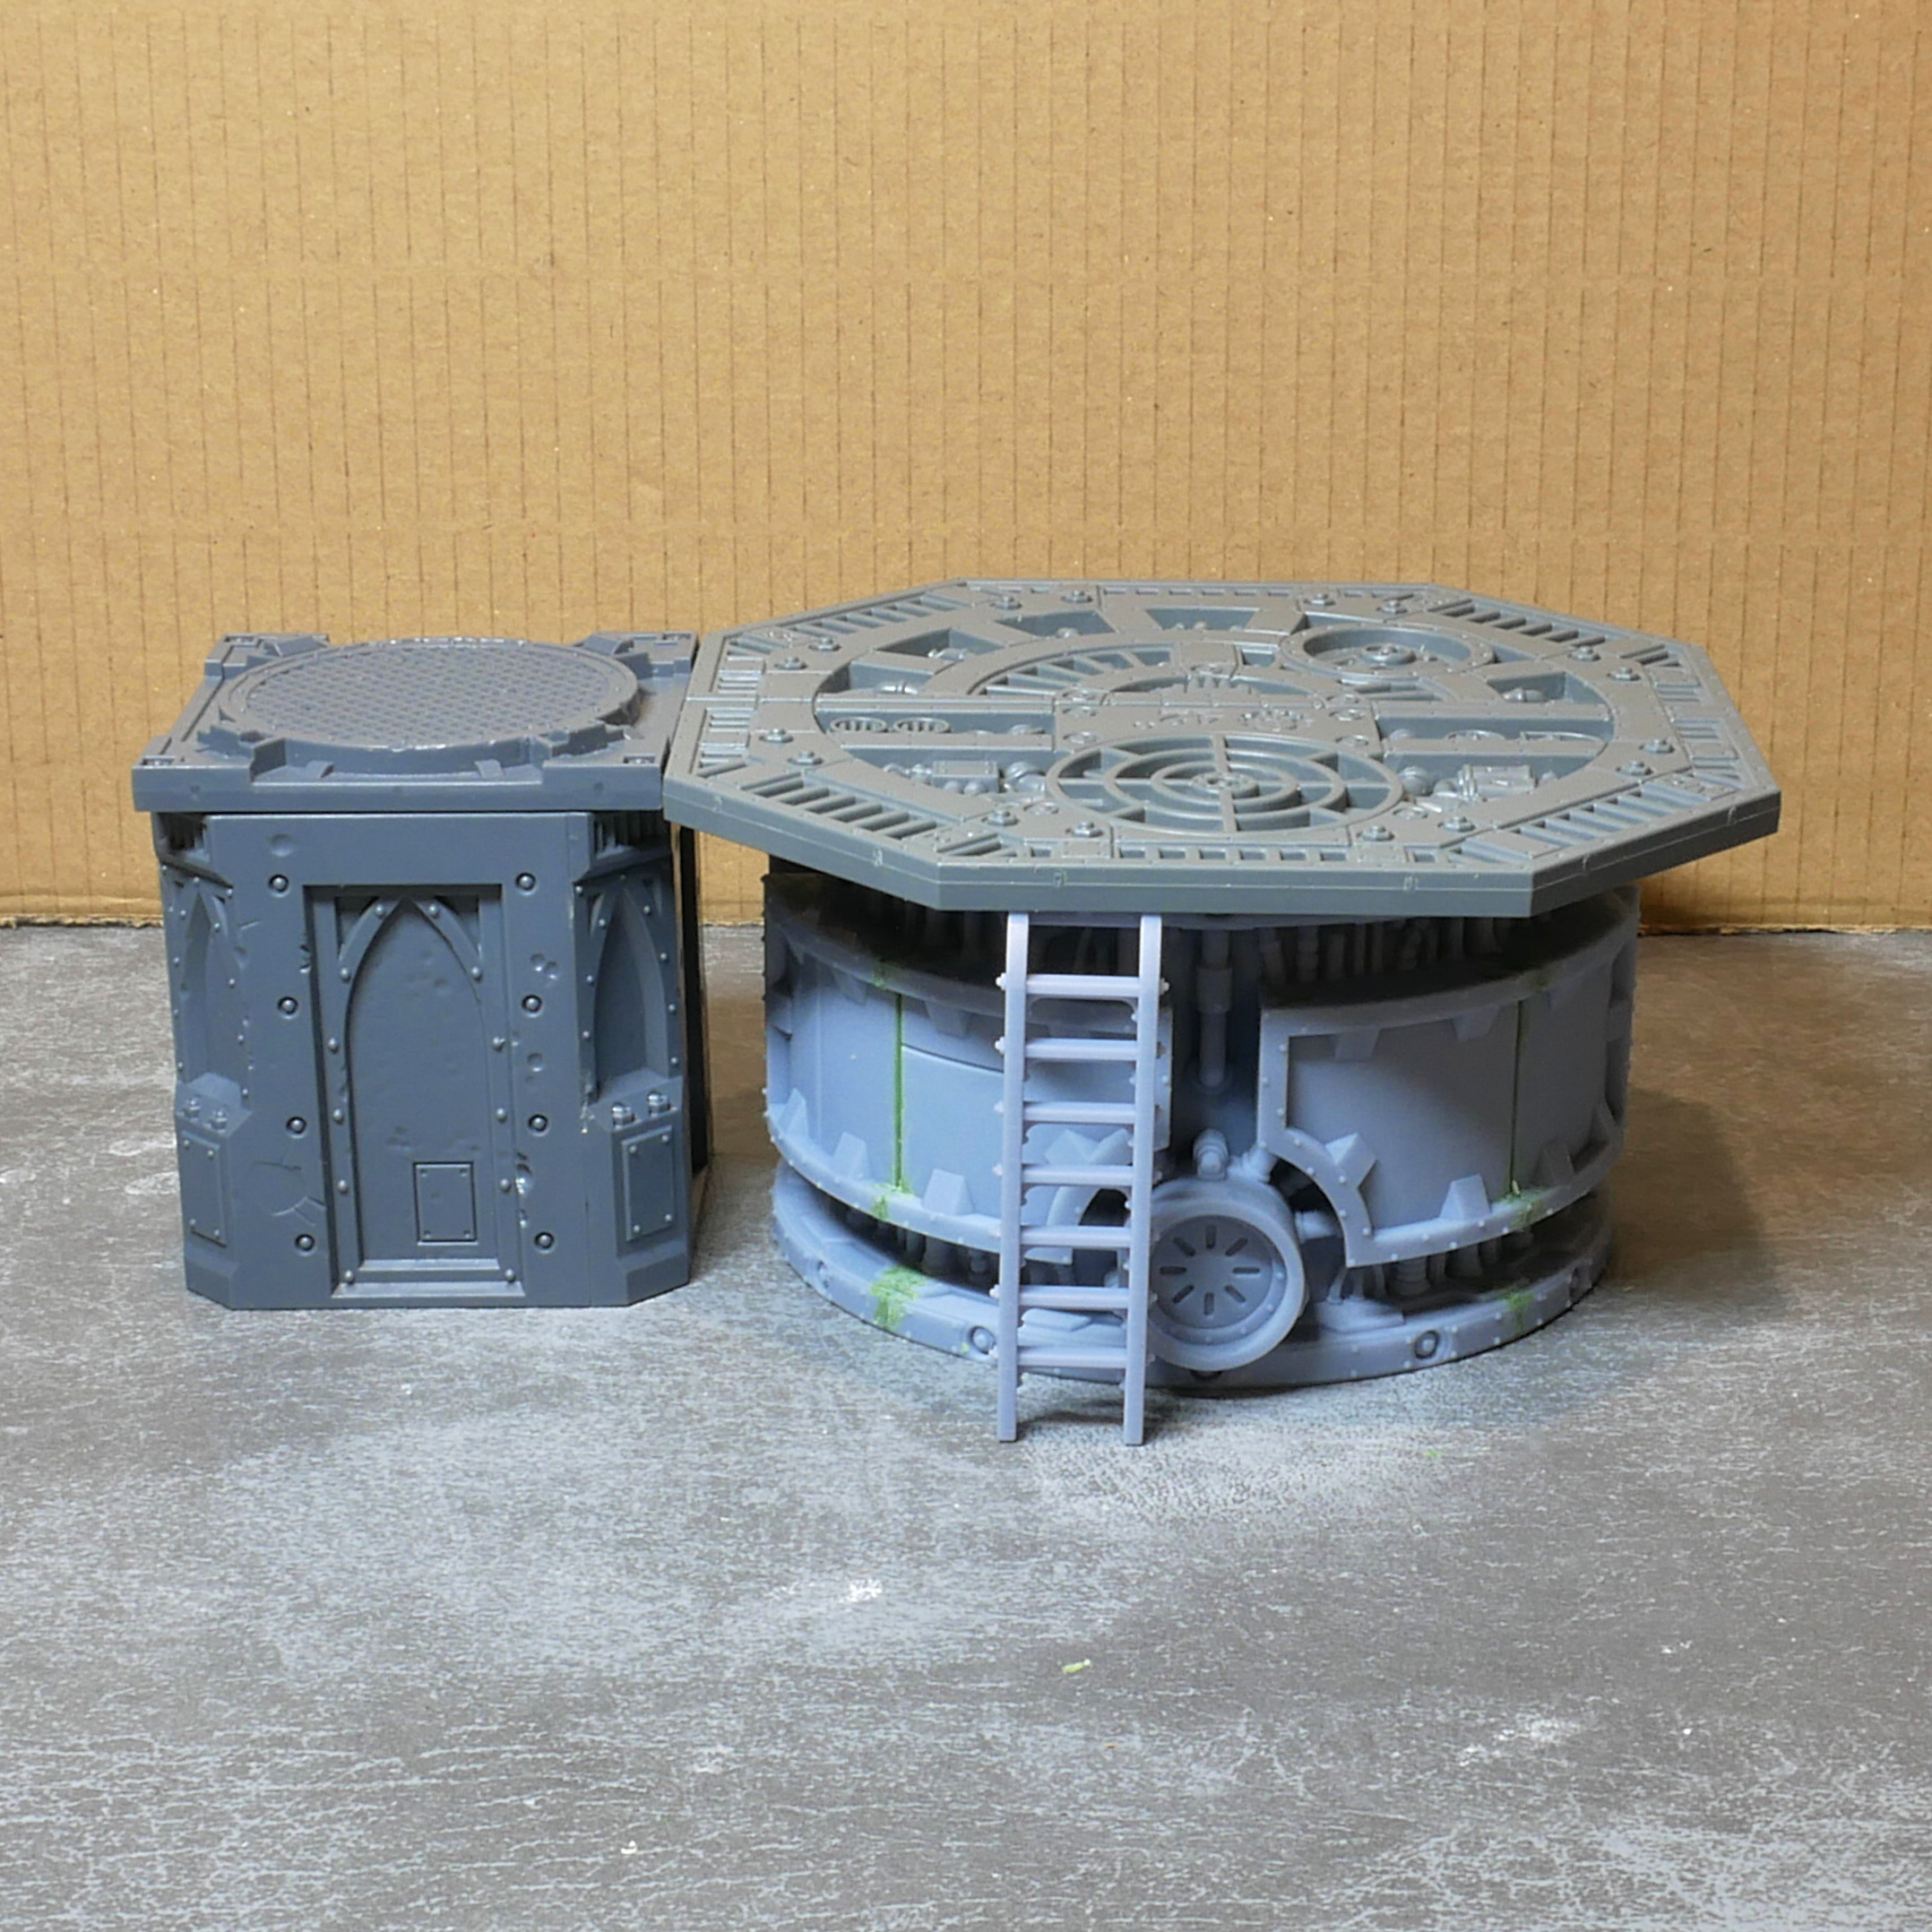
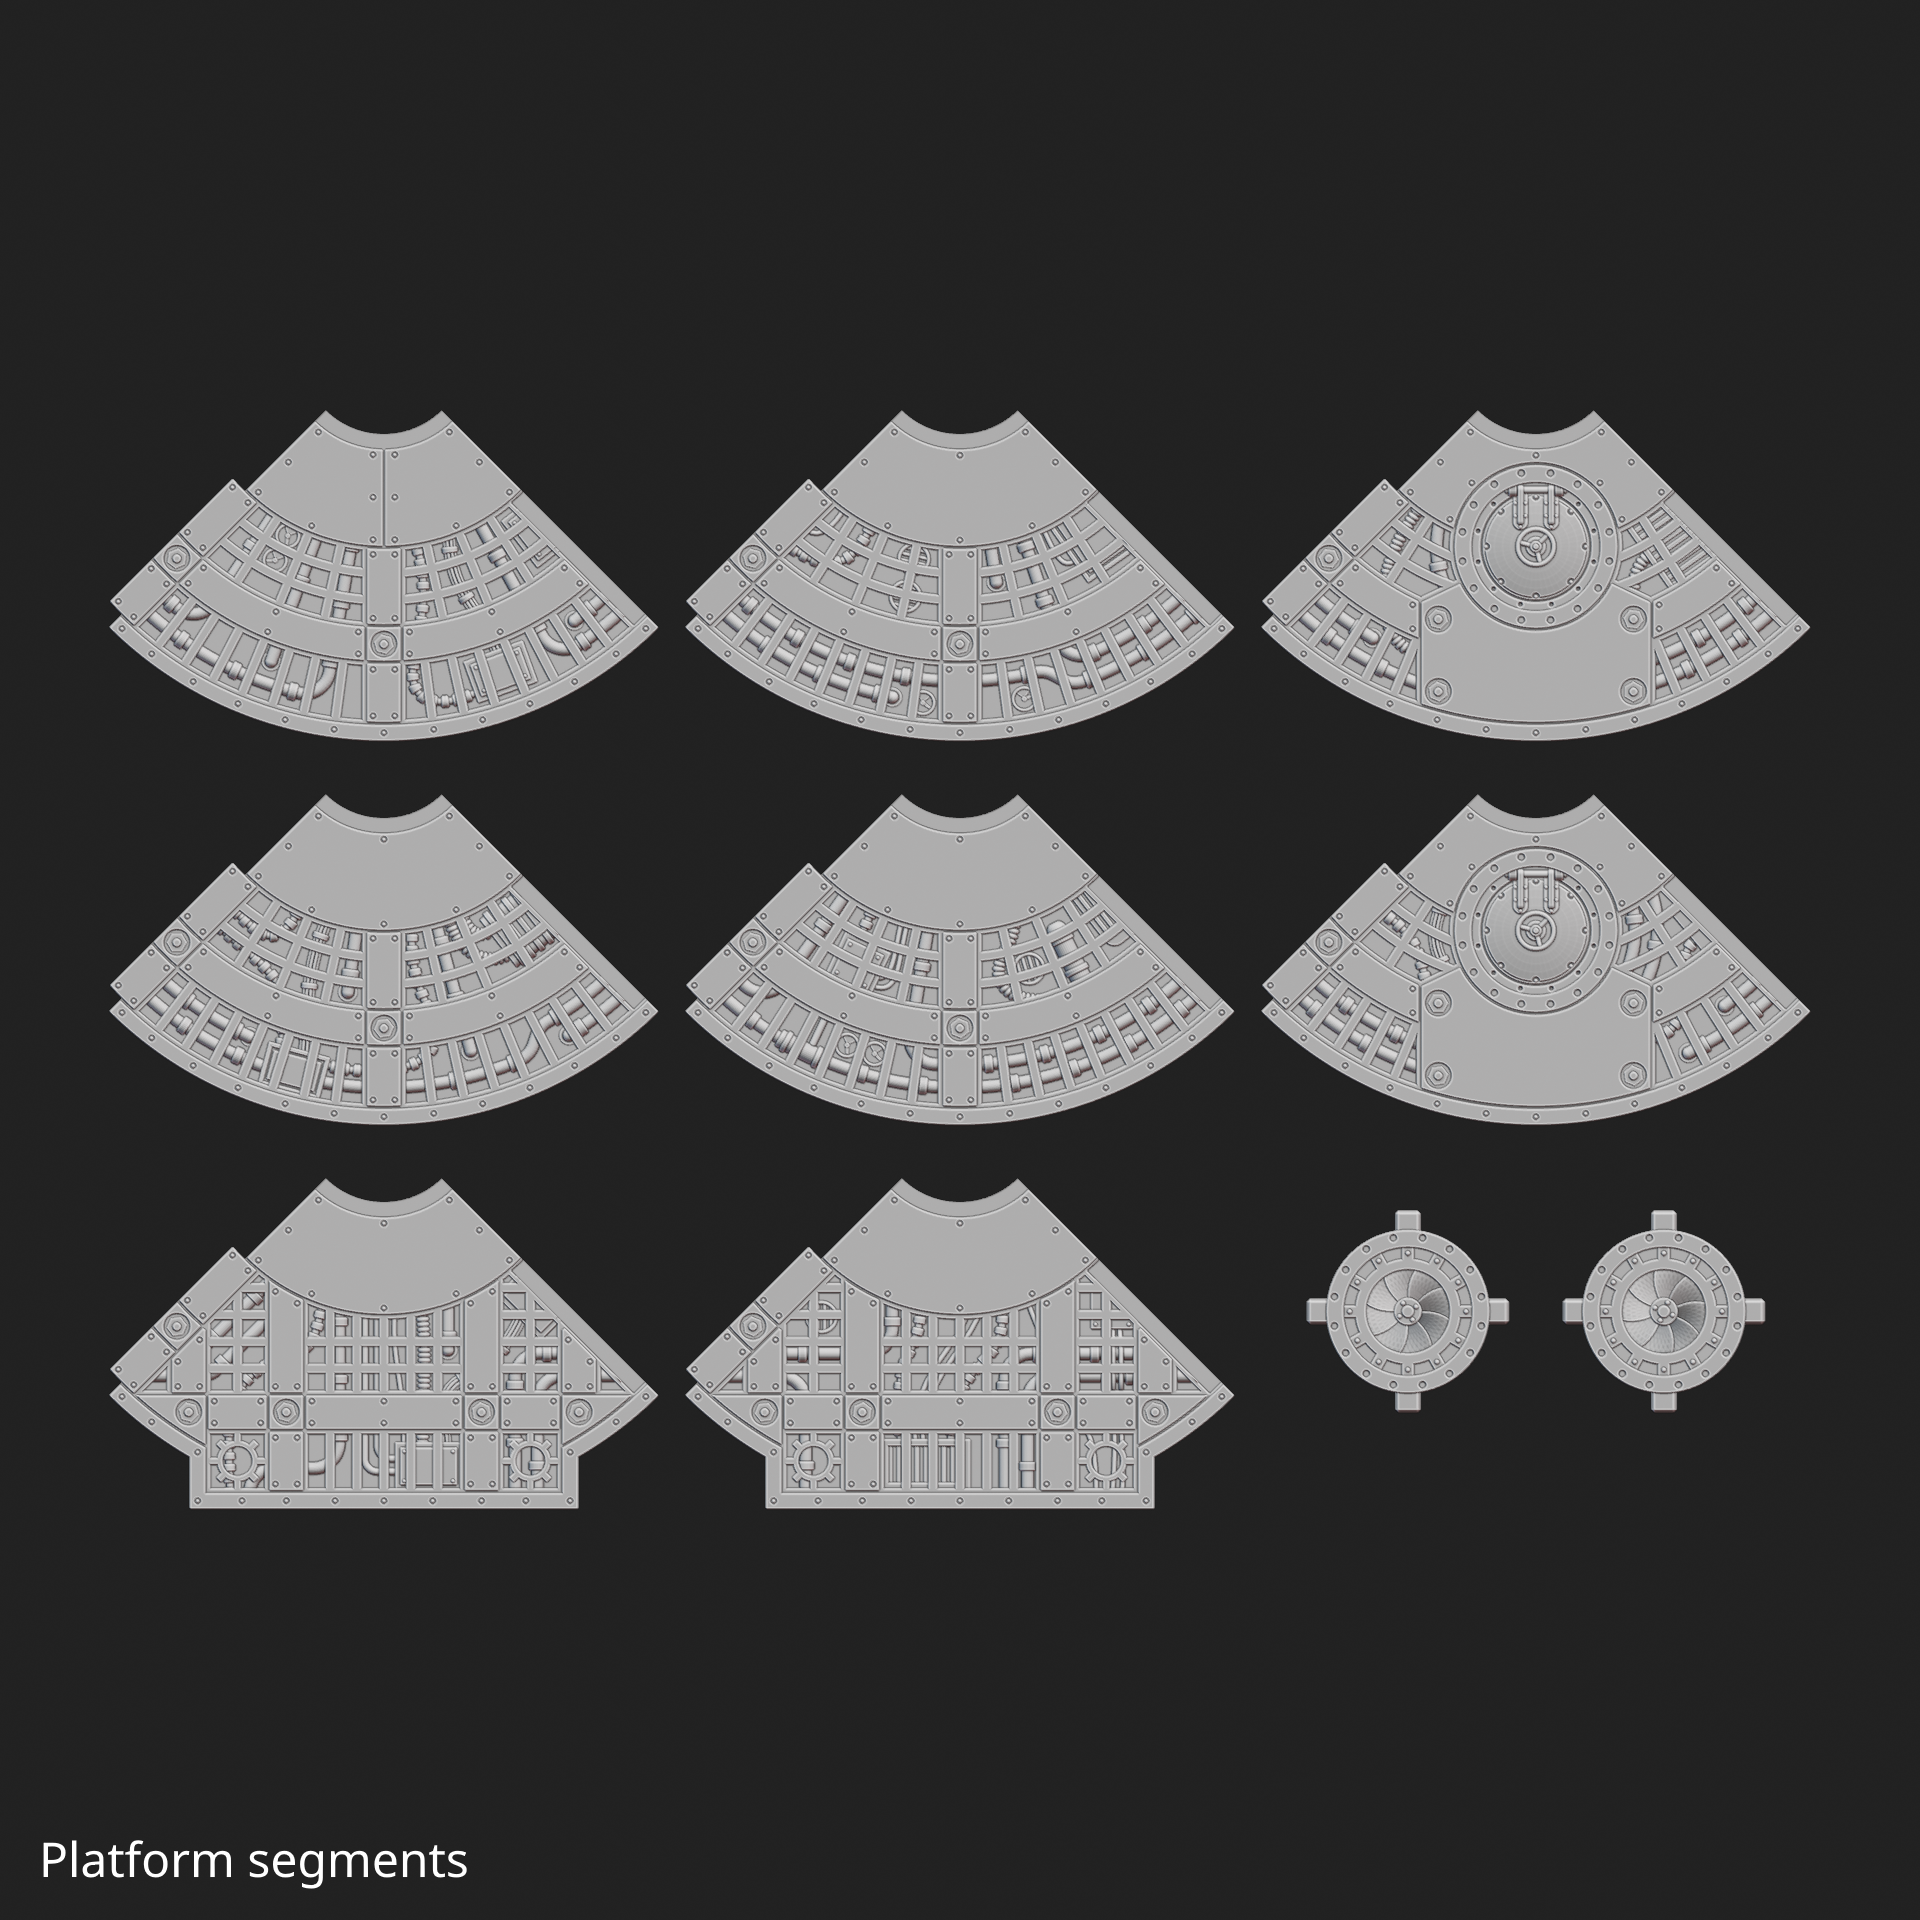
Platforms
You can use a standard Sector Mechanicus platform with these, just as you would for a regular Furnace. The mini lugs on the SM octagon will fit this cylinder as normal. If you want to make sure regular SM platforms align square with the cylinder, you can print octagon_platform_adaptor_plate.stl , which will both help join the tiles together, and locate on the cylinder segments. For an octagonal tile, you will need 2. For other tiles, which have more holes on the underside, you can use 2-4.
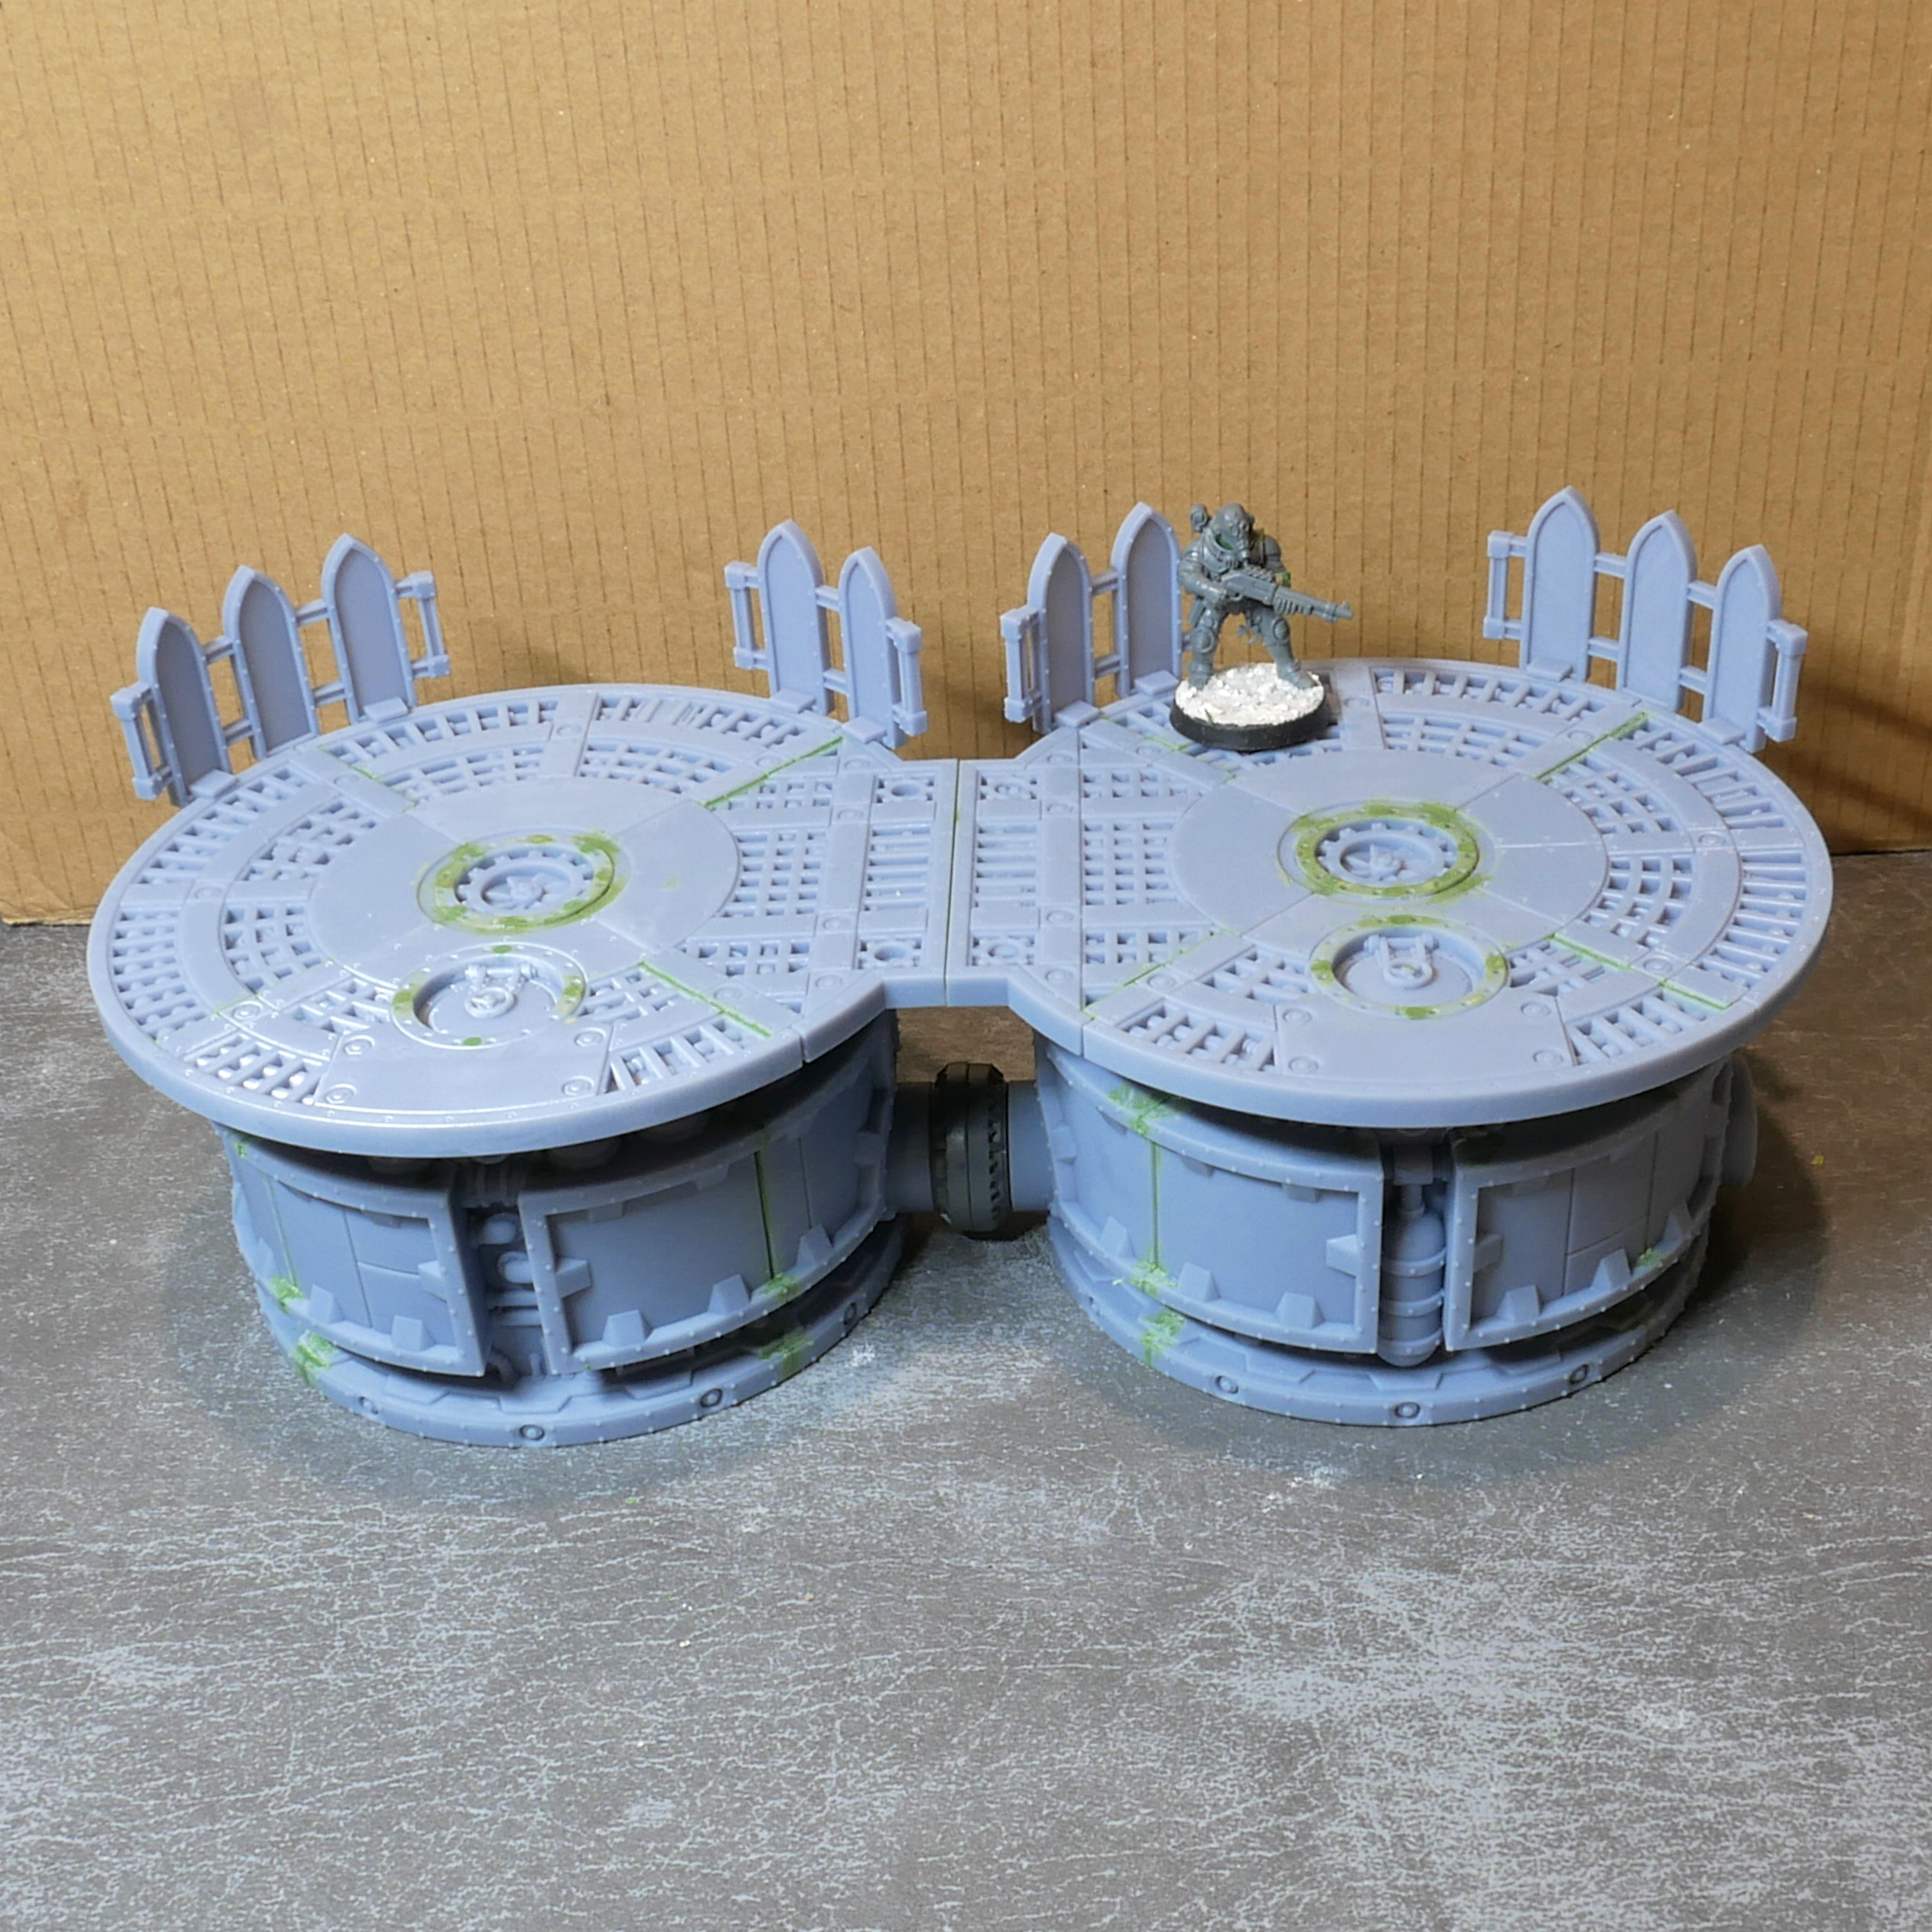
In this collection you'll also find round platforms, which you can use with this cylinder or other SM terrain. To make a full platform you will need:
You can use any segments you want - all are compatible with each other in any order and combination.
- End segments can connect to standard rectangular walkways.
- Port segments have little ports on, if you want to put plasma conduits or chimneys or whatever on them.
- All other segments are just plain round quarters.
The centre port is another standard pipe connector for other GW pipe type pieces.
Mirrored segments will only fit with other mirrored segments - but it's another option to get a bit more variation.
Segments should locate together by themselves. mini_join_plate.stl is optionally available to join them, or to use in positioning them.
There are numerous holes underneath for compatibility with other SM platforms. Other than the end piece, such holes are a little idiosyncratic in position. The intervals are consistent, and it made sense to me, but your mileage may vary.
If you want this round platform to align square with this cylinder, then print 2-4x round_platform_adaptor_plate.stl. They fit into the holes on the underside of the platform, and locate on the cylinder segments. They cannot be used together with the mini join plates.
If you want to use this platform with a regular Furnace, you may wish the print the versions with lugs - these are small protruberances on the underside just like the regular SM octagon tile. I'll admit I haven't printed these myself, but the measurements should be right. Just like the regular octagon tile, these lugs form a fairly loose fit with a cylinder/Furnace, and so can jiggle a bit, and rotate freely.
Balustrades
Provided are balustrades that fit around the round platform (or indeed any other round platform with 122mm diameter).
They are available with arched panels (much like the stock SM ones), or squared panels (simpler, just rectangular).
The number in the filename indicates the number of panels. 3 is the SM standard, but you can have 2 or 5 if you wish.
Assembly
I recommend that you have at least 1 top or base panel printed. This will help align the body segments. You do not have to glue the segments to this panel to use it for alignment.
My method was to hold the panels all together, and then squirt superglue along the inner joins. It infiltrated the gap between the pieces just fine. Superglue (CA glue) bonds 3D printed resin ridiculously fast, and in my experience is stronger than the resin itself, so this method avoids the pitfalls of joining pairs of segments and then finding a misalignment later. Another option would be to use slow-acting glue (a godsend for larger multi-part resin assembly).
Supports
I have provided supported files for everything I printed (and pieces that were functionally identical, e.g. slightly different surface details). This means there are supports available for all regular height split cylinder segments, plus all platforms, end panels and the 2&3-arch balustrades.
Are my supports perfect? No. I advise caution. I provide no guarantees that these supports will be good enough for you. If in doubt, support them yourself.
The cylinder segments are designed so that supports can be placed almost exclusively on non-visible, non-mating surfaces. Surface details are, broadly speaking, relief (I took my cues from the injection-moulded originals), and so require no supports as long as they're facing away from the build plate.
Finishing
My pieces came out slightly warped. I deemed it good enough, and elected to fill the gaps with Kneadatite (green stuff). You can see this on the photos; I'm not hiding it! If you are better at supporting than me, or have a more rigid resin (possibly a thicker layer height would also help - I used 0.03mm), then you may have less warping. If it comes out dimensionally perfect, you'll have 0.1mm gaps between segments to fill as you see fit. Mine were not dimensionally perfect, and so had gaps - the worst offender was 0.9mm at the largest extent.
Likewise with the platforms, some warping will result in a bit of filling needing to be done. I considered it acceptable. If you can print with less warp, then you'll have a better time of it.
Magnets
There are many pieces that are optionally available with magnet holes. You'll see files with mag in the file name. This is, frankly, idiosyncratic. I wanted this option, but I'm not sure anyone else will. But, hey, it's an option.
The holes are designed for 2x2mm cylindrical magnets.
All such pieces on pipe ports in this set are vertical, so if you are careful to have all magnets pointing in the same direction, everything will be compatible. This includes stacking cylinders, if you use base plates and top plates. To use the magnets on the underside of the round platform, it will need to be flush, and so join plates cannot be used.
I have also used them on the end platform pieces. For full switchability, these magnets should be facing in opposite directions.
For placing the magnets, I made myself a little jig/fixture thing, found as pipe_mag_jig.stl in the end_panels folder. After placing a few individually, I definitely found it easier to place several at a time with this, and guarantee alignment.
As you can see from the photos, if you want to use magnets and still have the pipe ports all smooth, then you'll have to use modelling putty. It wasn't fun, but it was a rod I made for my own back.
Pricing
I have initially given this set a modest price tag. As you may imagine, it took quite a bit of time and effort! I hope you'll see it as fair - contact me if you disagree. If you want to pay more than the minimum, that would be most welcome, but is entirely up to you.
I make no guarantees about its future price point - I reserve the right to share this for free at a later date, though I have no plans to do so at this time. If it still has a price here, it isn't available anywhere else in its entirety for free. If I ever do that, this page will also be updated.
I have shared a sample subset of the pieces for free, on this site and/or elsewhere - enough parts to make a single cylinder. If you want to try before you buy, go get that. Then, if you want waaaay more options, come back!
I have been careful, but if you see any faults with the files or have any dissatisfaction (supports excluded!), do let me know.

/https://fbi.cults3d.com/uploads/user/avatar/45647158/at.png "sister_matic")


:format(webp)/https://fbi.cults3d.com/uploaders/45647158/illustration-file/314caa70-8f46-465b-afb6-381133e51d07/overview_render_1.png)
:format(webp)/https://fbi.cults3d.com/uploaders/45647158/illustration-file/e7c42c2a-746a-44c5-9188-0f06a0d6e15c/side_photo.jpg)
:format(webp)/https://fbi.cults3d.com/uploaders/45647158/illustration-file/7cad0c32-a63b-464a-b3f7-df02fe3eb2c8/vent_demo.jpg)
:format(webp)/https://fbi.cults3d.com/uploaders/45647158/illustration-file/f47b481e-b40d-411d-b88d-42605f3540ca/sample.jpg)
:format(webp)/https://fbi.cults3d.com/uploaders/45647158/illustration-file/f99a21d9-c2a6-4ad8-9783-fb2f0020790d/panels_overview.png)
:format(webp)/https://fbi.cults3d.com/uploaders/45647158/illustration-file/c3f0f305-2ecc-4e58-bb94-8b350c4356ce/buildings_render1_2.png)
:format(webp)/https://fbi.cults3d.com/uploaders/45647158/illustration-file/bd70f77b-ca69-470e-8607-c370bcc96ea2/bunker_print_1_front.jpg)
:format(webp)/https://fbi.cults3d.com/uploaders/45647158/illustration-file/eba30139-0e95-4b72-87d4-f9a9e3ddf875/photo_1.jpg)