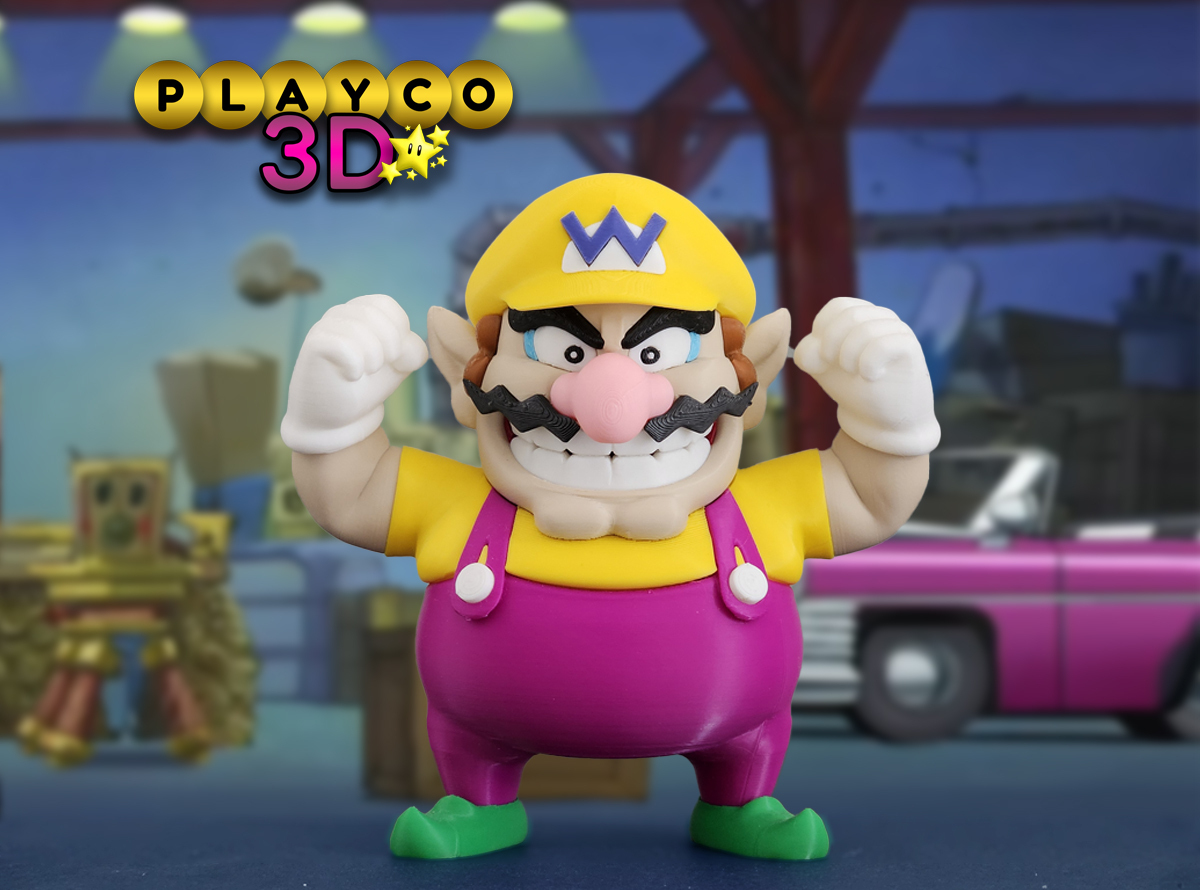
Introducing the ultimate 3D print for any Nintendo fan: Wario! Known for his mischievous grin, bold mustache, and trademark "W" cap, Wario comes to life in a whole new way with this 3D model. This print captures all of Wario's classic details, from his iconic outfit to his tough-guy stance, making it a standout piece for collectors. Whether you’re a Mario fan or just love Wario’s unique personality, this 3D print is the perfect addition to your collection. Bring a little bit of Wario’s chaotic energy to your desk or shelf!
Dimensions:
Wario stands just about 6.25 inches (158mm) tall and 6.5 inches (165mm) wide at 100% scale. Scaling down may pose some issues as tolerances could change especially with the small parts. Scaling up about 2x shouldnt pose much of an issue.
Different print options for Wario's Hat
If you have an AMS, you can print the hat in two colors to achieve the authentic look with a yellow and white bill.
Alternatively, you can print the hat in a single solid color.
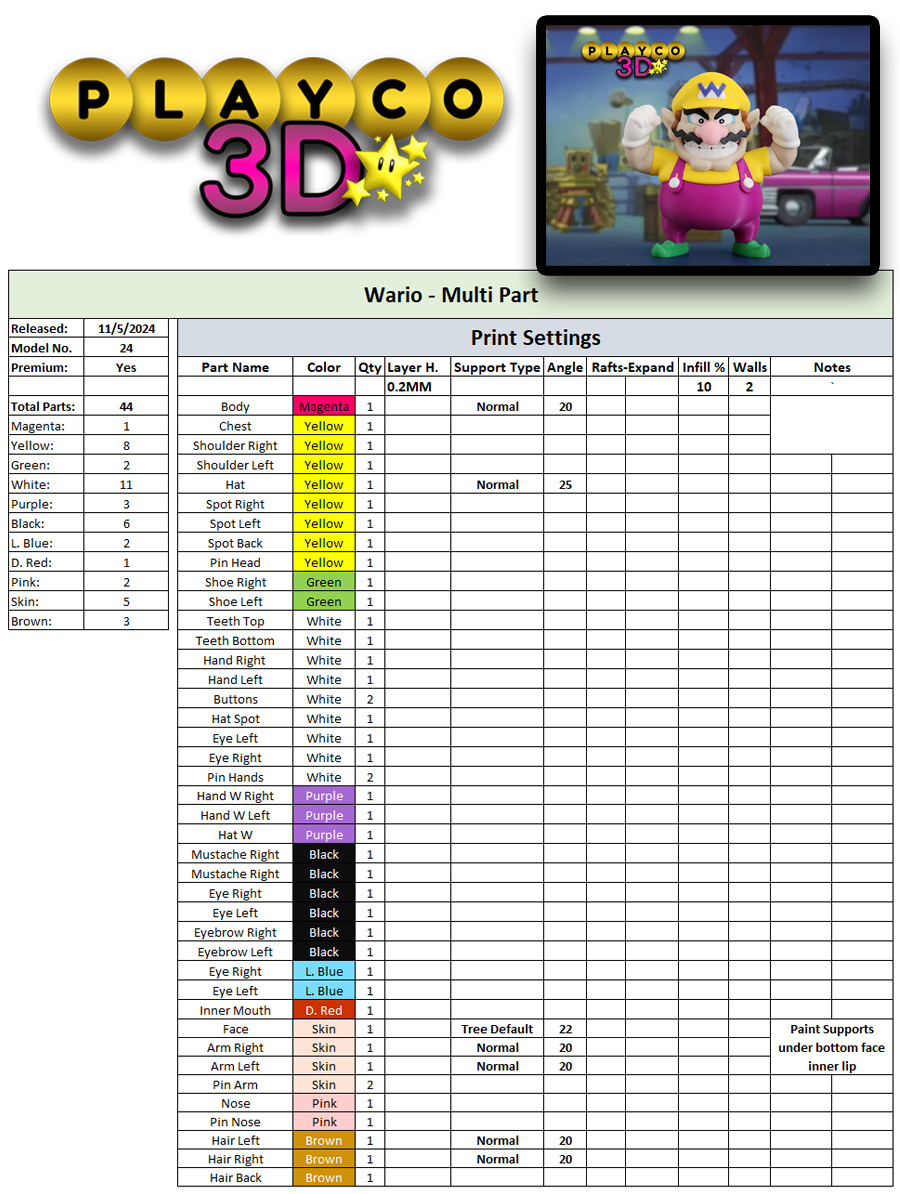
Colors Used:
Elegoo: Yellow, Sky Blue, Brown, Matte Beige, Pink,
Elegoo PLA Pro: Green
Creality Hyper Series: Purple (not the super bright version) and Very Peri
Bambu Matte: White
Bambu: Black
Esun: Fire Engine Red
Printing Tips:
Supports: Please refer to the print settings picture.
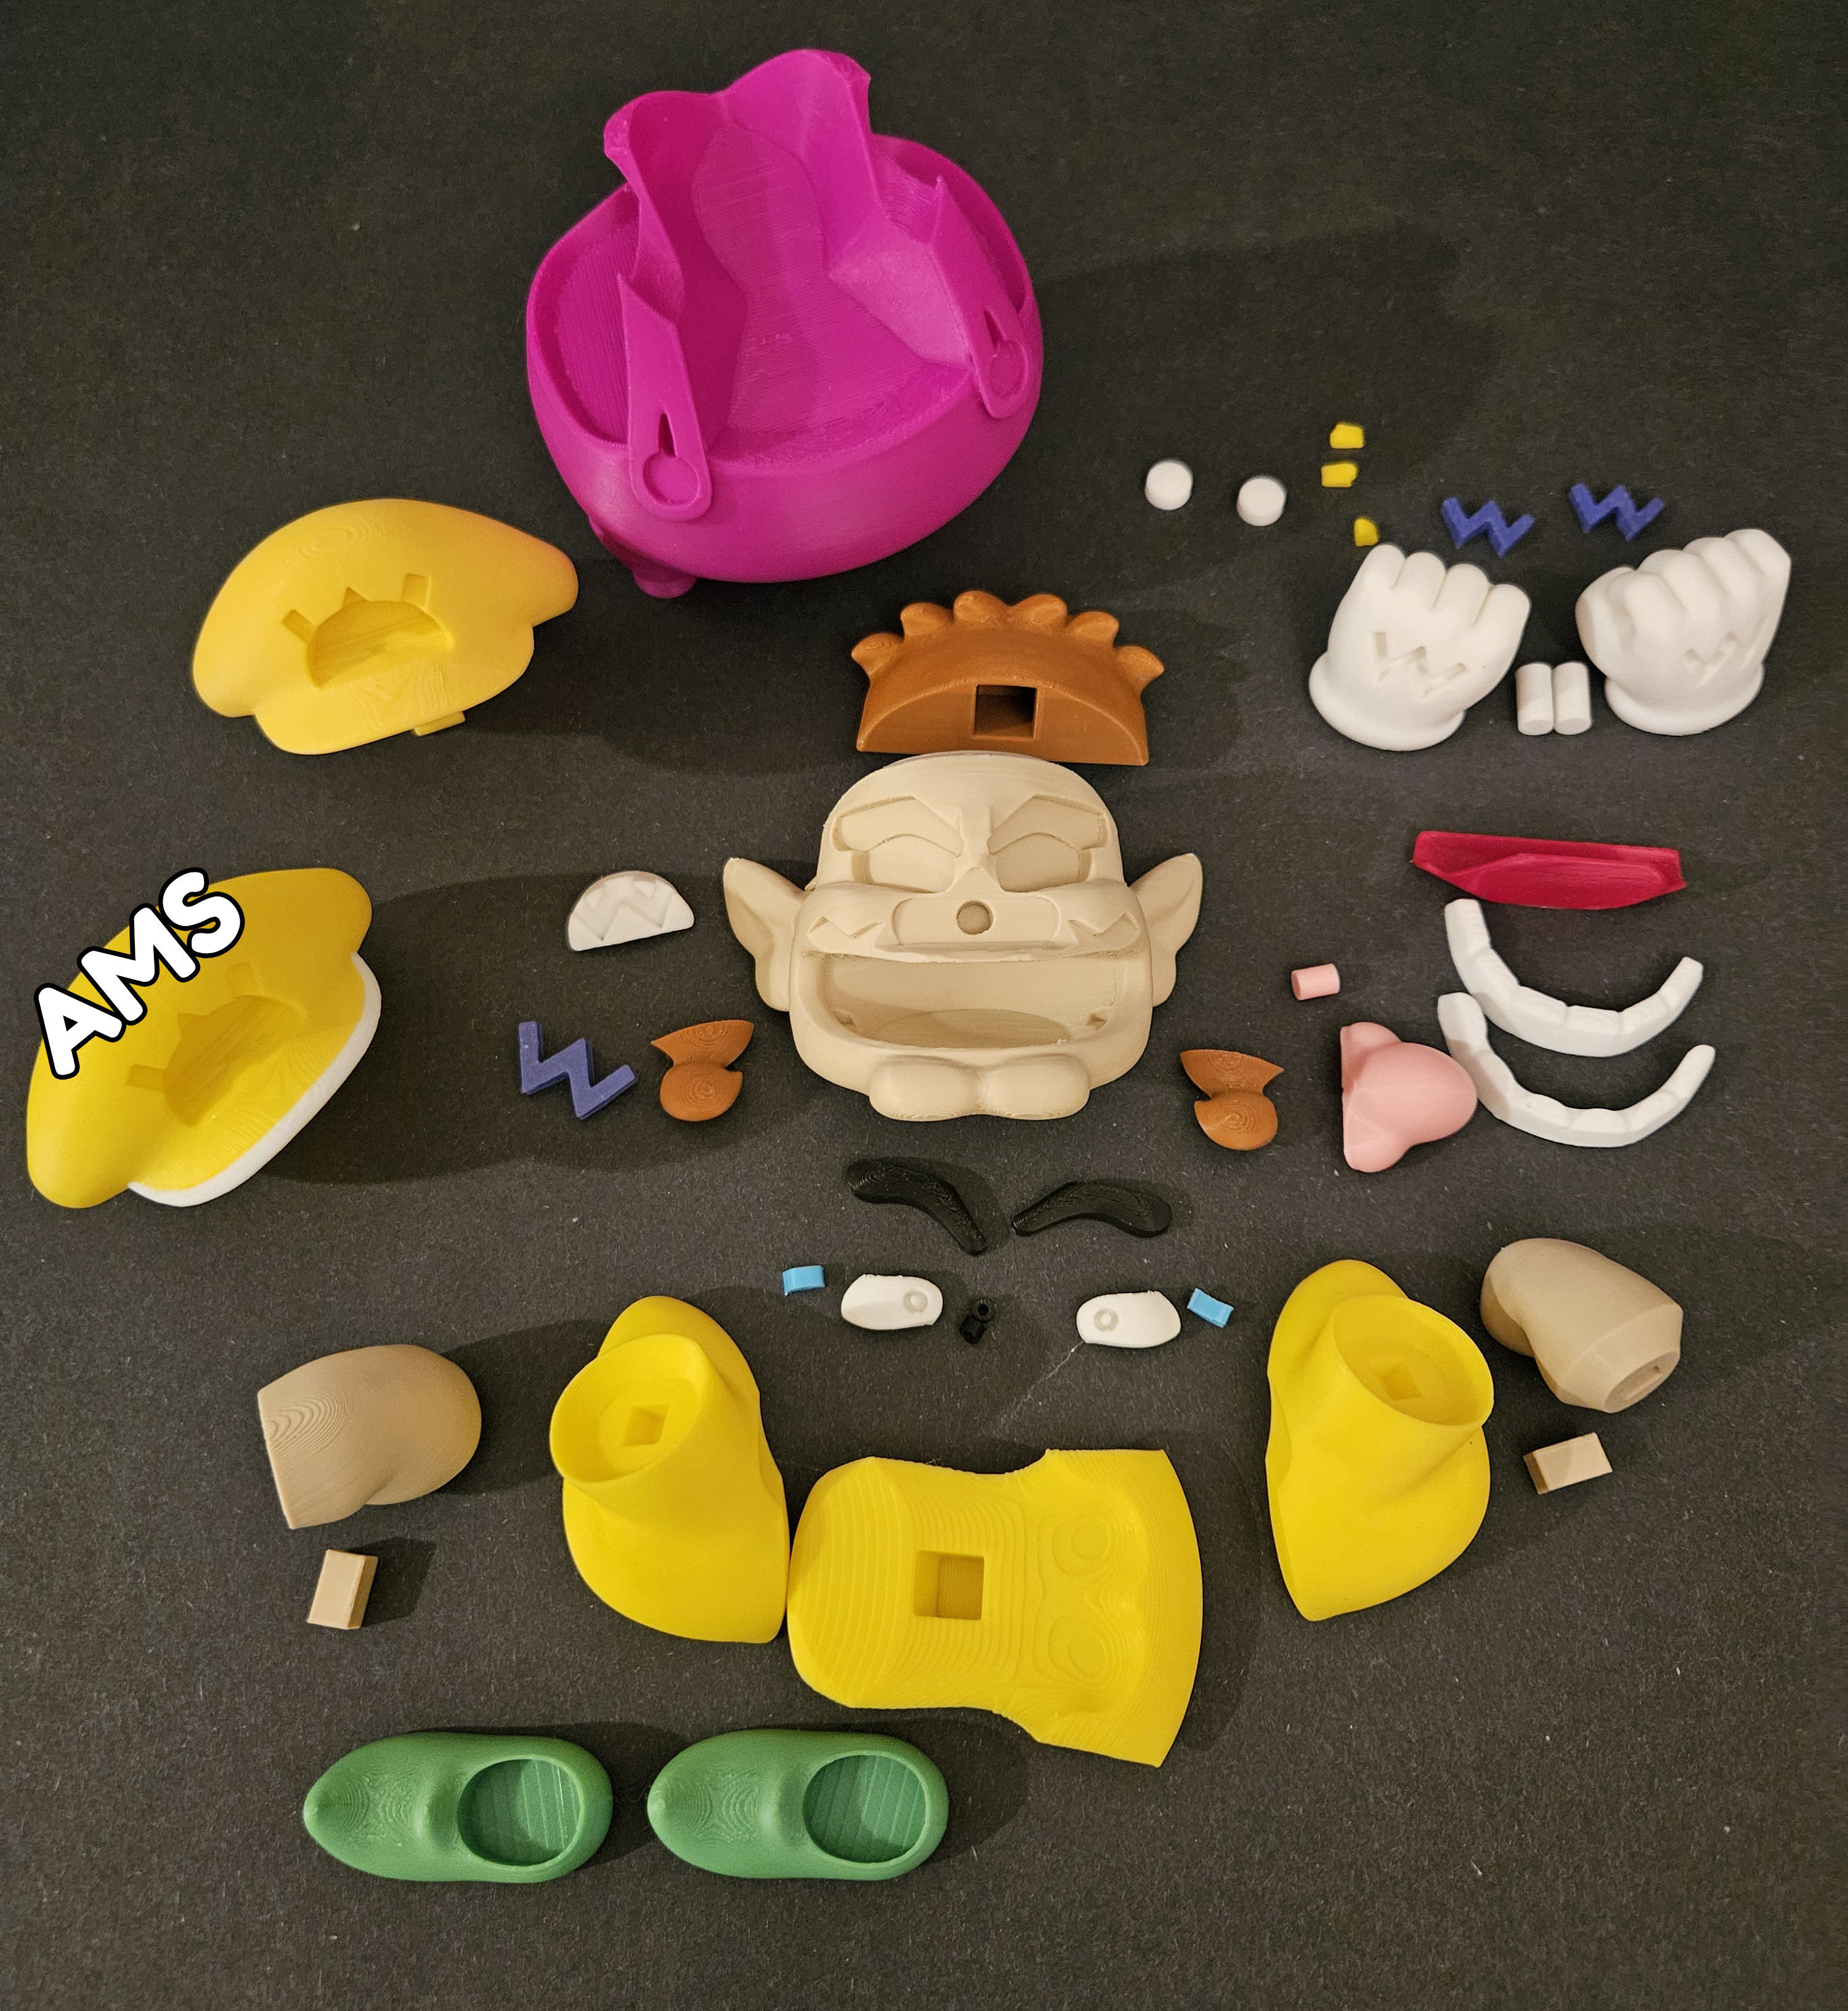
Assembly Tips:
For additional assistance, refer to the pictures in the download folder for the teeth assembly.
The top teeth are marked with a circle. Start by aligning and gluing the teeth together. Then, insert the red mouthpiece into the face (no glue needed). Once the teeth are fully glued, line them up with the mouth and press firmly into place.
Insert the small yellow spots on the pants before adding the white buttons.
Be mindful of the left and right purple "W"s for the hands, as they fit differently.
Assembly Steps:
Shoes and Pants: Glue the shoes to the pants.
Chest and Shoulders: Attach the yellow chest piece and yellow shoulders to the pants.
Arms: Insert the arms into the yellow shoulders using the pins.
Hands: Insert the purple "W"s into the hands, ensuring the left and right are correctly placed. Then, attach the hands to the arms with the pins.
Yellow Spots and Buttons: Glue the small yellow spots onto the front of the pants and one in the back. Then, glue on the white buttons.
Teeth: Assemble the teeth according to the provided pictures.
Nose: Attach the nose using the pin.
Mustache: Glue on the left and right mustache pieces.
Eyes: Glue the eyes in place, starting with the white part, then inserting the blue side pieces.
Eyebrows: Attach the eyebrows above the eyes, firmly press in.
Hat: Attach the white and purple "W" to the hat, then glue on the back and side hair pieces, and finally attach the hat.
Complete the model by attaching the head to the body with the pin
Your 3D-printed Wario is complete! With his signature mustache, "W" hat, and bold expression, he’s a fantastic addition to any collection. This figure brings classic Nintendo charm to your space—perfect for fans and collectors alike. Enjoy your new Wario!
Thank you very much for printing and building Wario! Happy printing!


:format(webp)/https://fbi.cults3d.com/uploaders/35213599/illustration-file/8108a4f1-471c-42df-bd20-92d542fd6c5c/Luigi-1-new.jpg)
:format(webp)/https://fbi.cults3d.com/uploaders/35213599/illustration-file/d3ead95d-4dc5-4a22-9336-a423dbbf2e70/Dry1.1.jpg)
:format(webp)/https://fbi.cults3d.com/uploaders/35213599/illustration-file/d52f2785-e078-4d71-ad1f-5c5498b63e14/Zombie1.3.jpg)
:format(webp)/https://fbi.cults3d.com/uploaders/35213599/illustration-file/cb678fca-e791-453e-b718-36c1173675ec/Marge-1.jpg)
:format(webp)/https://fbi.cults3d.com/uploaders/35213599/illustration-file/14d9ffd3-73e8-4f72-9e9a-002cf01278b2/Mega-1.jpg)
:format(webp)/https://fbi.cults3d.com/uploaders/35213599/illustration-file/606566e5-88fa-41cc-b7bb-e3df45b9b9f4/Wal1.jpg)
:format(webp)/https://fbi.cults3d.com/uploaders/35213599/illustration-file/ce69be69-80e9-4dde-941e-1b8166500589/Funky-1.jpg)
:format(webp)/https://fbi.cults3d.com/uploaders/35213599/illustration-file/b173b6ca-2bf9-4040-b7a7-47d6ed5ecc44/Jr.-1.jpg)