3D model description
Your support means the world to me! It helps cover the costs of materials, prototyping, and keeps me motivated to continue creating and sharing innovative designs with the community. Thank you so much!
Project Description
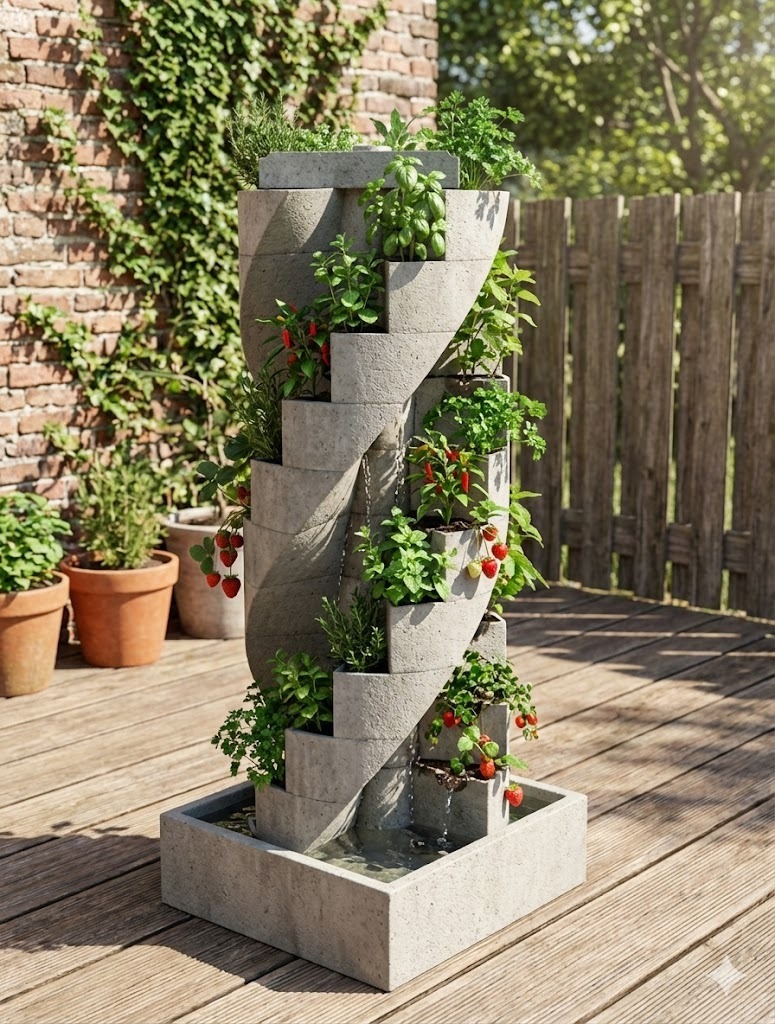
Welcome to the Modular Concrete Hydroponic Tower project. This is a 3D printed mold system designed to create a robust, aesthetic, and functional vertical growing tower. It was created to avoid the fragile look and high cost of commercial plastic towers, offering a sophisticated spiral design that you can build yourself.
This project is divided into 4 essential parts. Please read carefully before printing.
PART 1: Introduction, Concept & Important Warnings
This project is the result of dozens of hours of engineering and 3D modeling. I decided to create something 100% original, focusing on the durability of concrete and the beauty of the spiral design.
⚠️ Development Notice (Beta):
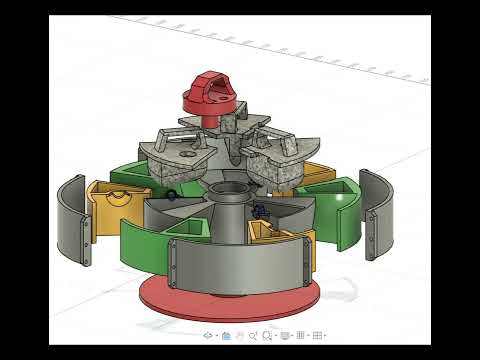
Due to the massive scale of this project and the hours required for printing the molds and curing the concrete, a full physical test of the assembled tower has not been possible yet. However, everything was designed with extreme care and validated through manufacturing simulations in Fusion 360 to ensure correct fitment and draft angles.
General Recommendations:
- Material: I strongly recommend using fiber-reinforced concrete (for structural strength in the thin walls) or high-quality concrete with a waterproofing additive.
- Mold Finish: The secret to success lies here. SAND the printed parts well to remove layer lines.
- Release Agent: Do not skimp on this. Use plenty of oil, Vaseline, or industrial release agent. Concrete copies everything; if the mold is smooth and well-oiled, the part will come out perfect.
- Electronics: The system is simple. There is a pass-through hole in the center of all modules. Place a submersible pump in the base and run the hose up through the center of the tower to the top.
- Note on Images: The realistic images in this post were rendered using Google Gemini AI solely to illustrate the visual potential of the final project.
🎥 IMPORTANT: Watch the explanatory video on YouTube to see assembly details and engineering tips: https://youtu.be/5oHmqrMxwfU
PART 2: The Base
The base is the foundation of the system and serves as the reservoir.
- Gold Tip: When pouring the base, the inner part of the mold (the core) will want to float due to the buoyancy of the liquid concrete. Place plenty of weight on top of the inner mold before and during the pour to keep it in place.
- Center Piece: Do not forget to position the disposable/spacer piece in the center (if applicable in the design) to ensure the water passage hole remains open.
- Check the YouTube video to see the correct mold fixation technique for the base.
PART 3: The Module
This is the heart of the spiral design.
- Preparation: This is a complex mold. Before pouring any mix, ensure the internal faces are sanded and extremely well lubricated with oil.
- Attention to Detail: Check the comments on the individual STL files here. There are specific instructions regarding print orientation.
- Demolding: Be patient. If you sanded and oiled the parts, the conical/spiral shape should facilitate removal, but proceed with care.
PART 4: The Top & Hardware
The final piece that crowns the tower and distributes the water.
- Mold Assembly: All molds are designed with 8mm holes in the flanges.
- Hardware: You will need 8mm (M8) bolts and nuts to close the molds tightly. Tighten them well to prevent liquid concrete from leaking through the sides.
- The top piece is responsible for receiving water from the hose and gently distributing it to the first spiral module.
Conclusion:
This is a challenging project, but with an incredible visual reward. If you print and test it, please post a "Make" and leave your feedback. Let's perfect this tower together!
Happy printing and happy casting!
3D printing settings
PLA, abs, petg, any filament
:format(webp)/https://fbi.cults3d.com/uploaders/32750543/illustration-file/a9e38449-ddd0-495c-8ca0-67ca6be82a77/unnamed-8.jpg)
/https://preview3d-images.cults3d.com/drnvwj9adeqiq9nsymzvx6r7iq26)
/https://preview3d-images.cults3d.com/k6ec5y7ddn3uumcyhmw6uaog70ni)
/https://preview3d-images.cults3d.com/v23lu83z1n17m17w0zz3hnl66q7z)
/https://preview3d-images.cults3d.com/kwlwqamfmb6nsafuhx9o5vbinlol)
/https://preview3d-images.cults3d.com/o0tp9btp5oyvq8j3e6tykcxiorfs)
/https://preview3d-images.cults3d.com/mxrmuva0u4bhs7f63bwa5n1omll4)
/https://preview3d-images.cults3d.com/094zpemeodgh5plumg4o9gasad04)
/https://preview3d-images.cults3d.com/7bo5t89as1ufrtbw9qktgb5agqwr)
/https://preview3d-images.cults3d.com/zioi7awh2gqb4qzflkzy4w3b8l8z)
/https://preview3d-images.cults3d.com/jhmp26ic98q3tfnulnky756t7bow)
/https://preview3d-images.cults3d.com/nn8qiibekx6rtugsi6m5bdscmbgu)
/https://preview3d-images.cults3d.com/tl0hzzuskzcjnu5jpbrmwiay1r5y)
/https://preview3d-images.cults3d.com/7ecqrsr7vtzieytex6gul2e6zp6v)
/https://preview3d-images.cults3d.com/i93opuo9yg6bi6kecvbt9ql765v9)
/https://preview3d-images.cults3d.com/bdsfdk8rj0dehjv7pxxjcdak3fcm)
/https://preview3d-images.cults3d.com/xbhc51g99whhozl69dyt5tnva6po)
/https://preview3d-images.cults3d.com/hpz0r4a6ozopg1idaaf3mub0yl2t)
/https://preview3d-images.cults3d.com/g67hmtnwobdqn8526s6qhu4jmtsm)
/https://preview3d-images.cults3d.com/42gfl6nrl38mkg8o53tss3gxistc)
/https://preview3d-images.cults3d.com/mhlf6wlp5d81huwcynmj5k0zbn7c)
/https://preview3d-images.cults3d.com/ucmqnhh8pzmfy7e4nm48absq0c1j)
/https://preview3d-images.cults3d.com/rii7kbp0qd2unwuq19vziyrsaatx)
/https://preview3d-images.cults3d.com/4xs0vsifei0c89qe419pq9il94do)
/https://preview3d-images.cults3d.com/qoeb7fdpcnyij7k1ilnxnesup86e)
/https://preview3d-images.cults3d.com/d8kmvbwm37m7c5uzaycsx57y8rln)
/https://preview3d-images.cults3d.com/cuz0xz5q8xdo27edptjbx2oc0nuc)
/https://preview3d-images.cults3d.com/87weggekz4rtjphn359aqedtvv8f)
/https://preview3d-images.cults3d.com/kt2cqpl9hqubf8u7yx7pmi7qngze)
/https://preview3d-images.cults3d.com/i3zq1bzpv7yvvpgyzx4xzis3988b)
/https://preview3d-images.cults3d.com/i6xdgsdpaq52ypyw7ctvef0xkqt3)
/https://preview3d-images.cults3d.com/sc2uz1l2y1zd2pkrzn6tuw11sxex)
/https://preview3d-images.cults3d.com/awggfaq80a1lo29hupk3nxz08cuv)
/https://preview3d-images.cults3d.com/dvubfk5kr5ak244uwbie5lh27l0b)
/https://preview3d-images.cults3d.com/pqtrfei27gq3ea5q98sn7i4klg8i)
/https://preview3d-images.cults3d.com/dmc598zgvj1rz8riy7ytkr0hiudl)
/https://preview3d-images.cults3d.com/hajyg62nrgnkqi53r4h315xm2q35)
/https://preview3d-images.cults3d.com/kmm7kv268pzp23gtyq24sqfiekwh)
/https://preview3d-images.cults3d.com/6cv9bznwbeox6r8cvunx8az7zqzq)
/https://preview3d-images.cults3d.com/n0x06j4m6j1botjgb4jhntq2ycof)
/https://preview3d-images.cults3d.com/dc122ab8iie0qzvajlwty7c6qj1f)
/https://preview3d-images.cults3d.com/cqwsl760slwoxdtyuo5f3r5sbwoy)
/https://preview3d-images.cults3d.com/8t5wwvdbdaqzvv2q00975ejvisbp)


:format(webp)/https://fbi.cults3d.com/uploaders/32750543/illustration-file/92df6414-b4d5-4a72-9d62-d4806783a05b/09554dd9-dd5c-440a-b001-799808bfcedc.jpg)
:format(webp)/https://fbi.cults3d.com/uploaders/32750543/illustration-file/e1bb733c-5d02-4a95-ba86-391f21d1518d/76623d51-a456-4409-9157-b8d3cd6deb5f.jpg)
:format(webp)/https://fbi.cults3d.com/uploaders/32750543/illustration-file/26533534-7fc7-40bc-ad75-2bbf126f7b07/7fbd3a5c-9fb9-4767-9436-035c61973cdc.jpg)
:format(webp)/https://fbi.cults3d.com/uploaders/32750543/illustration-file/def25398-031c-47d3-bbe4-9e24a1bfde88/b97c3125-56cc-4c89-9bca-349ff2190687.jpg)
:format(webp)/https://fbi.cults3d.com/uploaders/32750543/illustration-file/191fd3e3-594a-43e3-92d3-a19dec1a79e7/f0e75eb0-e6a1-42c0-bf1c-3e61eb24974b.jpg)
:format(webp)/https://fbi.cults3d.com/uploaders/32750543/illustration-file/753456a7-adbd-40a3-bb9d-058c0813e976/d4a021fd-d92e-4498-a0e2-8239fb08cbad.jpg)
:format(webp)/https://fbi.cults3d.com/uploaders/32750543/illustration-file/11b22b34-45be-4a64-a445-4e7b5f0fb407/57ca103d-afca-4417-b82e-b902d5c88ffc-1.jpg)