Design is to be printed out in separate parts in the corresponding colors to eliminate the need to paint. This also allows everyone to be able to print this design regardless of what printer you are using.
I decided to make a second version of my favorite Ninja Turtle; this time, I changed his facial expression to a more angry look by changing his eyes and adding teeth. I put Leo on the juice to really beef him up, increasing his overall size about 2% and added more defined muscle tone in his upper shoulders and arms. I am including an alternative weapon, the Sai… so much weaker than the original katana. That is a way better weapon that fits this design perfectly. I recommend printing 2 of the Katanas from the original Leo figure download to add to this design.
If you so choose, Leonardo V2 can be printed out with a different headband color. Red looks ok… but let’s face it, Leo wore a blue headband. I was running low on blue PLA, so most of the pics have him wearing the red. My apologies to Leo. I hope there is no confusion. This is Leonardo, simply the best most perfect Turtle!! I might get around to designing the other lesser, weaker turtles, but for now, please enjoy Leonardo V2 Angry face.
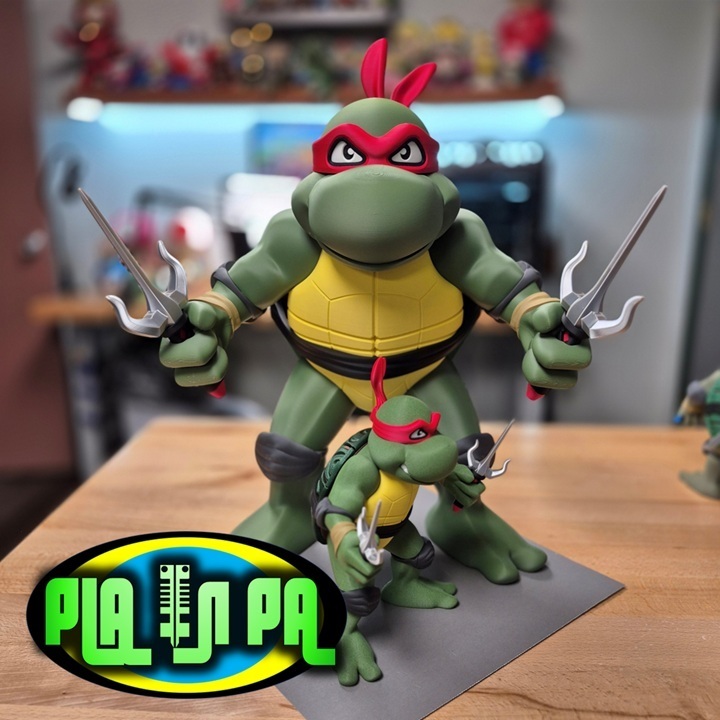
The smaller, original version stands 8.5 inches or 215mm Tall. I enlarged the design 210% and adjusted the clearances between the parts with the final assembly of the larger version standing over 18 inches or 457mm Tall
Printing…
As always, it should be relatively simple; 99% of the parts don’t require support.
I do recommend adding support to the Black Hilt parts for the Sai, as well as the red eye band.
Assembly…
I am attaching assembly pictures in the download files to help you along. Please reference the photos.
Should be fairly simple. Dry fit everything in place before adding glue.
I highly recommend PLA Gloop, if you can get your hands on it.
PLA Gloop Website
Starbond Adhesives make a good CA or super glue alternative at a lower price point. I recommend the Medium or Thick formula. I would defiantly pick up some Accelerator if your planning on using the Thick formula.
I recommend starting with the back shell and gluing in the dark green hex pieces into the brown shell hub. These are all numbered or lettered to their proper locations in their respective hubs and should be self-explanatory as to where they need to go.
With the back shell halves complete, attach them to the Black waist wrap; these are keyed so that they can only go in their respective locations. Once the back shell is connected to the Black waist wrap, it should be easy enough to figure out how to place the light green body halves on the assembly. They are keyed so that the upper body will slide in with a triangle cut out from the top, and the lower body has more of a square cut out and should be inserted from the bottom.
Now, the back shell, black waistband, and light green body parts should be all glued together. Add the yellow front shell to the assembly, and start working on the arms and legs.
Please reference the pictures in the downloads to help understand how the limbs go together. I recommend starting by organizing the parts. The gray elbow and knee pads are all keyed differently to signify which limb they belong to. The right half is keyed with an oval and the left with a triangle. There is a bit of a size difference between the arm bands and the knee pads. The larger of the two belongs to the leg parts, and respectively the smaller ones belong to the arm parts.
Once you have the limb parts organized as to where they belong, use the reference images in the download to help with assembly.
I found attaching the completed legs to the main body helped stand the figure up and made the next assembly part easier.
Add the Black head key to the assembly and slide on the sections of the head, starting with the bottom flat-looking part that is the bottom of the face. Next, add the mouth, then the eye band, then the top of the head.
Adding the left and right arms to this design should be self-explanatory as they are also keyed in a fashion that makes it nearly impossible to add them to the wrong locations.
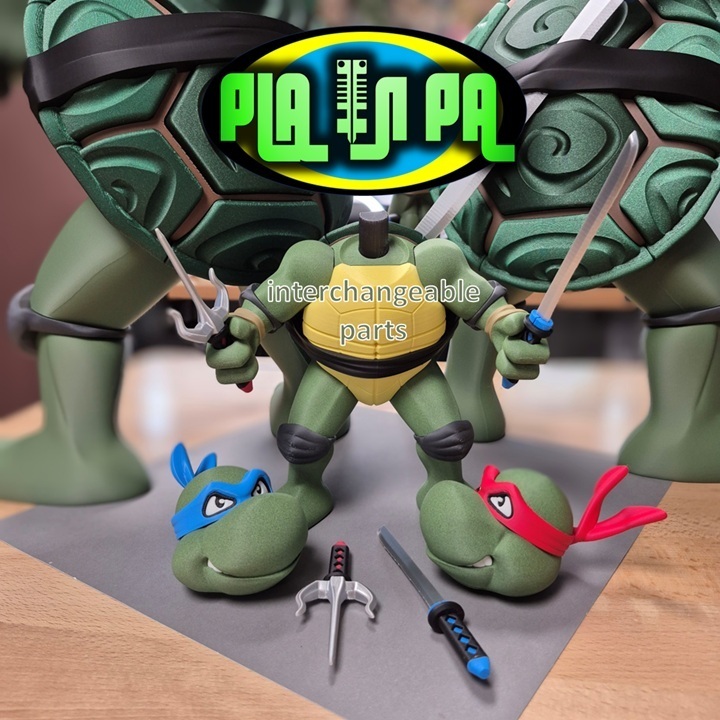
The Sai weapon included in this download is relatively simple to assemble and add to the figure once everything is put together. I don’t recommend gluing the weapons or head in place, as eventually you will want to swap them out with a head that was printed with a blue headband, and a pair of awesome katanas
Suggested Filaments
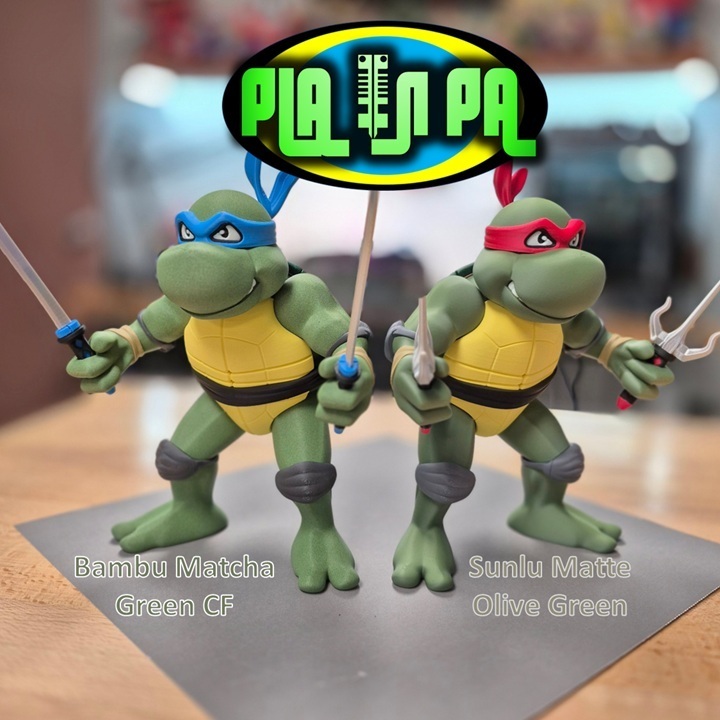
I experimented with both Bambu Matcha Green Carbon Fiber PLA, and Sunlu Matte olive green for the lighter green or skin tone parts. Both look great in my opinion.
Numakers Matte Black
Numakers Matte Golden Dawn – Yellow
Sunlu Matte Gray
eSun Silk Silver PLA
Numakers Matte Infernal Ruby
Ziro Dimond PLA Emerald Green
Polymaker Earth Brown
Bambu Wood PLA Classic Burch – Tan color used in pictures
Bambu Matte White
You can follow me on Instagram, https://www.instagram.com/pla.n.pa/
to find out what I designs I am currently working on
If you’re interested in selling prints of my designs, become a Patreon supporter here…
https://patreon.com/planpa3d
Thanks for checking out my design.


:format(webp)/https://fbi.cults3d.com/uploaders/16675644/illustration-file/dc020048-572f-4d2b-a221-13c117ed32ce/stash-pot-main.jpg)
:format(webp)/https://fbi.cults3d.com/uploaders/16675644/illustration-file/158c189e-d70b-415e-9bc6-074a88c71ee7/king-side.jpg)
:format(webp)/https://fbi.cults3d.com/uploaders/16675644/illustration-file/ffcc39f6-8974-4349-be67-076611633fa9/CultsSwitch-Container.jpg)
:format(webp)/https://fbi.cults3d.com/uploaders/16675644/illustration-file/c35c70ce-b871-46fb-86a0-bb7836c9da27/20220422_162228.jpg)
:format(webp)/https://fbi.cults3d.com/uploaders/16675644/illustration-file/6f92eee4-da9d-4127-9352-0a35cc2656a4/Plant-famly.jpg)
:format(webp)/https://fbi.cults3d.com/uploaders/16675644/illustration-file/13e587c4-cd73-4070-a8a0-1c4f2a5cb496/20220909_132506.jpg)
:format(webp)/https://fbi.cults3d.com/uploaders/16675644/illustration-file/307977f6-78c8-49e9-b4f0-f57ff15c5378/Front-Face.jpg)
:format(webp)/https://fbi.cults3d.com/uploaders/16675644/illustration-file/66fb990f-b9b2-4fbd-a238-7dca166156d5/cover.jpg)