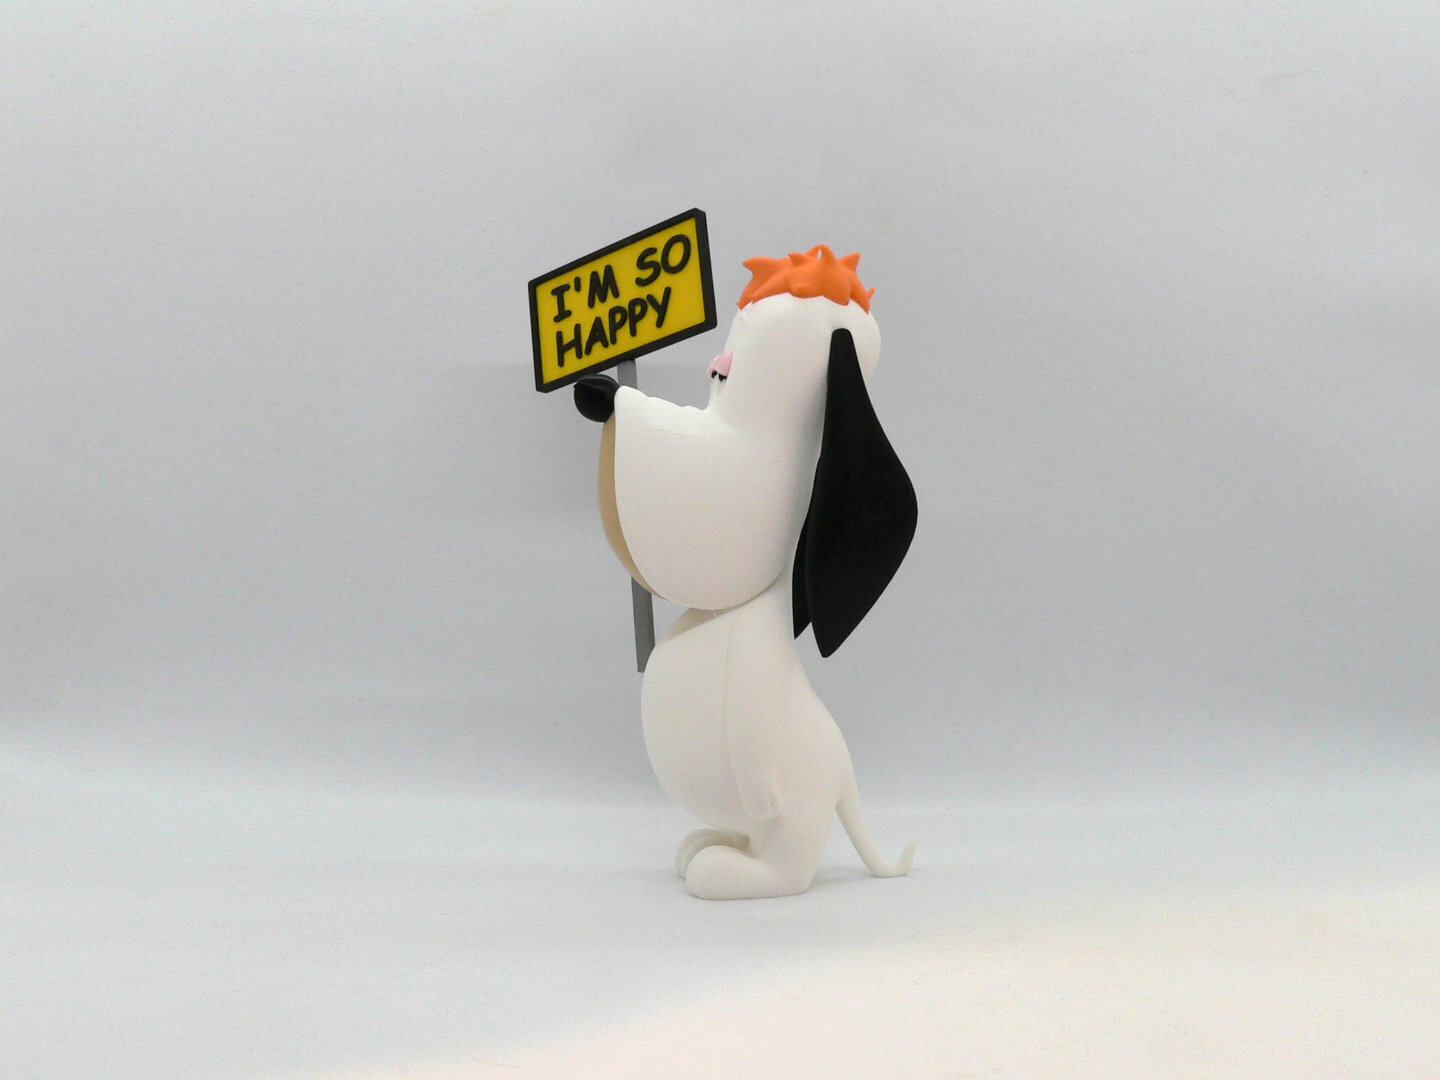
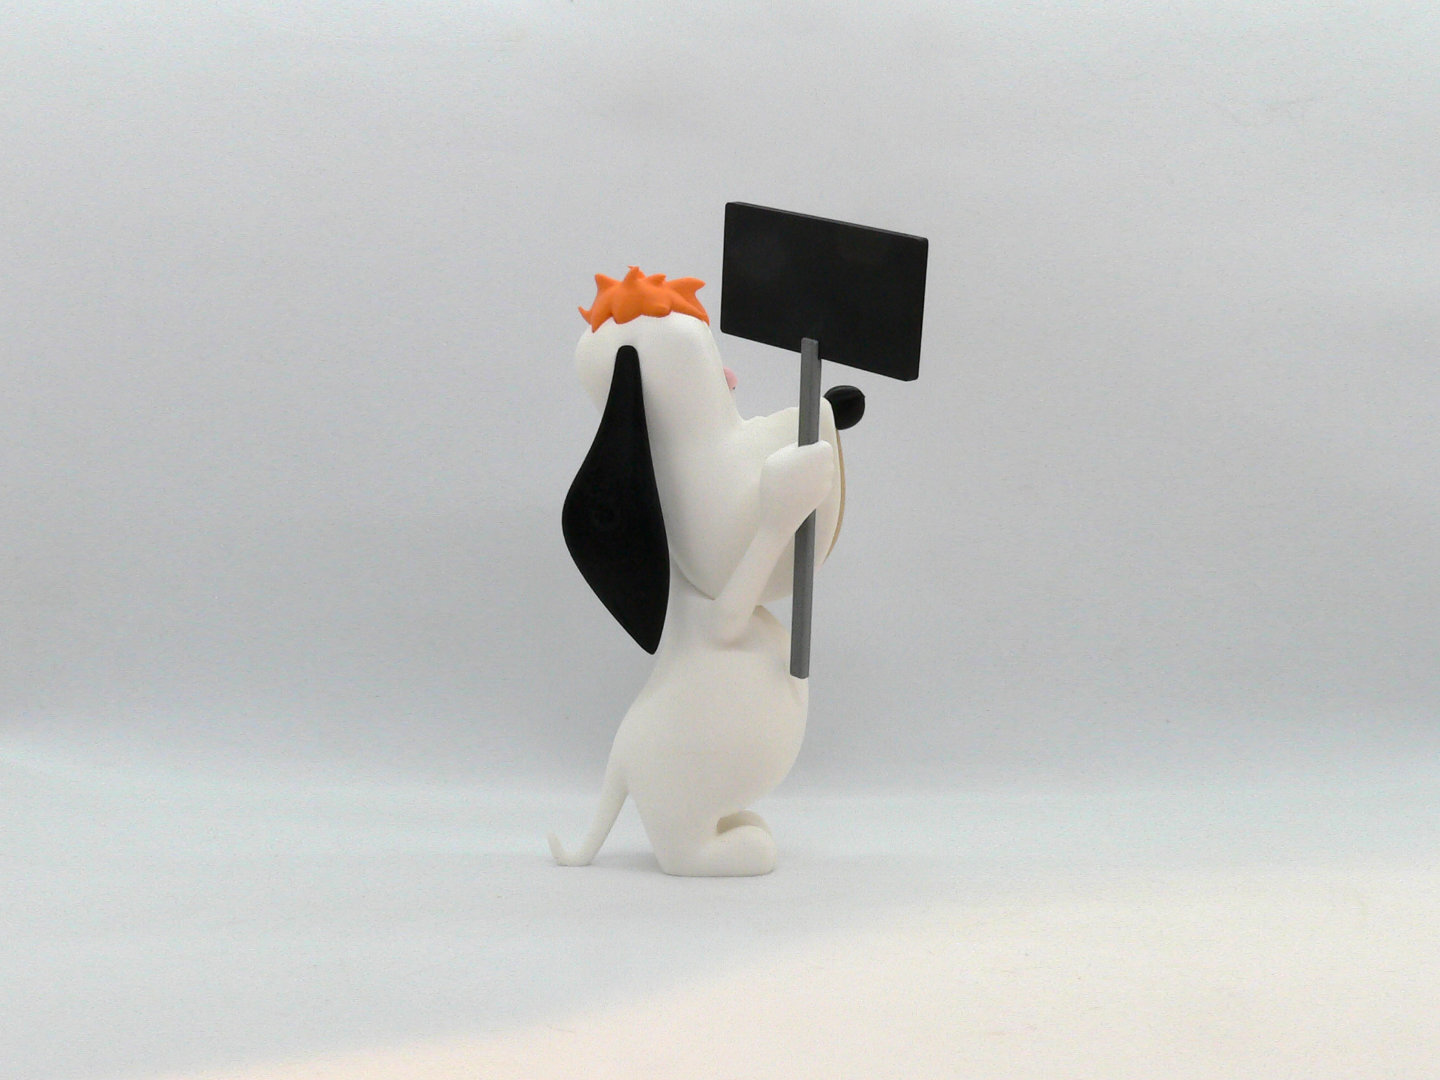
Droopy Dog, created in 1943 by Tex Avery for theatrical cartoon shorts produced by the MGM cartoon studio
Droopy is a white Basset Hound with a droopy face. He moves slowly and lethargically, speaks in a jowly monotone voice, and though hardly an imposing character, is shrewd enough to outwit his enemies.
Supports ARE required on one part only. See notes for specific helpful printing tips.
If you have the proper filament colors, no painting is needed.
The assembled model is 200mm tall.
Enjoy!
...........................................................................................................
Special shoutout to maker Benoît Lussier for providing QA printing and quality feedback.
Special thanks to Jason McMillan (makerworld ID Gatekeeper) for creating the Bambu Print Profile on Makerworld.
...........................................................................................................
Print Instructions:
Supports: YES on one part only, see specific instructions below
Resolution: .2mm
Infill: 15%
Notes:**
Refer to the notes below for a few helpful printing and assembly instructions.
...........................................................................................................
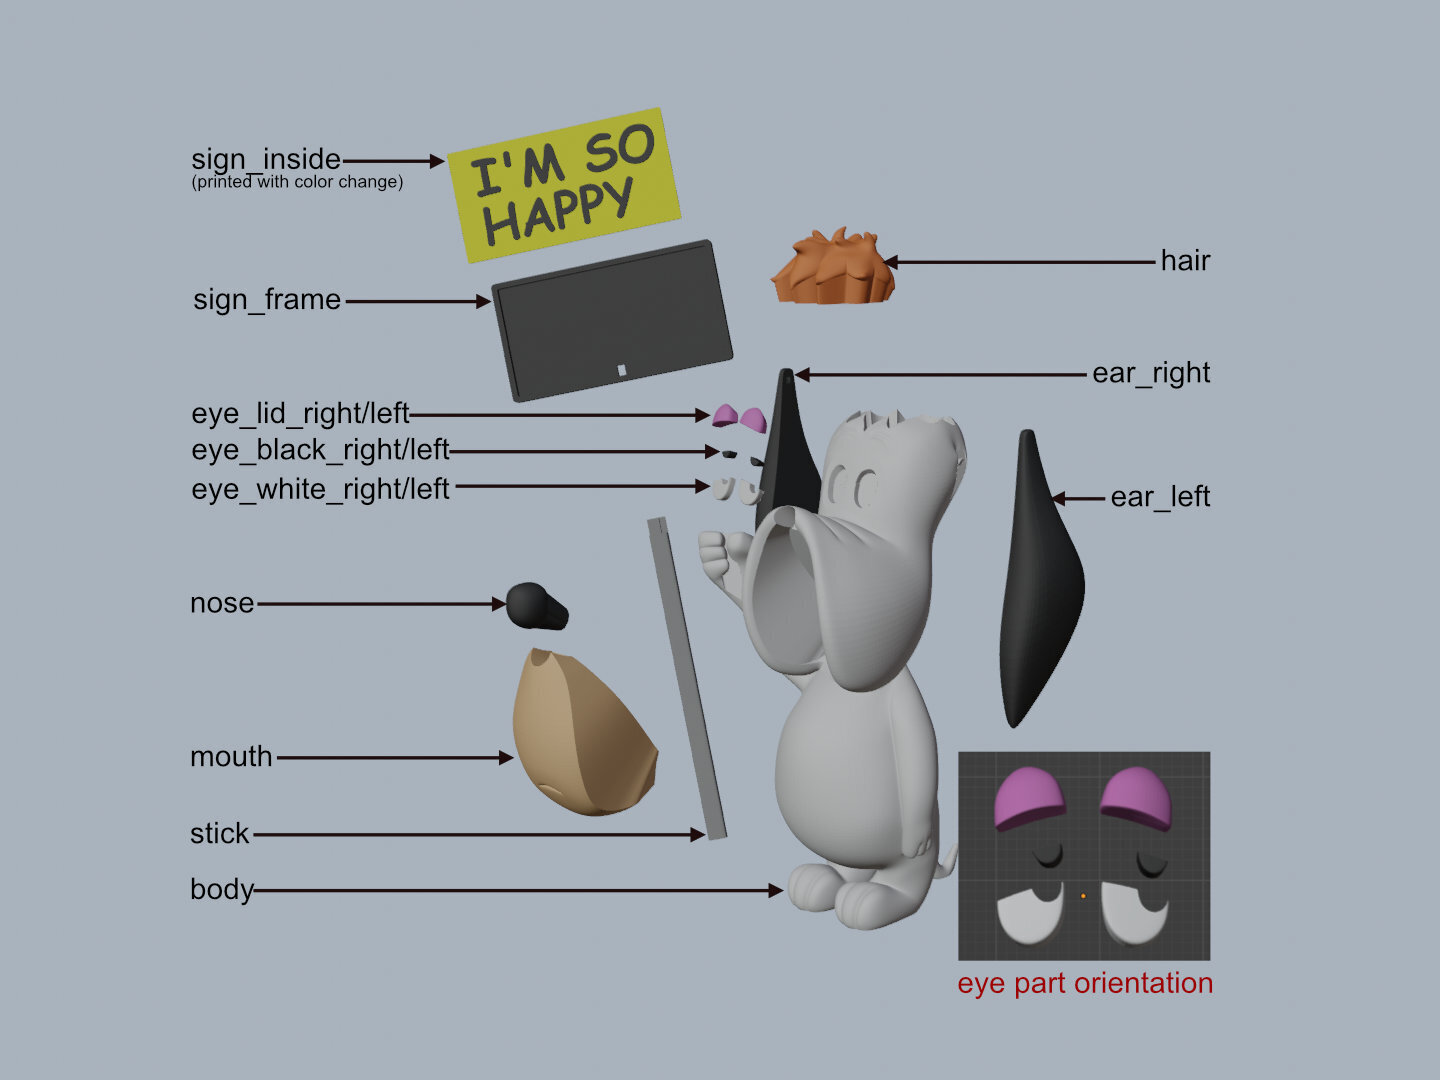
Building the model
Colors
Black: (Devil Designs PLA - Black)
eye_black_right
eye_black_left
nose
ear_right
ear_left
sign_frame
sign_inside (layer change after yellow, see notes)
..
White: (Devil Designs PLA - White)
body (see notes for printing instructions)
eye_white_right
eye_white_left
..
Yellow: (Devil Designs PLA - Bright Yellow)
sign_inside (layer change before black, see notes)
..
Gray: (Devil Designs PLA - Gray)
stick
..
Skin: (Paramount3D PLA - Universal Beige)
mouth
..
Pink: (CookieCad PLA - Pale Pink)
eye_lid_right
eye_lid_left
..
Orange: (Bambu Lab PLA - Mandarin Orange)
hair
..
...........................................................................................................
Printing and assembly tips
Printing tips
1 - Supports are required on one part. I minimized many of the angles of the model as much as possible to reduce the need for any other supports.
*supports: organic/tree supports were used on:
-body (29 degree angle only)
2 - The eye_white_right/left should NOT be printed with 'arachne' perimeters due to the thin edge on one side. The old 'classic' parameter generation should be used instead for these two parts.
3 - There are some pieces that may need brims or rafts, use your discretion. When setting up my prints I prefer to be conservative to ensure the least chance of a print failure, especially since the base of many parts are hidden when inserted into another part.
*I used a raft on:
- eye_black_right
- eye_black_left
4 - sign_inside is printed with a color change by layer. The first few layers up to .8mm are printed in yellow, then the rest are printed in black.
5 - VERY IMPORTANT The left and right eye parts are significantly different from an assembly perspective and if they get mixed up it will make assembly tedious. Be very careful keeping track of these parts when removing them from the printer bed. Also, since they are small, I advise printing extras in case you lose some.
6 - When removing parts from the printer bed, it's a VERY good idea to place left/right parts into separate containers to help with the assembly process. Sometimes the difference between the left and right parts is very small but it is still worth keeping track of them and assembling them in their proper place.
..
Assembly tips:
1 - Take your time gluing the model together and enjoy the process. Give some thought into which parts to glue together as groups and then gluing the groups together. Let the glue for each group set completely before combining groups.
2 - I used 3D Gloop (strong fast drying) and E6000 (tacky slow drying) glues to put this model together. For both glues using a smaller amount is usually better than more glue.
3 - important for all my models, be sure to dry fit all parts before gluing.
4 - Due to the eye parts being so small, it is easier to assemble them with a sticky glue. Glue in one eye_white, then the associated eye_black and then the associated eye_lid. It all fits together but fat fingers get in the way and patience may be needed. Refer to the closeup picture of the eye and note that the eye_blacks are inserted with the raft side facing out. Also note that the eye_blacks are not round and the flatter side touches the eye_lids
5 - Refer to the assembly diagrams in the pictures section as well as the uploaded pictures for putting the model together. The model is meant to be glued.
Do not hesitate to ask questions, feedback is essential to making better models.
:format(webp)/https://fbi.cults3d.com/uploaders/12888752/illustration-file/7826273b-dc81-45c3-8881-4d8299729883/droopy-angle.jpg)


/https://preview3d-images.cults3d.com/srcj1g11jmcg9qbjt68wpmba6m4d)
/https://preview3d-images.cults3d.com/34ugnwm6fh47sjbaxrs1l0qkmtoa)
/https://preview3d-images.cults3d.com/7xbkz0zh8fcjzvmuhmp3sio2lhll)
/https://preview3d-images.cults3d.com/zx9vzndygzqlflhv34bf7qa4c66l)
/https://preview3d-images.cults3d.com/v6tgib8f5ydkhwtazpus5smn0vns)
/https://preview3d-images.cults3d.com/xc24vpbop3ob1m0ngazaaqc938g0)
/https://preview3d-images.cults3d.com/dq6k5mueayv7l6shiuenyrvl90y4)
/https://preview3d-images.cults3d.com/7ff77288hn7vwac8l2pf2inaunxg)
/https://preview3d-images.cults3d.com/j77vnwt3epu42d18r0ikeqzt698y)
/https://preview3d-images.cults3d.com/px4ukgp0dn57jwpt60zphyawmm2o)
/https://preview3d-images.cults3d.com/2buunwso7nbi651yupudioyf6rad)
/https://preview3d-images.cults3d.com/4gmtm76edxfhfgqsci1629gixj32)
/https://preview3d-images.cults3d.com/i1f2rrpjbdvmn7iymh7yryxsgky0)
/https://preview3d-images.cults3d.com/txil5fwfhycce4mj445ffg2qwc69)
/https://preview3d-images.cults3d.com/anvvordeanqvrsrpxobple5gpcyr)


:format(webp)/https://fbi.cults3d.com/uploaders/12888752/illustration-file/1466756698-6047-9939/Capture_d_e_cran_2016-06-24_a__10.22.19.png)
:format(webp)/https://fbi.cults3d.com/uploaders/12888752/illustration-file/1466757475-6047-5333/Capture_d_e_cran_2016-06-24_a__10.35.33.png)
:format(webp)/https://fbi.cults3d.com/uploaders/12888752/illustration-file/1466757796-6047-6005/Capture_d_e_cran_2016-06-24_a__10.39.40.png)
:format(webp)/https://fbi.cults3d.com/uploaders/12888752/illustration-file/1466758245-6047-0600/Capture_d_e_cran_2016-06-24_a__10.43.24.png)
:format(webp)/https://fbi.cults3d.com/uploaders/12888752/illustration-file/1466758592-6047-2514/Capture_d_e_cran_2016-06-24_a__10.48.58.png)
:format(webp)/https://fbi.cults3d.com/uploaders/12888752/illustration-file/1467831904-29883-9246/scene_angle.jpg)
:format(webp)/https://fbi.cults3d.com/uploaders/12888752/illustration-file/1469551534-8824-0955/dilbert7a.jpg)
:format(webp)/https://fbi.cults3d.com/uploaders/12888752/illustration-file/1470180379-30202-8608/boss_front1.jpg)