This also includes the C4-Style block body.
THE FPV DRONE IS PURELY FOR ILLUSTRATIVE PURPOSES AND IS NOT INCLUDED.
Find the updated bent spring fuze guide here: https://youtu.be/Td4vOcRZw6M
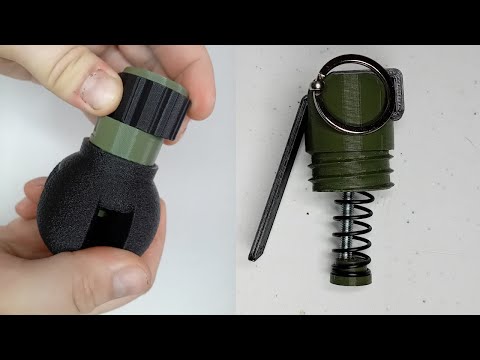
The Meteorite, an airsoft impact grenade which uses readily available cap gun 8 shot rings to make a loud bang. I get my caps from a small UK business called bangstuff.co.uk for £2 for 12 rings. Which is around 18-20p per shot. Much cheaper than disposable airsoft grenades but also a lot easier, safer and lighter than blank firing grenades!
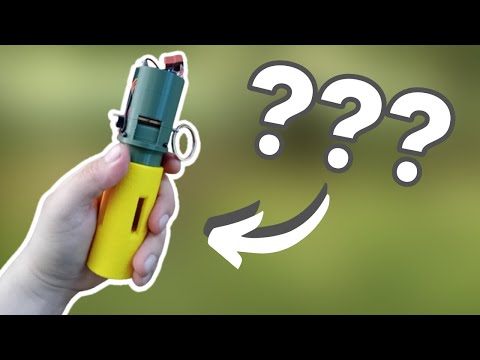
This is a C4-style body with rear mounting holes, I use the C4 block on my Wheelbarrow UGV. And the fuze system is electric, allowing for electronic triggering, stick a few volts into the fuze to instantly fire it!
• Can be used for airsoft, gelsoft, paintball, Nerf, re-enactments etc.
• Electrically-fired fuze head, can be used for booby-traps, drones or whatever else you can think of!
• Very cheap to run, cap gun caps can be found in many shops and online too. And if you use decent caps (Sohni-Wicke recommended) the Meteorite can be a lot louder than what you expect. Customers have told me they're not far off .209s and in my experience the volume difference is negligible.
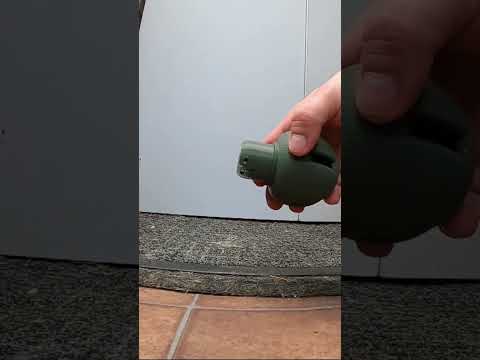
• Easy to reset, no tools needed. Just press and twist.
• Easy to print and assemble. Modular design allows for quick replacement of broken or worn out parts. Minimal hardware needed.
Non-printed parts list:
Amazon links are affiliate.
8 shot cap gun caps (obviously). I strongly recommend Sohni-Wicke caps.
1x Cut down AEG spring (OD 14mm, ID 12mm MINIMUM), I recommend using an M110 airsoft AEG spring, I found that 35mm is the best length, don't worry about the leftover hooked end in fact the cut end helps dig into the plastic and hold it in place. Too weak of a spring won't strike the caps hard enough and too strong of a spring will make the Fuze more insensitive.
AEG SPRING ALTERNATIVE: Any spring with an OD of 14mm, a wire diameter of 1.4mm and at least 35mm long will work. I now use 1.4x14x40mm springs that I cut down to approximately 38mm before I bend the spring. You don't have to bend the spring but I strongly recommend you follow my updated fuze guide if you want the best performance out of your fuze.
1x M5x50mm Roofing bolt for the firing mechanism. Needs quite a low but wide truss head, 12mm head diameter maximum.
Threadlocker, superglue or similar (recommended).
Grease also recommended. Silicone oil is good to reduce the friction.
1x N20 gear motor, I recommend you don't go any faster than 100RPM or you'll lose torque. Conversely you don't want one that's too torquey or you won't be able to turn it by hand to reset it. I use a 6V 100RPM and it reliably fires from a 11.1v LiPo: https://amzn.to/4jf2PcT
2x M3 grub screws. These help reinforce the Twist Ring against the motor's D-shaft.
2x 2.5x8mm screws, these hold the Cap onto the Fuze: https://amzn.to/3EvATSX
Wire for the motor. I quite like a JST connector personally. Doesn't need to be a high current connector or wiring.
ASSEMBLY INSTRUCTIONS:
Print parts, remove supports and check fitting, some sanding and trimming of the Fuze heads may be necessary. The Fuze and Body should screw together and undo relatively easily. The Cap Carriage should be able to drop inside the grenade body without getting stuck. The Striker's smaller end should fit inside the main spring.
Screw the M5x50mm bolt through the Sear. Make sure the Sear sits flush against the underside of the bolt head. The bolt should cut it's own threads but you can use an M5 tap if you wish. Threadlocker is strongly recommended to prevent the sear spinning loose. If it does loosen you might find it difficult to cock the grenade.
Pass the M5 bolt and Sear assembly through the top hole of the Fuze, the Sear and bolt should slide down through the hole without binding up. Take the cut Spring and slide it over the bolt end sticking out of the bottom of the Fuze. Next take the Striker and screw the M5 bolt through the hole in the Striker, make sure the smaller end of the Striker fits inside the spring. The bolt should cut it's own threads. The spring should be sandwiched between the Striker and the Fuze base. It might be a little tricky. The bolt end should be flush with the bottom of the Striker.
The sear on this fuze is designed to slip, so pushing the mechanism upwards will not lock it into place like the impact Meteorite fuzes. You also don't need to worry about tuning this fuze unlike the impact fuzes. Take the N20 motor and gently heat the shaft with a flame or appropriate heat source, once hot enough gently press the shaft into the Twist Ring's central hole, ideally aligned with the D shape of the hole. Make sure the Ring is on straight as the shaft melts into the plastic and make sure the end of the shaft is roughly flush on the other side, if it sticks out too much it will foul against the mechanism as you try to cock it. Install the two grub screws in both of the side holes on the Twist Ring, these will help reinforce the central hole against the motor shaft.
Take the completed motor/Twist Ring assembly and slide it onto the Fuze body. The twist ring should be able to freely spin on the Fuze body, if not then trim/sand down any obstructions and apply grease where necessary. The Twist Ring doesn't need to turn that much, about 90 degrees. Solder on the wires onto the motor terminals. Slide the Fuze Cap over the motor and wires, you may want to add some glue on the wires for strain relief if you wish. Use the two small screws to mount the Cap onto the Fuze body via the 2 small holes on top.
The electric fuze is now complete. When powered the motor should turn the twist ring anticlockwise to fire. Make sure whatever is powering your fuze has the correct polarity. Switch the polarity if the motor is spinning in the wrong direction. I also strongly recommend you make sure whatever is initiating the Fuze has a timed cut-out or something that doesn't output a continuous current. The motor will be stalled after firing as it cannot move, so an interrupter circuit is strongly recommended.
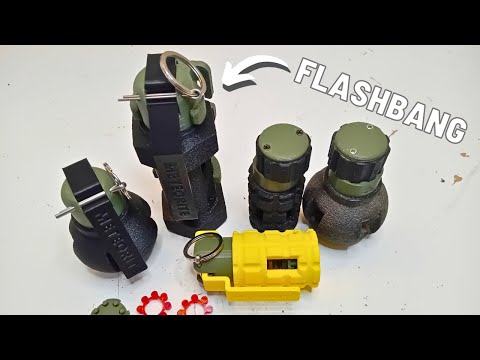
This fuze is compatible with ALL Meteorite bodies.
Using the Meteorite Electric Fuze:
Push up on the Striker to compress the spring. Whilst holding the mechanism in place, manually turn the Twist Ring clockwise until it stops. The mechanism should be locked in place. There is no safety pin and manually turning the Ring will fire the fuze. So be careful. Gently press an 8 shot cap ring onto the Cap Carriage pins, it may help to gently press the Carriage on a flat surface to force the caps on. Once the Cap Carriage is loaded, drop it into the grenade Body, make sure the TOP side is facing upwards. If it's inverted you can jiggle the grenade until it's the correct orientation. Don't worry about the loose Cap Carriage, once the Fuze is screwed into the Body there is not enough space for the Cap Cartridge to flip or to jam (it might rock around but once the grenade fires it slams down flat) inside the grenade. Screw the Fuze into the Body if you haven't already. Make sure you don't accidentally turn the twist ring.
The Meteorite is now loaded. Applying current to the fuze should fire the grenade, if not then make sure the polarity is correct. Or make sure you're giving the motor enough voltage.
With a ring of 8 caps firing at once the Meteorite is very loud, arguably comparable to most airsoft disposable pyro grenades.
Do NOT store the Meteorite cocked!
For airsoft use ONLY. Use only on private land with permission or at a proper airsoft site. Use responsibly, I'm not responsible for any harm or damage from misuse or malicious use of this device. Check with your airsoft site first. Keep away from ears, this is still a noisemaker at the end of the day. Do not use in confined spaces. Unload/disarm before entering safezones. Wear face protection when playing airsoft. Do NOT store or transport loaded. Be careful where you throw this, it's lighter than a BFG but is still a solid object. FOR CAP GUN CAPS ONLY!
I do not authorise reselling of this design, physical or electronic.
Caps, bolts, springs, threadlocker, motor, wire and grub screws not included.
:format(webp)/https://fbi.cults3d.com/uploaders/21489582/illustration-file/9913c2f8-e295-463f-ae7d-867c70adecf0/IMG_20250419_195423377_HDR.jpg)


/https://preview3d-images.cults3d.com/z7zmihs67tzi6ruvayb1kd16tj4z)
/https://preview3d-images.cults3d.com/jtoapw5aqm4bqvp5z7ohtf20n518)
/https://preview3d-images.cults3d.com/6cyo3qy19hhvj7sxsk439wc4elr0)
/https://preview3d-images.cults3d.com/wje1clva8wm0zgi5x768kx4m4oly)
/https://preview3d-images.cults3d.com/8vx9quvlwunox8ljfgdvfc2kwoay)
/https://preview3d-images.cults3d.com/o0n4elq97r0yy3sq1r7x5dcin227)
/https://preview3d-images.cults3d.com/88zl6dz2kn099ab9fbny2bjdg6fu)


:format(webp)/https://fbi.cults3d.com/uploaders/21489582/illustration-file/fee60a0d-d344-4584-be27-109f31b3c363/Burster-Detonation.gif)
:format(webp)/https://fbi.cults3d.com/uploaders/21489582/illustration-file/1a0c883f-2ea0-4d96-8ccc-1ba1ccc4a3d4/IMG_20231115_123833.jpg)
:format(webp)/https://fbi.cults3d.com/uploaders/21489582/illustration-file/48c517e3-61ce-4c20-901f-ee27cdcef48d/IMG_20231203_151813.jpg)
:format(webp)/https://fbi.cults3d.com/uploaders/21489582/illustration-file/04798ee3-4954-491b-b797-abaf61f9ea57/IMG_20240110_142447.jpg)
:still()/https://fbi.cults3d.com/uploaders/21489582/illustration-file/da0a11e8-6634-440f-a4fc-83f408a90655/TwistHeadMeteorite-ezgif.com-video-to-gif-converter-1.gif)
:format(webp)/https://fbi.cults3d.com/uploaders/21489582/illustration-file/34dd4862-206b-46ff-9f7c-c00fe0dbe695/20240129_160552.jpg)
:still()/https://fbi.cults3d.com/uploaders/21489582/illustration-file/3ec9eb32-6446-441c-b79c-8a98d1fb41c3/flashconvent-ezgif.com-video-to-gif-converter.gif)
:still()/https://fbi.cults3d.com/uploaders/21489582/illustration-file/5c5f7be7-f52e-4026-bbc7-ef2cddab4413/Flashtwist-ezgif.com-video-to-gif-converter.gif)